
No doubt I’m not the only one, despite being a long-term Sonoff BASIC user, who’s noticed that AliExpress and Temu have what look like cheap Sonoff knock-offs running as low on Temu as €2.00 on special offer and not much more on AlieExpress. Good deal?
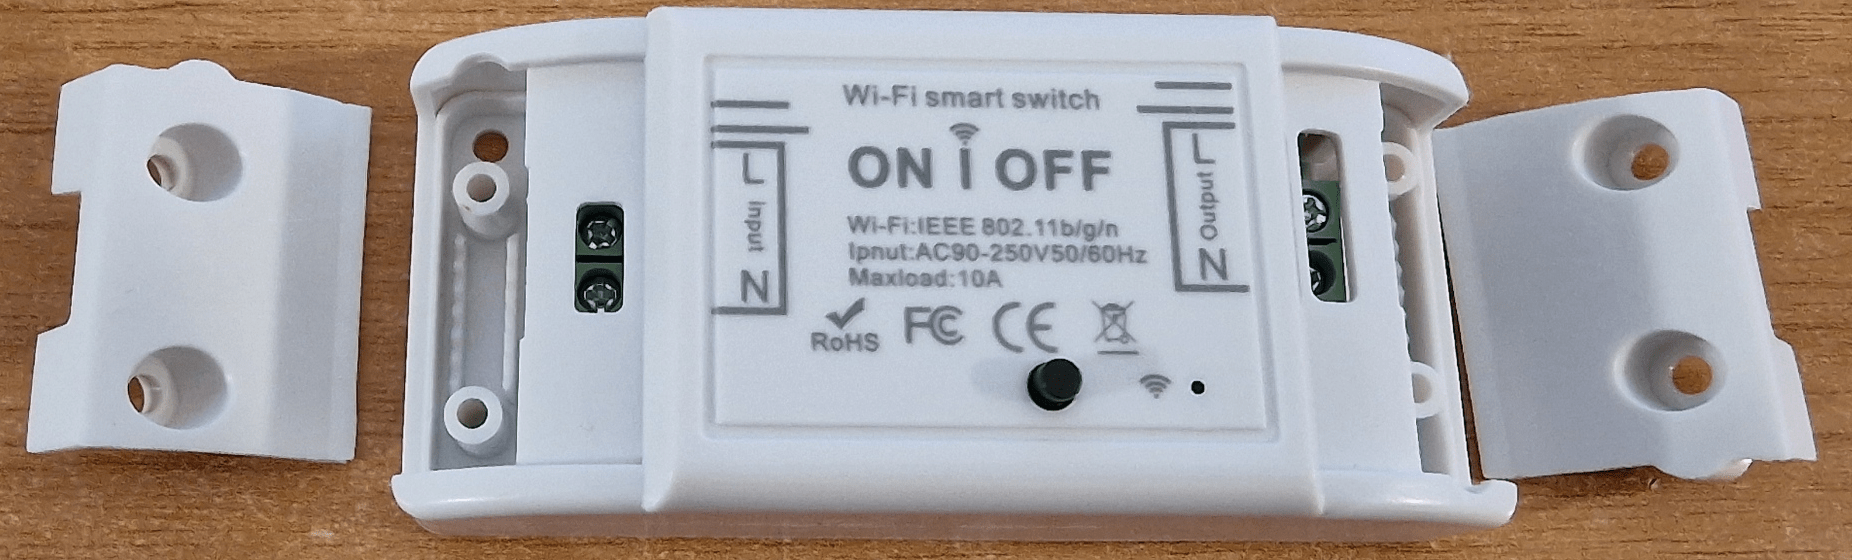
Well, for the sake of it I bought two different kinds – all look the same externally – just like a Sonoff BASIC (well, almost – for one thing, live and neutral are superimposed compared to genuine Sonoff BASICs – for no good reason that I can see ). This article written in November 2023 with January 2024 update section at the end.
They do indeed look like un-branded Sonoff BASICS on the outside – and the good news is that both kinds I bought are based on ESP8285 – so at least in theory – they should be able to Tasmotize if you’re not keen on running them on the cloud-based SMARTLIFE APP – I’m even less cloud-keen now than I was last week having had some WiFi dropouts recently which of course immediately rendered Alexa and my Google Home Hub useless.


Anyway with Tasmota you don’t have to worry about any clouds – all local. But therein lies the rub: one of my three units uses an ESP module, vertically mounted – and what looks like an extremely basic main supply. But the worse part is, it has no PCB pin markings and no holes/pads to program up the ESP module.
The other units are identical to each other and the ESP mounted on the underside and do have some breakout pads – no holes, but again no markings – so figuring out how to connect to gnd, 3v, rx, tx, gnd and GPIO0 looks at first glance like it is probably not worth the hassle.
Update after a few days off to solve my broadband issues:
These are fine if you don’t mind cloud control of basic on-off – but for example: I thought I’d use these in a pair of bathroom lights (same switch) and have the lights under normal control but turn off after a while (timeout) as both my wife and I regularly forget to turn them off. SIMPLES – just set a time-out and have them default to ON on powerup. So they light the lamps when you switch them on and after, say, 15 minutes turn off – but NO – there’s no time-out and no ability to default to ON.
Even using a Smartlife SCENE you can’t do it – SO unless I could figure out a simple way to Tasmotise these which I just did – it was going to be the BIN for them. Such functionality and beyond is bog-standard in Tasmota.
Simply set them to default after power cycling to ON – and instigate the timeout of your choice. If only these companies weren’t so intent on trapping you into using Smartlife… at least Sonoff make the pins accessible on some of their boards for Tasmota etc. flashing.
Later: I’ve done it for you… That photo top right above – starting on the right and moving left – the round pads – ground, nothing, GPIO0 (ground when powering up to program), RX on your FTDI ,TX on your FTDI, VCC. For Tasmota configuration – GPIO12 is relay, GPIO5 is the button (that’s NOTHING like Sonoff BASIC which uses GPIO0 for button AND programming) and GPIO1 LED (LEDi – so you get the blue light for comms AND to indicate that the relay is on).
You have to wonder why they’d use a comms GPIO pin when there are plenty of GPIOs available to do the job (though I’m rather pleased that they DIDN’T use GPIO0 for the button). I could not figure out how to get to another pin for a temperature chip – so we’re just looking at a basic Tasmota relay output only – but that’ll do me.
I can set this board to default to power up and to time-out after say 15 minutes, all in Tasmota – which means where I have a wall switch that’s impossible to get into – I’ll use the wall switch for on/off but hide one of these boards where each of my two bathroom lights are.. and have the lights time-out after 15 minutes (bathroom – keep forgetting to turn the lights out) and all for under €2 each on special (depending on when you buy) .
For my uses: command POWERONSTATE 1 to ensure the device is ON when powered up – and PULSETIME 1000 for 15 minutes (900 + mandatory 100 offset)
And the last of these three – the one which has the ESP8255 module – not as hard as it looked to solder: only GPIO0 was tricky (programming) – a gold circle on the module as against one of it’s connectors..
On this final board, again GPIO12 = relay – but the LED (LEDi option) is on GPIO4 (and VERY bright blue). The button is on GPIO13. You’d never think Sonoff did this all years ago, setting the standard – though to be honest unless you want to re-program – I prefer the button NOT to be usable for programming – that could always lead to accidents happening.
Subtle indicator light? Erm, no.

But in general, how hard can it be to have a single standard for which GPIOs to use for a straight-forward power switch?
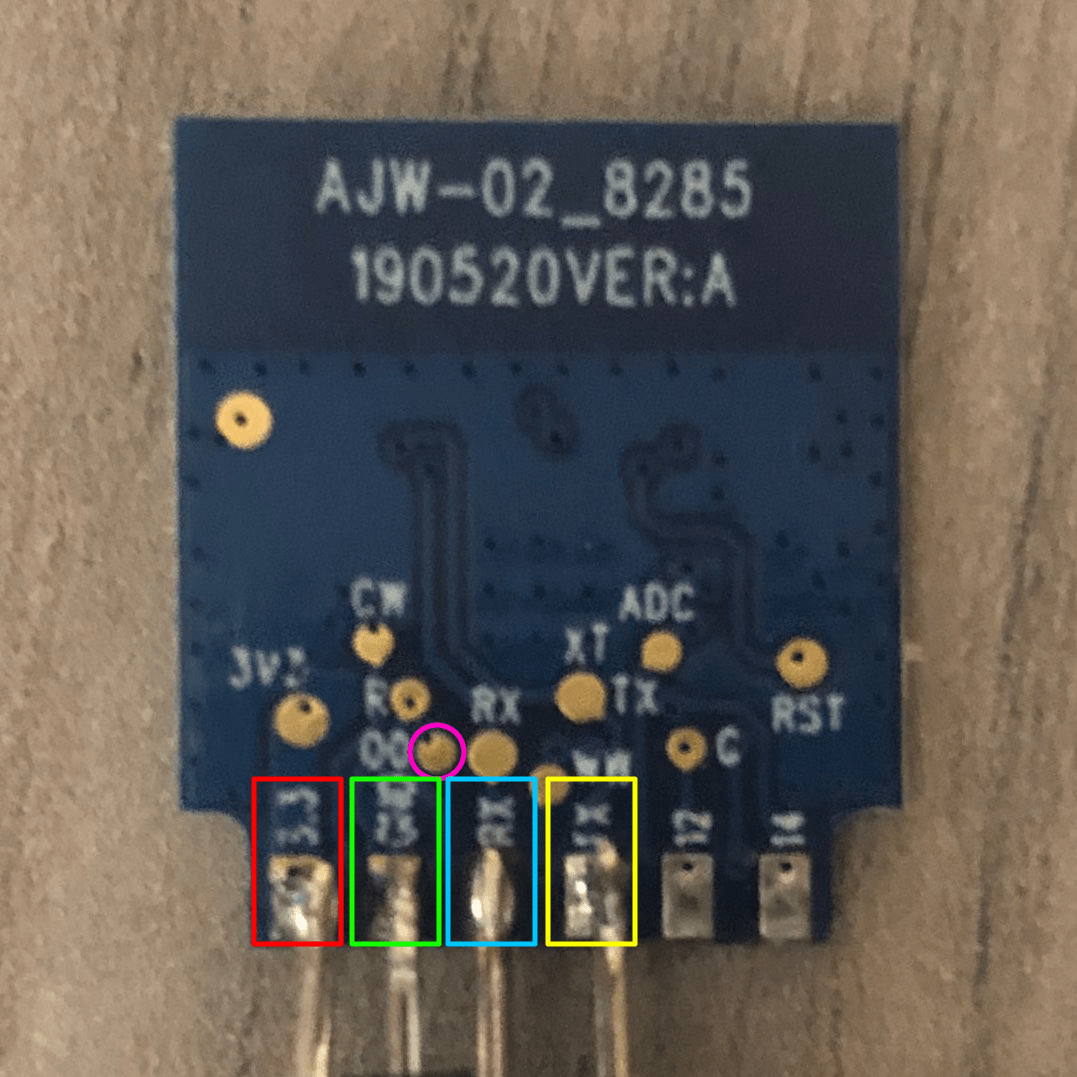
Red power, green gnd, blue rx, yellow tx, and that purple circle is the programming pin GPIO0
So basically all you have to do is ensure the device is ESPxx based and there will be a way – and for clarify – November 2023 – no – Tuya-convert does NOT work with these or similar devices otherwise I’d not have gone through all this. I had to prove that one way or another that I could get them running offline – and I wanted the timing features which you just don’t get on cheap Tuya devices yet which are common in Tasmota. It might of course have been easier just to spend extra and buy previous-model Sonoff BASICS which have the pins clearly marked and a spare GPIO pin (GPIO2) for anything extra you may care to add like a DS18B20.
So then, I bought a cheap AliExpress Aubess DIY Smart Switch – 16A, Zigbee 3.0 – no part number anywhere – which is annoying.

I connected the Aubess to the mains and long-pressed the button on the underside until a blue light started flashing and… could this continue my lucky day?

I went to my Zigbee2MQTT web page and told it to accept devices. Sure enough this Tuya unit is recognised.
Short-pressing the button on the underside of the unit turns on the relay (and a blue light again on the underside). I renamed the unit from it’s unfriendly long Zigbee ID to “aubess-1”.
The button can be set to toggle, state or momentary and the unit has the choice to powerup off, on or last state. That”s pretty much it and it’s all I’d expect from a dirt cheap controller.
One caviat – the two connectors S1 and S2 – for replacing a real switch – I found when messing about with a wire across them (don’t do this at home) that quickly repeated sequential presses put the Aubess unit back into pairing mode… why when you have a pairing button underneath? I sometimes wonder about designers.
Back to my bathroom now, I wish I’d bought two of these Aubess units when the Temu sales were on. As I have this unit running under Zigbee2MQTT, it is easy to add the functionality I need (not stand-alone but then not cloud-dependent either).
Update January 17 2024
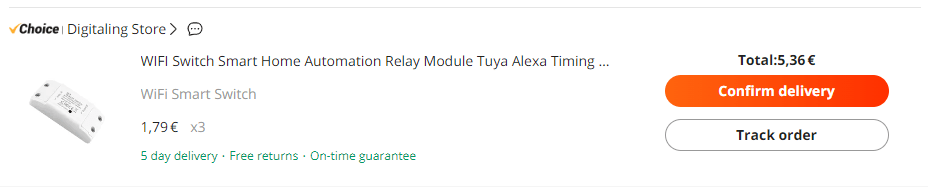
I’ve done it again – an AliExpress offer – I got three of the Tuya (Sonoff Basic Lookalike) units above (right photo – chip onboard, not on a module) for €1.79 each – and yes they included and achieved 5-day delivery to rural Spain.
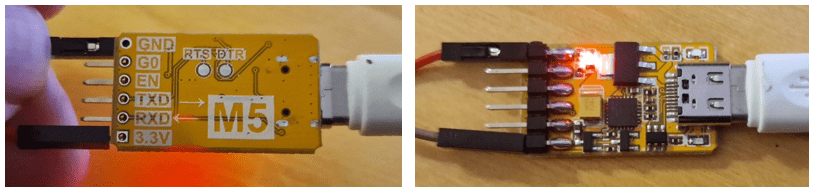
Again – I connected an FTDI (I’m using a cheap one which cost just a few Euros and has a USB-C as against microUSB connector) – shown below – only ground and 3v3 connected at this point after initial Tasmota flashing (using the Tasmota online flasher and the RXD and TXD wires for flashing), I’ve now entered my WiFi access point – next – the pin assignments – as previously:

Because of the pins they used, I’ve made sure after initial flashing, only 3v3 and ground are still connected to the module while I do Tasmota pin assignments). Again GPIO12 is relay, GPIO5 is button, GPIO1 is LEDi. Weird – but hey, it works.
They couldn’t use fewer power components if they tried – but note – at least once again they have decent track spacing and wide tracks on the underside.
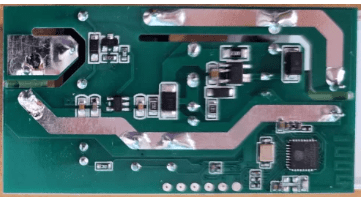
Note the lower thick track (photo on right) is neutral (in and out) and the upper thick track is live to the output (from the relay) on the right.
Once again the no-hole pads for (right to left) ground, nothing, GPIO0 (grounded when powering up to do initial flashing only), RXD on your FTDI ,TXD on the FTDI, VCC in that order.
Ok, I know, for enthusuasts with time on their hands.. but the whole operation including soldering the FTDI leads to the board, flashing, unsoldering and getting to the Tasmota console took all of a few minutes the second time around. Again the standard 10A 250v relay (absolute maximum non-inductive load, I tend to stick well below that).
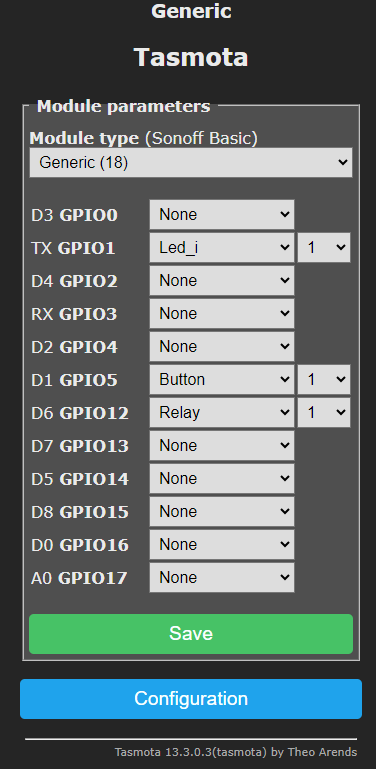
So with the WiFi set up using my phone browser, as usual I went over to the PC, set the Tasmota module as a generic(18) to give me access to all 8266 pins, you can see the assignments I put in on the left.
After checking and giving the board a name under settings – WiFi and settings – other then adding that name and going to MQTT settings under settings – mqtt, I then disconnected the power wires from the module and put it back in it’s box. I could have also enabled Alexa capability at this point (configuration – other – tick Belkin WEMO).
I’ve used a Tasmota SETOPTION in the console to show the IP address (handy) in the console so53 1 and also so65 1 to stop the unit from resetting after multiple power failures (that happens a lot in rural Southern Spain).
Of course if one wanted to use these boards in a timer situation where a hall light once turned on would go off all by itself in say for example, an hour – adding 100 to a pulsetime in seconds would give the desired effect. Again in the console: pulsetime 3700. Timed events are also easy – all locally with no server and no cloud. The whole thing can be set up on a mobile phone though I find it easier once the WiFi is up, to use a PC browser instead of a phone browser.
To take one of these boards after setup to a different local WiFi, all that’s needed to revert for a few seconds to the local AP is to press the button 6 times in quick succession. Checking mobile phone will show the AP is available with whatever name was assigned. Once the phone is connected to 192.168.4.1 a new local AP can be assigned.
Voila, another dirt cheap local access only mains controller, bearing in mind, because I choose to control these devices from a single Raspberry Pi or my PC, external access without using any kind of Tuya cloud is still easy via TailScale VPN (I’ve covered that in another blog entry).
At this point I expect the odd “Home Assistant” comment. I don’t want to use Home Assistant as I’m happy with Node-Red-Dashboard. Is this a good time to mention that Dashboard 2.0 (a complete redesign) has just been released as v1. 0 – I’ll be looking into that real soon.
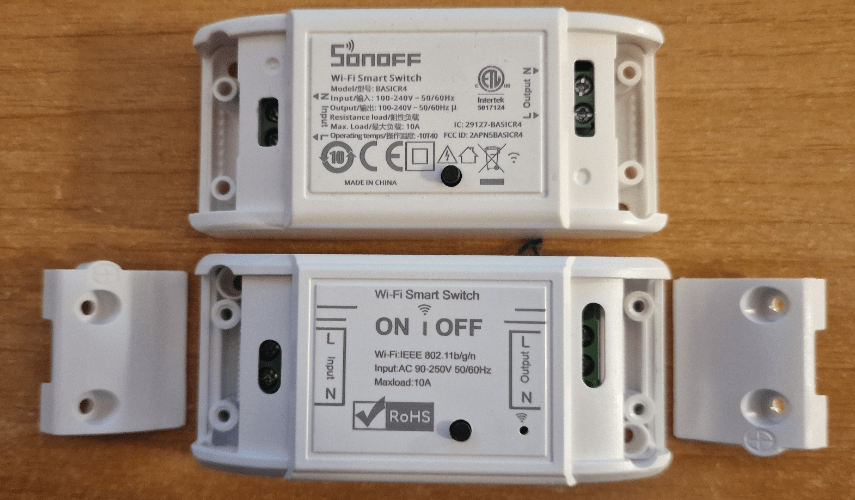
Finally – a comparison with the new Sonoff BASIC 4 unit.. the latter uses an ESP32 hence has an internal overheat sensor – and works with MATTER (though once converted to Tasmota I’m still not able to get MATTER working with the Sonoff unit) but other than that – judge for yourself (photo below)..
On the surface of it, you have less control over button use on the Tasmota-converted version than you do on the original Tuya – but the simplest delving into tasmota COMMANDS will show that this is not the case.
As an added bonus – see this article on running these Sonoff BASIC look-alikes on 12v instead of high voltage. I can only vouch for the units I received.
Hi Peter,
is there a way to know which ones of those sonoff knockoffs will work with 12V?
Did I understand right that the label on the device still says AC (starting around 90 to 250) but if connected with 12V DC and the + goes to L they will work too with no modding needed?
Greatful for a link, or an answer that will help me to pick those AC & DC on aliexpress.
Uli
The ones I have will work with 12v unmodified – and yes the label does say 90 to 250v. You will have to go by my photos – no doubt there will be changes on the AliExpress over time. If I look at the part now on AliExpress – the description has changed a little (no longer shows ON-OFF prominently) and the price has shot up to €9+ each so really it’s a case of buying when they are on offer.. https://www.aliexpress.com/item/1005004792119903.html?spm=a2g0o.order_list.order_list_main.59.7d771802pHzI25
Thanky you Peter, I might give it a try.
The picture on that aliexpress item looks totally different, only one of them with the one-to-many explanation shows a device with L on top and N below.
Are the traces for power just the PCB or are they covered with solder like the Sonoff devices? Not sure on the current capacity of the traces only.
Part in part. There is some solder as you see in the photos but not right across the track. Nothing to stop you thickening it up if you have an iron.
Pete
Aliexpress knockoffs….
Ikea is Rolling out more and more Zigbee stuff, most Lively in partnership with Tuya, also Lidl is doing the same. If you deploy all over the house, think home assistant and component which are safe from reliable sources. Maybe start looking at matter / thread (too late for you).
Why home assistant? To avoid being dependent on the cloud If you internet is cut off.
Interesting you say that – for a while I was using Ikea and Lidl stuff but at least here in Spain, Lidl stores seem to have lost interest in much of that – and the Ikea controllers I used didn’t have as much as the option to power up in the previous state so I binned mine. I don’t use Home Assistant – don’t like it personally and am much happier in Node-Red Dashboard – I always ensure Tuya Zigbee will run on Zigbee2MQTT (hence MQTT controllable from Node-Red) – most Aqara sensors will work with Zigbee2MQTT – I’d rather not use Smartlife if possible. I haven’t yet succceeded in getting Tuya and Node-Red collaborating – can’t get past the project setup. A long time ago when Tuya-convert worked I was a lot happier.
Matter – I have my first devices already running on Matter but none of the miriad of ESP8266-based devices will go near Matter – and the Google Home/Matter hookup is far from perfect – Alexa seems OK with it but Alexa audio recognition isn’t as good as Google IMHO. “Hey Google – Living Room ON”. No problem. “Alexa, Living Room ON” works half the time, other times I get “I’m sorry, I don’t understand” or “Living Room can’t do that”. I’ve sworn more at Alexa than at our cats.
Some time back I got a Lidl Zigbee concentrator, it was on sale at 12 euros (I think that’s when Lidl was liquidating all their smart home stuff) , and worked fine with Ikea Zigbee lightbulbs. Then when the Dirigera came out, I got it. But quickly realized it was totally useless and a poor spending of 59 euros so returned it, since it was not integratabtle with NodeRed or HomeAssistant. So it got all the functionally under control after moving my NodeRed flows to HomeAssistant and using the Zigbee Skyconnect HA USB dongle without any problems. All zigbee devices now happy locally with NodeRed and/or HA automations. And the rest is a historical mix of SonOffs (all tasmotized), RF433 plugs (controlled with SonOff bridged-tasmotized, and unmodified Shellies since they integrate natively via MQTT.
Lidl was a big disappointmnt – their lights alwaus started at OFF on power cyle – no way to change – then as you say they seemed to give up on the idea altogether. I try to integrate all my stuff with Node-Red. Almost all my Zigbee stuff works on Zigbee2MQTT and hence into Node-Red with or without nodes… until recently my Sonoff eWeLink stuff worked with Node-Red but there’s currently some authentication issue. I’ve been onto Sonoff about it. And yes agree about Shelly stuff – MQTT and so again into NR.These new Sonoff lookalikes obviously have MQTT via tasmota.
Didn’t know about the Lidl lights as did not buy them instead got and still ikea lights and also a bunch of switches (on sale at 4.99). All ok in NR and HA.
The issue I have w one shelly, used the garage gate actuation is that it often is out of wifi range. It is configured as a dry contact wired to the control pcb of the gate motor. Debating whether to put a external Antena to the Shelly or dremelling a sonoff mini zig bee for dry contact conversion ?
I use Node-Red to avoid being dependent on the cloud…. and check out my new blog entry on ChatGPT – https://tech.scargill.net/chatgpt-booboos/
It could be in the not too distant future that it could write some useful glue code for Node-Red…. not totally convinced yet based on the experiments I just did.