 Yesterday I referred to using DELAY in Node-Red to slow down one of the Blynk controls. To backtrack a little… We’re talking here about controlling devices such as ESP8266 boards using MQTTT – which I maintain is the best way to have a boatload of devices around the place and talk to them. I do this from a Raspberry Pi 2, using Node-Red which is a visual system, relatively easily fitted to the Pi (see my articles about my script). Once you have this in place, you can use simple (but excellent tools such as MQTT-Spy to send out MQTT messages to your devices and get input from them.
But in the real world who wants to sit there programming a tool just to turn a light on. So there are various options including the rather expensive Raspberry Pi touch display. A better option IMHO for local operation are the Nextion touch displays which work serially. I’ve covered these elsewhere – a project that is still in it’s early stages but with a little work is usable – so much so that I plan to use them in my place here in Spain and back in the UK as thermostat wall mounts – I’ve covered that elsewhere under “Nextion”.
And so to Blynk. For many months I’ve been trying to get a decent control/display combo for the mobile phone. I’ve written my own in jQuery mobile and used the likes of NETIO and THINGSTUD.IO – all of these are viable methods – another that is coming up is Blynk – again very preliminary and I’ve reported lots of issues with this – but it works.
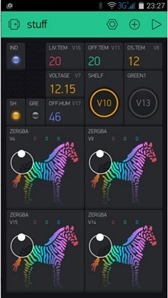
There are several useful controls – you see in the image above some simple LEDs (which can be set to various intensities though you can’t programmatically set the colour, sadly), some simple status outputs and two buttons (which can be set to ON/OFF or push to operate). They also have a controller called the zeRGBa which is a visual controller for setting RGB lighting. You see 4 of them in use top right of this article. You can basically move your finger over the control – which will then fire out RFGB values. Thankfully you can set the maximums as not everyone works in the 0-255 space. My PWM controls for ESP8266 use 0-99 for example. This widget falls down currently in 2 areas, firstly you cannot SET it’s position – you can only use it as an output control. Secondly and arguably more importantly it sends out rather too many commands one after another when you move the unit around. I prefer courser control, smoothing the transition in my ESP boards.
So, given a control that fires out RGB sets rather too rapidly, how can Node-Red help. Thanks to the developers who I’m fortunate enough to get lots of feedback from, it’s actually quite easy.
Here we see 3 inputs from the App coming in via the Blynk Node. The first thing I need is a function to convert that data (a simple array of 3 values) into an MQTT statement to fire out.
msg.topic=”sidewall/toesp”;
msg.payload=”{rgb:4,” + msg.payload[0]+”,”+ msg.payload[1]+”,”+ msg.payload[2]+”,70,1}”;
return msg;
Easy enough – I set the topic for MQTT to my wall RGB ESP8266 board (the format is my own, don’t get hung up on that) and I use a message payload of say “{rgb:4,255,0,0,70,1}” – what the hell does that mean? Again my own format… the braces are there for technical reasons – my ESP boards accept MQTT or serial – and the ESP’s put out some crap at the beginning and debug info – so I wrap my messages in “{}” just as delimiters. So the actual message is “rgb:4,255,0,0,70,1” – which means – using output 4 of the ESP, send out RGB 255,0,0 (i.e. RED), smooth the transition from one colour to another over 70ms – and I can’t remember what the last parameter is – irrelevant here.
If you look at the code, what you’re getting from the Blynk node is an array (msg.payload[0-2]) so a simple substitution.
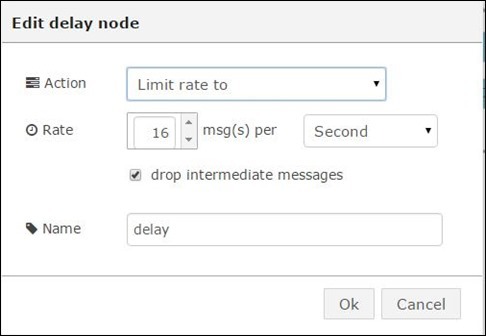
That one string goes out RATHER TOO QUICKLY on message after another for my little boards and I was wanting to slow them down just a touch. the DELAY node can be used for this..
Absolutely brilliant – so it will not allow more than 16 message a second – and if it gets more – it will drop some intermediates. Works perfectly – the actual rate of course depends on your project. I had utterly missed this – thinking that node was nothing more than a simple delay as suggested by the name – but dig in and it has so much more to offer.
So right now I can control several RGB devices around the house, limited only by the somewhat large size of the zeRGBa widget and the inability of BLYNK right now to handle several pages per project (though as of the other day you can seamlessly move between projects which helps).
In case you’re wondering – the language used in the functions is JavaScript – who’s ability to make life easy when it comes to handling different types of data such as arrays and JSON, is a wonder. I look forward to the day we have a PROPER, fully working interpreter on the ESPs themselves.
Oh – and to run the Blynk server on your own kit – you need Java 8
apt-get install oracle-java8-jdk
And I made my blynk directory and those below it full read/write/execute.


Hi Andrei
Followed your instructions – at which point a new Node-Red appeared to be starting in the terminal…. got as far as “starting flows”. At 192.168.1:8000 I noted a blank white screen with HAP as the icon in the browser but no content at all on the screen. Meanwhile my normal Node-Red appeared to be running as usual with no new nodes added or anything. Not entirely sure what to do next…. Tried pasting your flow into my Node-red – the OK button would not appear at which point I realised the quotes were messed up – into nodepad – replaced both types of quotes with ordinary ones – back to paste, no joy.. and that is when I ran out of time – back later today. Suggestions?
Yes, the quotes are messed up. I think it’s some kind of font or localization problem. You can copy the flow from: http://pastebin.com/MP16xpkF
I fixed the bug you reported. I was using Chrome and was using some non-standard features. It should work fine now on IE. It doesn’t change any other instance of node-red. It’s independent and comes with node-red integrated.
Thanks for the feedback!
Erm, the problem was in Chrome – I’ll try again but I just got a white screen. I fixed the quotes – but then with a white screen there was not much I could do…
I’m also working on a UI interface to use together with node-red.
The idea is to define the ui in an xml file (Hello world) and have a node inside node-red called on button click that forwards a message when you click that button on the UI. Of course it will support various controls.
It’s based on angular material so it should scale nice on all kinds of devices and the backend is the same as node-red (node.js) so no other dependencies required.
It will support users/roles (admin/user/guest), different ui parts show/hide depending on the user logged in. Also editing the flows will be restricted to admin.
And of course, it’s open source.
Let me know if you want to try it out and give some feedback. I haven’t written any documentation yet.
To compare with others out there, more than an XML file will be needed – most of them have visual interfaces – however always happy to look at something new… got a link?
I agree, but I can’t come up with a visual and enough flexible way of describing the UI.
Here’s the repository: https://github.com/andrei-tatar/HAP.red
Just clone, “npm install” and “node index.js”. It should start a node-red instance with the interface on port 8000 (access on http://localhost:8000). It has some test xml definitions.
You can try this flow as a short demo:
[{“id”:”86ae8ef.f79517″,”type”:”button”,”name”:””,”controlId”:””,”x”:156,”y”:111,”z”:”32ce0c7a.cd31f4″,”wires”:[[“32b34903.cd4cb6″,”fe092580.01f6d8”]]},{“id”:”32b34903.cd4cb6″,”type”:”text”,”name”:””,”controlId”:”info”,”x”:379,”y”:111,”z”:”32ce0c7a.cd31f4″,”wires”:[]},{“id”:”e896ab63.176958″,”type”:”switch”,”name”:””,”controlId”:”test”,”x”:350,”y”:205,”z”:”32ce0c7a.cd31f4″,”wires”:[[“f9efab39.061058”]]},{“id”:”f9efab39.061058″,”type”:”function”,”name”:”invert”,”func”:”msg.payload = !msg.payload;\nreturn msg;”,”outputs”:1,”noerr”:0,”x”:303,”y”:320,”z”:”32ce0c7a.cd31f4″,”wires”:[[“fdbe7392.02419”]]},{“id”:”fdbe7392.02419″,”type”:”delay”,”name”:””,”pauseType”:”delay”,”timeout”:”1″,”timeoutUnits”:”seconds”,”rate”:”1″,”rateUnits”:”second”,”randomFirst”:”1″,”randomLast”:”5″,”randomUnits”:”seconds”,”drop”:false,”x”:444,”y”:318,”z”:”32ce0c7a.cd31f4″,”wires”:[[“e896ab63.176958″,”2bebb405.d4144c”]]},{“id”:”c6714c5.f398eb”,”type”:”slider”,”name”:””,”controlId”:”slider1″,”x”:457,”y”:443,”z”:”32ce0c7a.cd31f4″,”wires”:[[“a3b991b4.5c467”]]},{“id”:”6e047af2.91fb84″,”type”:”inject”,”name”:””,”topic”:””,”payload”:””,”payloadType”:”none”,”repeat”:”1.5″,”crontab”:””,”once”:false,”x”:244,”y”:557,”z”:”32ce0c7a.cd31f4″,”wires”:[[“a3b991b4.5c467”]]},{“id”:”a3b991b4.5c467″,”type”:”function”,”name”:”increment”,”func”:”if (typeof context.value === \”undefined\”)\n context.value = 0;\nif (typeof msg.payload === ‘number’) \n context.value = msg.payload;\n \nmsg.payload = context.value;\ncontext.value = (context.value + 1) % 11;\n\nreturn msg;”,”outputs”:1,”noerr”:0,”x”:458,”y”:560,”z”:”32ce0c7a.cd31f4″,”wires”:[[“c6714c5.f398eb”]]},{“id”:”fe092580.01f6d8″,”type”:”toast”,”name”:””,”sendTo”:”all”,”x”:364,”y”:61,”z”:”32ce0c7a.cd31f4″,”wires”:[]},{“id”:”bf07c99a.40f838″,”type”:”toast”,”name”:””,”sendTo”:”all”,”x”:712,”y”:363,”z”:”32ce0c7a.cd31f4″,”wires”:[]},{“id”:”2bebb405.d4144c”,”type”:”template”,”name”:”message”,”field”:”payload”,”format”:”handlebars”,”template”:”Set switch to {{payload}}!”,”x”:564,”y”:364,”z”:”32ce0c7a.cd31f4″,”wires”:[[“bf07c99a.40f838”]]}]
Want to make this << Here’s the repository: https://github.com/andrei-tatar/HAP.red Just clone, “npm install” and “node index.js”. >> a little clearer – I’ve no experience of cloning a GIT directory (I don’t use GitHub) – so we need a directory for web code? And a node adding to Node-Red?
You can download the repo as a zip file (https://github.com/andrei-tatar/HAP.red/archive/master.zip). Unzip it in a folder, open cmd in it and run “npm install” and “node index.js”. After this, you should be able to open http://localhost:8000. Here you can click edit flows and add the sample flow from above.