 The BeagleBone Green Wireless is the result of a joint effort between Seeed Studio and Beaglebone.org. It is based on the open-source hardware of the Beaglebone Black and they’ve added 2 Grove connectors. You might recall I did a blog on the Grove stuff a while back – basically the usual sensors for temperature, humidity, moisture along with relays etc., all on nice little boards with a standard connector.
Important items here are: WIFI and Bluetooth, AM3358 1Ghz ARM Cortex A8 processor, 512K RAM, 4GB EMC, 3D graphics accelerator, NEON floating-point accelerator, 4 x USB 2.0 connectors. https://www.seeedstudio.com/item_detail.html?p_id=2650
If you check out the Seeed site they have all of the little adaptors and so here is a system you can put together with minimal or no soldering.
Planned shipping 31st May – price $44.90. Apparently Mouser and Digi-Key are distributing internationally and NKC Electronics in the USA.
So this isn’t going to be one of those “gee this is wonderful” reviews – I’ll comment as I go along – it may be nice, it may be brutal. The first thing that grabbed my attention was 512K of RAM – I don’t know why people do that when the leaders out there like Pi have 1GB but I guess it all depends what you want to use these boards for.
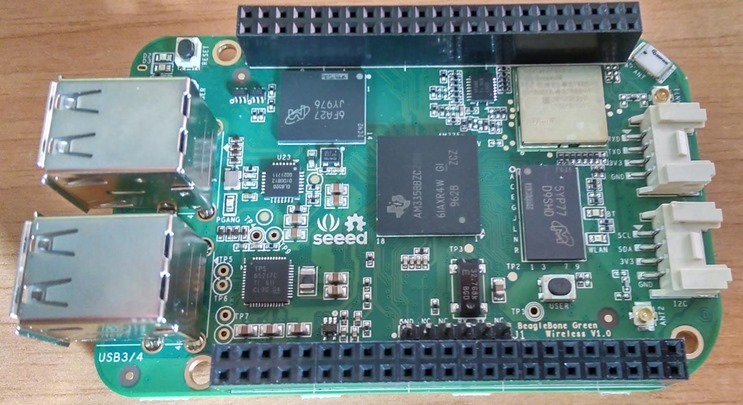
So, enough of the official press release stuff, here’s a photo taken this morning on my bench as I took a first look at he BeagleBone Green Wireless. Clearly they want you to use this with their other modules (though you don’t have to) because as well as the two 4-way connectors on the side, there’s a plug in board with a TON of connectors.
I’m quite at ease with a soldering iron personally but plugging these two boards together (see photo above)… well, I can see the attraction – they’ve sockets for EVERYTHING on there – as you likely can’t read them – the 12 sockets are:
2 UARTS, 2 analog inputs, 4 digital I/O (totalling 7 I/O pins) and finally 4 I2C sockets… now as it happens I just bought a couple of I2C I/O expanders so straight off I can get 16 extra (well, 14 when you take off SDA and SCL) outputs for a couple of quid!! The switch on the left lets you switch between 3v3 and 5v and I’ve not figured out what the one on the right is yet.
There are 4 USB 2 connectors on the left of the main board, Power is micro-USB and there’s an on-board ceramic WIFI antenna. 3 buttons include reset, power and user. The board is the same size as a Raspberry Pi (but rounded) and there are 5 indicator lights in a neat row. At the bottom there’s a 6 way connector which basically is power and serial I/O. There are also a couple of connectors for external antenna.
All very pretty. I powered it up.
A blue light over on the right of the image above started to flash along with a green light upper left. At this point I had no SD in.
Before long a plethora of lights were flashing and after several seconds this settled down to a blue and green lights over to the right – and one green and 2 blues on the left (top behind the USB sockets above).
As I often do – I got this far without reading a thing. Could I go further? With no HDMI out I wasn’t that sure what to do next without cheating and reading online – so off I went to check for WIFI access points on my phone. YES – “Beaglebone80997” showed up. I signed into it, picked a web page at random and sure enough my phone came up with a VERY pretty home page.
My WIFI is called “wififorus” and I was a bit confused to find that the board was seeing half a dozen of them with numbers on the end – no idea why but I picked the first one – put in the password and also it wanted a “board password” – I was unsure what that meant but assumed a new password – so I put one in. That worked. No visible change in board lights but I was told the board was now 192.168.1.33
Remember this is all played by ear. I hit OK and a page of instructions came up on the web page – this was all looking very polished up to now. All in good English as well.
It told me that the board was running with Debian, Linux drivers for countless USB gadgets and that there is an interactive tutorial. I think this info is for the BeagleBone BLACK as it was mentioned. There’s even a script for flashing outputs… right there at the start.
The Cloud9 IDE is supported so that you can develop live on the board… somehow I didn’t think that would work too well on my phone – so I opened a browser on the PC to the address given. At first nothing but just as I was getting despondent…. the page popped up on my browser – all local. Call me easily impressed but this is one of the first boards I’ve reviewed (and I’ve done a lot of reviews but not Beaglebone) where everything worked as expected without having to read anything up!!!
I remember one of the guys telling me that I should update the software – so off I went to updates… (remember the board was merely plugged into USB for power and I was doing this on my PC browser – what could be easier). Here are the instructions as read off the board.
The following was me going down the wrong path but I’ll included it anyway.. if you can’t be bothered with a sob story – skip to “The right path”.
The wrong path:
There are multiple ways to run initial software on your board, but it is likely that the simplest way to get an update is to create an exact replica of a bootable microSD card and boot off of it. The BeagleBone Black Rev C has 4GB of eMMC storage (2GB on previous revisions) that can be initialized by a program booted off of a microSD card. If you want to update to the latest software image for your board, this is a way to do that.
Step #1: Download the latest microSD card image
Download “Angstrom Distribution” from http://beagleboard.org/latest-images.
Note: Due to sizing necessities, this download may take 30 minutes or more.
The Angstrom Distribution ships with the boards. The file you download will have an .img.xz extention. This is a compressed sector-by-sector image of the SD card.
ANThe second item down was for various boards including the Beagle Green Wireless – this is nice as often when you get a brand new board (released this coming weekend) there’s zilch out there for it… but in keeping with my experience so far this is looking painless. 775 Meg to go – time for coffee…..
And then it all went wrong for a second…
To turn these images into eMMC flasher images, edit the /boot/uEnv.txt file on the Linux partition on the microSD card and remove the ‘#’ on the line with ‘cmdline=init=/opt/scripts/tools/eMMC/init-eMMC-flasher-v3.sh’. Enabling this will cause booting the microSD card to flash the eMMC. Images are no longer provided here for this to avoid people accidentally overwriting their eMMC flash.
I don’t have the foggiest idea what that paragraph above means. Thankfully elsewhere there were instructions for unzipping the file with 7-zip – that produced an .img file – and I know what to do with that – WinDiskManager !!!!
Sure enough – the image wrote successfully to one of my 16GB micro-SD drives. That gave me plenty of time to drink my coffee. I blew the image – and realised that unlike a Pi image – the result was unreadable by PC!! This was starting to turn ugly.
I pulled out my trusty WINSCP and put in the IP address. I had no idea about username or password so picked one at random. The board started to connect then popped up a window telling me what the username and password were “debian” and “temppwd” – handy! I put that into WinSCP and up I was up and running!!!
With only the vaguest knowledge of Linux I plugged in the microSD into a USB adaptor and plugged that into the board. Yet another light came on – this time a green light near the USB socket.
 Encouraged by this success I went off looking for devices… in /home/debian I created a directory called “petes” (as I write this I just know this is all going to fall to pieces as I haven’t a clue what I’m doing).
I then tried:
sudo mount /dev/sda1 /home/debian/petes
I have to tell you – I was DEAD CHUFFED when it actually worked. Maybe all this reading about Linux is doing some good after all. NOW hopefully I could follow the instructions. Sure enough there was a boot/uEnv.txt file. Of course TYPICALLY I didn’t have permission so I had do go into a terminal (instead of WinSCP file few) and use that awful NANO editor.. “sudo nano /home/debian/petes/uEnv.txt”
The problem then was – the instruction above – line starting #cmdline – simply didn’t exist.
The right path:
Anyway it turns out that in trying to update the eMMC memory, I was using the wrong IMAGE – I asked SEEED support and they came back very quickly with a user forum which had the link to the latest image. I blew that onto an SD and tried holding the USER button down while powering up – SURE ENOUGH it updated the eMMC and then I could run the board without the SD in place. Magic.
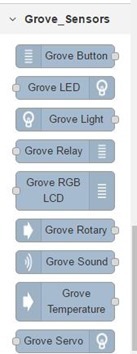
I just happened to be looking at the online documentation when I noticed a reference to NODE-RED !!! Well, quite excited I clicked the button and it promptly tried to run Node-Red but with the wrong IP address. I corrected that and sure enough, Node-Red came up. But here’s the thing – Node-Red with NODES FOR GROVE!!!!
In all the reviews I’ve done – I have never seen a board come out of the box already kitted out with Node-Red and full support for I/O – the nearest is the PI with Pi GPIO support – ALL of the other boards I’ve tested just left you to get on with it.
Could I be this lucky? I didn’t get any sensors with the board but I just happened to have a bunch of them from some time ago. I plugged in the top board and of course that immediately killed the processor. I should know better. I rebooted the board and shortly thereafter tried again – Node-Red came up.
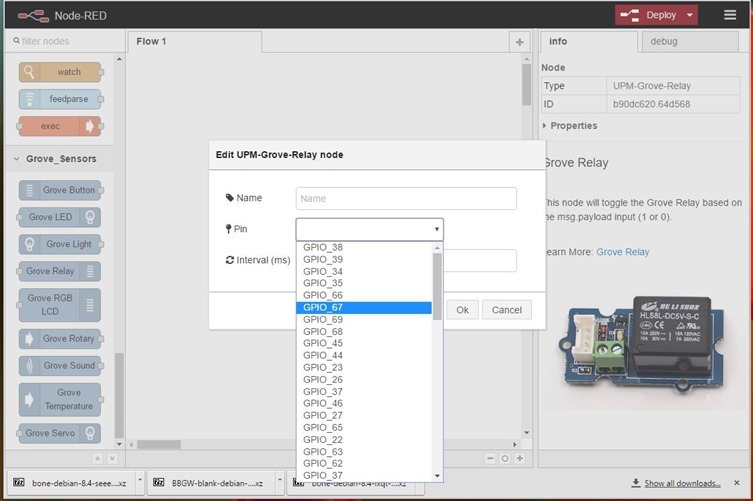
I plugged the relay into one of the GPIO connectors – marked 115/117. I dragged the relay node – and… there’s a helpful PICTURE!!!! Now why can’t others (like me) do that…
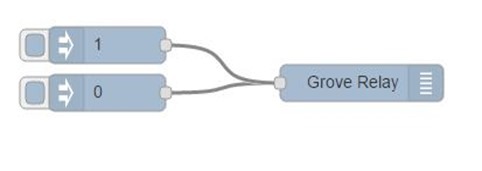
I selected GPIO 115 (seriously!!!) and added two inject nodes – one sending 1 – the other sending 0.
It WORKED. I tried the temperature sensor and that produced a strange value – then I realised – that my temperature sensor though pin compatible was not the one they had in the photo – fair enough and again – good idea including pictures!!!
I tried the servo – I had one of those – none of the connectors on the top seemed to match the pin selections so I picked the first 4-way connector on the main board. I made 2 injectors – one outputting 0, the second outputting 100. IT WORKED… straight out of the box, no soldering – I had a servo up and running. This is FUN!
I don’t have all of the sensors and I noticed that some of the little modules I have don’t appear to have nodes for them – at least not out of the box. I will revisit these at a future time.
I tried the LED output – there are – wait for it.. SIXTY FIVE OUTPUTS!!!
And that – is that for now. I need to get more plug-in sensors etc. to give this a good hammering.. but if you ignore my incompetence with the setup – we’re talking out of the box to having gadgets running on Node-Red in – what – MINUTES. This then from the perspective of someone absolutely new to Beaglebone and this board – is a TOTAL improvement on previous experiences I’ve had with boards. I’ve reviewed lots of them and of course I’m a Raspberry Pi addict – especially with the extra power of the 3, but given that I’ve not even read the documentation – to get this far in so short a time with so little effort… I’m WELL impressed.
Summary:
Between ease of use and online programming this is a good board. Normally I would install my own Node-Red. In this case it is pre-installed with the various modules to control their boards.
So one might think it would be easy to just add one’s normal nodes to Node-Red? By default I initially could not add nodes – even though trying both globally and normally, the directories were created – the nodes were not added to Node-Red. I could not start from scratch as that would mean losing the control nodes they have fitted.
Then I discovered that the settings.js file at /usr/local/lib/node_modules/node-red could be altered (as root – which initially has no SCP password but once logged in you can use passwd root in a terminal to add one)
Uncomment and modify the file as such..
nodesDir: ‘/home/debian/.node-red/node_modules’,
After stopping node red (again as root – service node-red-stop) and then restarting (service node-red start) – my BIGTIMER sitting in /home/debian/node_modules/.node-red-contrib-bigtimer appeared (I created /home/debian/.node-red and had previously installed the timer from there).
From there, as the DEBIAN user, I was able to install the various nodes I would normally use – including the admin node (the global version didn’t work so I tried the local version and that installed.
I did however have issues installing some of the nodes – unusually i had to install them as root – and SQLITE3 node was just NOT having it – I also noted that all of this took longer than a Raspberry Pi 2 and MUCH longer than a Raspberry Pi 3. MQTT also failed to start up – even though Webmin SAID it was starting it up. Clearly there is some setup here interfering with what would normally be a simple setup.
I hope you found this useful. For more see here – officially announced today – http://www.seeedstudio.com/


Hi there, thanks for the review, I too have been down what appears to be the wrong path to update the eMMC, what is the correct link for the image? Many thanks, Dave
Once again thanks Pete!!!
Indeed, that’s impressive ease of use. Thanks for the good review.