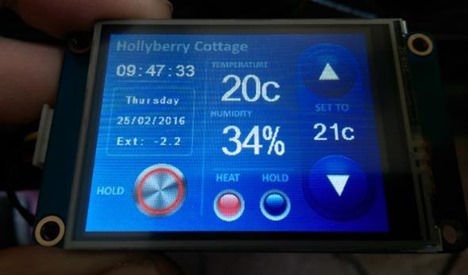
Things have come quite a way since my first stab at using the Itead Nextion displays with an ESP8266. I now have a fully working thermostat display running on MQTT – but I’m beginning to wonder if 56KBaud is pushing it a bit for the software UART. Now that I’m pushing a reasonable amount of information onto the little display, I’m very occasionally seeing small glitches in incoming information when pushing buttons. Not enough to worry about but perhaps drop the speed down a notch.
14 thoughts on “Nextion Progress”
Comments are closed.


I’ve got one of these display but haven’t had a chance to play with it. What are you using to create your images for buttons etc? I know they make it look easy but seems like most of the work is making images for your buttons. I wish they had an extensive library of available buttons to save some time. lol I know, dreaming.
I’m just using Powerpoint to create the images – then saving as .PNG and reducing to size with GIMP before importing into the Nextion. Yes and unfortunately many of the decent button images are owned by the pesky Getty and Corbis.
Let me explain that a little further… I grab .png files from the web – and put them together to make two overall images – one where everything is turned on – another where everything is turned off. The latter is used as the main background.
I’m new to the site, so this might be a silly question .. do you have a post about the thermostat part self as well? If I understand correctly, this is just the display. I’d like to try and make a (simple) thermostat on Arduino, but usually once I start reading posts about it, it becomes more complicated as I read on. So I was wondering how you are controlling the thermostat, is it an existing solution, or did you code and connect something yourself?
Not complicated at all. So I work in minutes past midnight. I have times and temperatures for the week and another 4 for the weekend – you could start off more simply.
Every minute work out the time in minutes past midnight and do a series of tests on your on off times… simple if. Reducing it to minutes makes life simpler…..
if t>=t1 temp=tp1
if t>=t2 temp=tp2
etc
So that’s your set temperature – I only work in integers- ie nearest degree – pointless trying to heat a room to sub-degree accuracy. If using a gas or oil boiler – trap excessive changes – I don’t allow state to change from on to off etc more than once a minute.
Oops! just realised, the waveform is like an oscilloscope not like a chart as the latest data is always on the left.
Never mind it will still do the job I suppose.
Just started to experiment with my screen and the simulator, a bit tricky but getting there, the waveform component looks really good as I will be able to graph data over a period as well as see the instant value, really good.
Not coded anything for the ESP12 yet just using the simulator connected to the screen via the serial port.
Figuring stuff out with the instructions they provide is proving really difficult!
Hi Pete,
I’ve just ordered some of those screens. Were you going to release the code and plans for the little boards that go on the back.
Regards
Paul
When the new boards turn up if we have them right we’ll put the Eagle files on the blog. As for the software we’re looking to providing binaries for those interested as the software is our general sofware and way too involved to support. It is available on the web however.
what are you running on the esp8266 ?
i have looked at the nextion arduino library it does not appear support esp yet..
i am just learning to program on arduino ide..so be kind lol
jimmy
I’ve not looked at it in detail, but a quick goggle shows how to control a TFT screen with Arduino here.
http://forum.arduino.cc/index.php?topic=316321.0
Consider that it should be possible to use an ESP8266 device with the same code (after a bit of tweaking)
One way wire things is use dedicated TX / RX wires of the ESP8266 to be the “2 wire” UART to the display (connect up the display to the ESP8266 after the ESP8266 has been programmed).
A better way is to dedicate 2 other pins to be a software UART (as Pete is doing), This is so you can program and use the ESP8266 without having to re-wire the pins, see Testing info back through USB etc.
The upshot of any code conversino from “Arduino to ESP”, is that it might only be a few tweaks to the “Arduino” code (e.g. to use different libraries), so that the new code works OK on an “ESP8266”.
Look a the work I’ve done – you can support Nextion from just about any chip – it is just simple serial…
why this 56kbs limit? is its uart fixed at this speed?
It’s not a limit – it’s a software UART.