I recently wrote about my first experience with the SMLIGHT SLZB-06 Ethernet Zigbee coordinator given to me by a good friend in the UK (and left there – working well – I’m now back in Spain). That prompted me to contact the company who make them – here’s a link to their site. Like many Zigbee2MQTT users, I have up to now been using a USB serial Zigbee coordinator in both locations. I have Sonoff (both types P and E) and the original Electrorama USB product.
Smartlight wrote back to me almost immediately to tell me about their products and promised to send them some to play with – they arrived this morning. The company is based in Ukraine and their ABOUT ME page is quite refreshing – I recommend reading. Just to be clear, no, I’m not being paid – they simply sent me some bits to play with – no preconditions.
Preamble
I’ll start the blog in order of opening but first let me pass comment about the packaging: I’m used to packages arriving from AliExpress literally covered hap-hazardly in sellotape, making re-use of packaging a challenge.
When this package arrived I noted the usual grey thin plastic waterproof envelope – and inside – a shed-load of pink bubble-wrap – all held together with thin strips of cling-film, making the packaging material almost 100% re-useable – good start.
AIR Conditioning Controller
Among the items they send was a small USB dongle called the “SLWF-01 Pro” for controlling air-conditioners – sad story – neither of us thought to ask… my aircon doesn’t have WIFI or USB, only infrared remote control.
So, I can’t review that right now, but let me just say – they told me to plug it into USB and look for a new WIFI access point (Tasmota and ESP-HOME users will immediately know what I’m on about here.).
I plugged the unit into any old USB supply and sure enough, a new access point became available to my mobile phone – the unit suggested I tell it about my WiFi SSID and password. I did and lo and behold the dongle appeared on my WiFi..
Thats when I realised we had a problem..
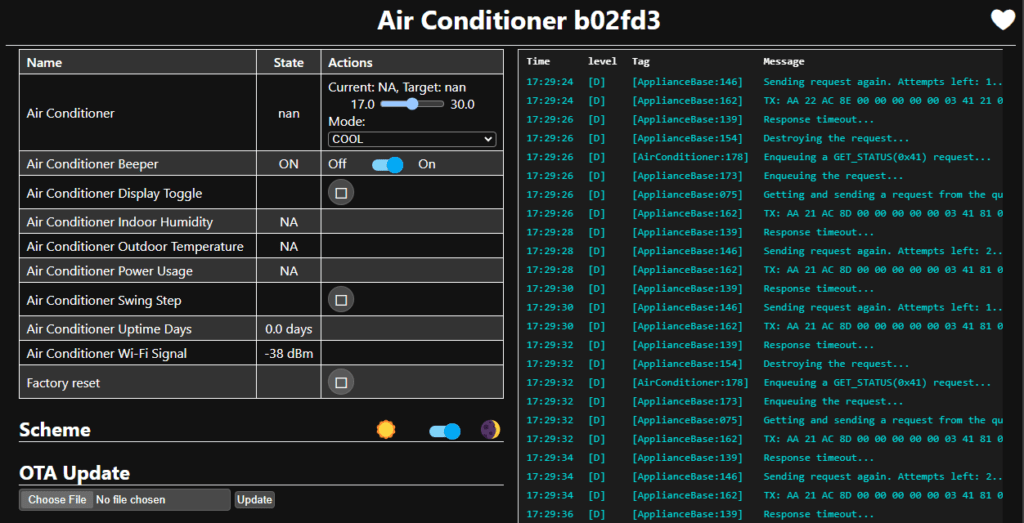
The device has it’s own web page and also integrates into Home Assistant easily – and can control a wide range of air conditioners – see the options on the left.
And that’s where it ends – immediately it started hunting through a wide range of commands for various leading brand air conditioners – and got no-where as my reversible aircon unit is a virtually unheard-of brand with no WIFI… mind you it was only 500 Euros fitted.
I’ve informed the company that when we get our next aircon (another room – the current one is in my office and is simply on-off controlled by Home Assistant right now using a Zigbee Smartplug. I’ll finish the review when I can but for now – this is fairly obviously an ESPHOME application on a custom ESP8266 stick – and here it is…

And that’s all for now on that subject. Good start…
A1-SLWF-03 LED Controller
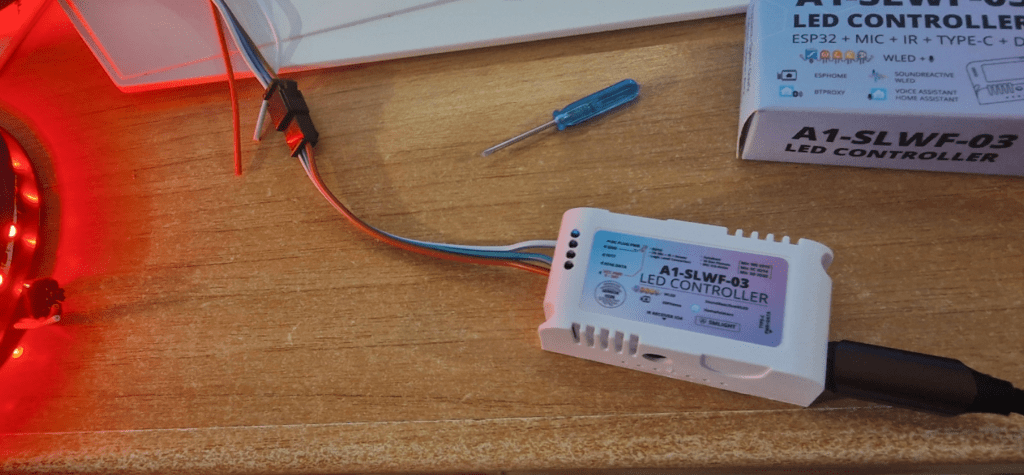
Next, a tiny RGB light controller called A1-SLWF-03 (that’s A1, not the generally over-used AI) and powered by WLED – good idea – why re-invent the wheel when WLED is so good – I use it a lot.
Ok, USB-C and DC connector inputs, persumably works with Home Assistant (obviously as HA has a WLED integration) and of course it’s own WLED web page. The unit comes complete with sticky pads, a tiny Allen-key and a screwdriver – no assumptions made here – everything you need except RGB LEDS – but they also supply select RGB LEDs and sent me a reel to play with.
Note that for a full reel of RGB LEDs you might want to use the DC input – for now I’ll use the USB-C input for testing. The unit has a microphone, IR receiver and Sensor button….. they even tell you on the box which ports they use. It seems the unit is can also be a BT proxy and they refer to ESPHOME – though I’m going to leave the default WLED in this one. It has the lot, sound-reactive, IR remote control and Home Assistant integration. VCC power is 5-24v and they are supporting a type of RGB LED which uses up to 2 data pins. I’ve never done that before but as it happens it looks like they shipped standard WS2812b LED strip which only uses the one pin.
No instructions so I went in at the deep end and simply plugged in USB-C. A tiny internal blue light came on. My phone said WLED-AP – sign in required. A web page opened up on my phone at address 4.3.2.1 That tiny screwdriver was about to come in handy for attaching LED STRIP. But first – in the web page that appeared on my phone – I went to the config page and told it about my WiFi access point so the device was now sitting on my network at default name wled-smlight-slwf-03 or in my case http://wled-smlight-slwf-03.lan
All I had to do now was wire in some RGB lighting (serial) – thankfully the unit came set up for the supplied 300 LED strip and the casing info agreed with the GPIO settings in WLED. Absolutely nothing to do but plug it in. And what about “sound reactive”. Well, I thought I had a bad connection as I tapped the box and the light started to flicker – no – that’s deliberate 

As for how much power this thing can handle – well with serial LEDs that’s down to the power cabling to the LED strip. Next I tried the IR input with a handy cheap Chinese IR remote I’ve had lying around for ages – the controller did not do anything – no joy. Turns out you have to tell it what kind of remote you have – never done that and don’t have instructions – of course all of this was be on the website – I was just being lazy. I’m going to send you off HERE for far more info on this product and IR info etc…
Up to now, this is great – I do have several WLED installations – but for a beginner – it really doesn’t get any easier (unless you have extremely large hands – the tiny screws and that tiny screwdriver could be an issue).
There are no IR handsets on their website but the WLED site has files for a number of common cheap IR READILY AVAILABLE handsets from AliExpress and others. There is a file for my standard cheap 44-key Chinese remote which I selected but initially didn’t seem to do anything. This is the link to select an IR remote if needed. https://kno.wled.ge/interfaces/json-ir/json_infrared/ and of course the port used can be seen on the case. There’s a file that can be updated in WLED settings – EASY.
Here’s a short segment of the 44 button remote on the WLED site… be sure to SAVE AS then edit in a plain editor if you need to – displaying in Chrome for some reason strips some quotes – well, it did for me – anyway – here’s the general idea….
{
"remote": "44-key",
"0xFF3AC5": {
"label": "Bright +",
"pos": "1x1",
"cmd": "!incBrightness"
},
"0xFFBA45": {
"label": "Bright -",
"pos": "1x2",
"cmd": "!decBrightness"
},
"0xFF827D": {
"label": "Off",
"pos": "1x3",
"cmd": "T=0"
},
"0xFF02FD": {
"label": "On",
"pos": "1x4",
"cmd": "T=1"
},
Meanwhile I just realised when I started coughing, the lights flicked – so the sound reaction works well too. All in – a good job. I could not see how to stop the sound reactive mode so I ent into WLED settings and for DIY1 button I set to simply show RED at half brilliance – DIY 2 still turns on sound reactive – hey – this is fun!
The company’s devices are available from Ukraine or China. It’s all in the links above.
Soon we can get onto the Ethernet ZIGBEE controllers…but first – a quick look at the USB Zigbee coordinator they sent me – SMLIGHT SLZB-07. Because I have the Ethernet units I’ve no need for a USB coordinator – but I thought I’d better make sure it works.
They sent me a link to their update page so I used that to VERY EASILY upgrade the firmware…. So easy in fact that I plugged the untested SMLIGHT SLZB-07 into my PC USB and up popped the above page with an option (big white bar) to UPDATE SMLIGHT SLZB-07 FIRMWARE.
I got the usual option to select the right USB port, did that and was shown the latest firmware and also given the option to CHANGE the firmware – first time around I simply went for the upgrade to V7.4.1.0 – DONE.
Moments later (no unplugging needed) I went back in to look at the CHANGE FIRMWARE option. I was presented with a list. See on the right “ZB Router”. As I don’t need another coordinator – I’m confident the SNZB-06 Ethernet coordinator unit is working fine and so I clicked on the ZB Router option for the SNZB-07. DONE.
I should point out that their website has a mountain of information available.
As for the SLZB-06 and SLZB-06p7 devices – very similar – but here’s a thing – in the built-in webUI menu under MODE- you can turn these devices into ROUTERS directly in the menu – is that NEAT! So if you find yourself with a spare, use it as a router (mesh repeater) as you would any Zigbee lamp or other powered Zigbee device – but with the better range and device expansion afforded by these units – a brief look on the web showed me that a typical Zigbee light might act as a router handling 5 or so sensors – these dedicated routers handle a larger number – depending on the router – each one might handle 20 or more end device (for example battery powered Zigbee sensors which do NOT act as routers)..
End note: a quick request – if you’ve not subscribed to the blog – and my YouTube Tech playlist – please do – it helps me a lot..


I really like their stuff, the updates come frequently and UIs are well thought out. A refreshing approach in the smart home market.