Still ploughing away with the thermostat side of my home control. Having had working code for some time now using ESP8266 modules (and hopefully soon the odd ESP32 device) to control things with Node-Red on the Raspberry Pi acting as the central controller and in charge of mobile and serial UIs, I’ve been making changes with the advent of the relatively new BLINK app and even newer (to me) node-red-contrib-ui. (All of this is running live).
I also had complaints from my wife that the heating was too high up overnight. At an early stage I’d made the decision to have 2 on-off times in the day, so 2 periods of peak heat and the rest of the time off-peak. This has been working for some time – but it occurred to this week what a stupid way to control the heating that is.. and so yesterday I completed an upgrade to 5 PROGRAMS a day (with 5 separate ones for the weekend). So now armed with up to 5 program times and 5 temperature settings I have WAY more control over the heating.
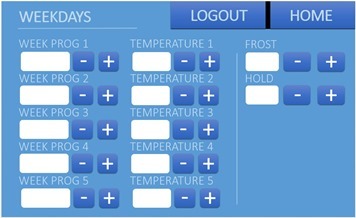
 I use Nextion displays for the wall (serial) talking directly to the Pi. Their editor is currently very primitive and the graphics not that good, especially in the smaller displays like mine (400*240). I should say at this point that I think the hardware is very good value for money – but like SO many projects they start with good intentions then other stuff gets in the way – so right now editor progress is slow. So – I make my own backgrounds in PowerPoint (NEVER under-estimate PowerPoint).
As you can see – on one small page I’ve managed to get all the weekday controls and some extras – on another page I have the weekend controls. Simple enough – this is just a .PNG graphic which acts as a background then I use the Nextion controls to make hotspots and dump in simple text values. It’s a compromise but it looks good.
On mobile phones however things are not so easy – you want a few simple controls – fine but many of the UIs out there do not lend themselves to displays with this much information – which is why I’ve abandoned so many in the past. I’m still hoping the Blynk guys come up with more – but it seems to me that again, right now I’ve not seen new toys for that system for AGES (I should also point out that there is a reconnect issue with Blink and the otherwise excellent node-red-contrib-blynk nodes – I should also point out that the very helpful author of the latter thinks he has a fix and is just waiting for the Blynk guys to incorporate his fixes – if you’re working on this – do write to Blynk and ask them to merge in his changes ASAP.
 Meanwhile there is the increasingly flexible node-red-contrib-ui – and I think this might be the one – the author Andrei is working very hard on this right now but visually it leaves something to be desired and I think the community could help there as his code (if you know where to look) lends itself to CSS modding as essentially this is not an APP but a web sockets page running under Node-Red.
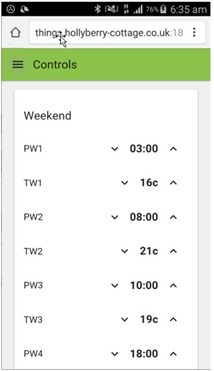
On the left you see my current control page. It works (as of last night) but there is just SO much waste d space. A good start would be to go full-screen but on Android Chrome – I just cannot get this to happen – I suspect you must need something in the page header.
So my wish-list would be firstly to eliminate the cluttering menu (Chrome’s menu). From there I suspect it is down to some CSS. On simple LED controls it is possible to get two items on a line – but right now with individual nodes it is one per line. A simply tick box option might be the way around this but it is down to convincing Andrei of the need (and after all like many of us he’s doing this for fun so it’s not like we can insist.
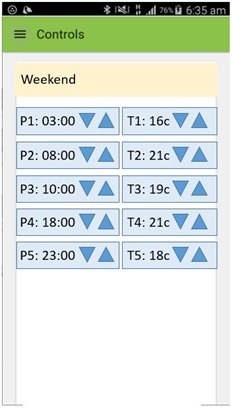
As you can see, in my Christmas wish list version of the control, space is used FAR more efficiently. And it is needed because I plan to do SO much more with the stat.
Right now – I read the temperature in the living room – and act accordingly – but this is silly – at night who cares what the temperature in the living room is – I want the BEDROOM temperature monitored etc.. so ultimately each of the 5 programs will be able to select from one of 3 sensors. Great but creates more nightmares for the UI – so flexibility of sizing here is the key and right now we don’t have that.
Today we have node-red-contrib-ui with basic examples of use – what would be really nice would be a complete guide to CSS possibilities for dummies along with example controls using the “template” control to supplement existing controls – I think we might have to chip in and help Andrei with that. Right now I know how to change that green “controls” menu background colour – and that’s about it.
I’ll finish by thanking the authors of node-red-contrib-blynk and node-red-contrib-ui for their work so far and encourage them to keep going – so many possibilities. Thoughts welcome.

Probably not the answer you wanted to hear but in the end I decided for my heating system that I wanted to roll my own instead. It helps that I’m a web dev and so writing something in Angular + node was easy for me but the ESP8266 + mqtt has made the whole thing so much simpler than my old system. I even managed to add in control of power sockets in an afternoon after my wife told me she would like to be able to turn a lamp on the other side of the room on/off without having to get up.
These pre-built UIs are ok up to a point but in the end you spend so much time trying to shoe-horn the right type of controls that you would like that you might as well have written it from scratch yourself. Things like Angular + bootstrap make the job 10x easier than they used to be and you don’t have to be a graphic designer to get a half decent looking system up and running.
No I agree about the pre-built UIs which is why I’m excited about node-red-contrib-ui because the TEMPLATE node allows you to pretty much cook your own thing – now that uses Angular so if you’re a whizz at that, any contributions would I have no doubt be most welcome…
My angular project is on github https://github.com/cookejames/sarah-frontend but there are also a few supporting projects at
https://github.com/cookejames/sarah-backend
https://github.com/cookejames/sarah-sensor-dht11
https://github.com/cookejames/sarah-sockets
and https://github.com/cookejames/mosquitto-docker
It all ends up looking like the following. Feel free to have a poke around and use what you like – your site has been massively useful in learning about the ESP8266 and following its development.