You can’t get away from it, the iTead products are inexpensive – and sometimes that is very important. But are they the best solution for Home Control? Well, that depends… I think they are very good… Sonoff products have always been inexpensive. But bear with me.
At one time the company had a seemingly unbeatable grip on the DIY end of home control – their products which are usually based on the the ESP8266 include Sonoff BASIC and many others. The BASIC is lomited to basic on-off control, less than £5 sterling gets you a simple WIFI controller with button. Today there is some competition depending on your wallet and how much you want to spend on controlling a light.
Of course many of us are averse to using even more Chinese “cloud” or even more APPS – not in my case for political reasons but because I am a happy Raspberry Pi/Node-Red user – and I want to keep my home control working as much as possible even if the WIFI goes off – you can mitigate power issues by using battery backup, generators and other solutions but if your entire control system is cloud-based, what do you do if the Internet service provider screws up?
Every IOT company seems to think you should use THEIR APP… I already have lots of different apps for my various watches – I don’t want any more for my home control thank you. Which brings us back on topic – Sonoffs. Sonoffs were the smallest and lightest cheap control box until along came Shelly. But on cost, Sonoff still have the edge by some way – and on size, well, the new Sonoff Mini competes there as well.

Shelly made some smart moves however – MQTT support and a nice user interface. Sonoff Mini has DIY mode and as I just found out that kind of works – though it needs fixing up. Cutting to the chase, this page has good info on using Sonoff Mini in DIY mode and within that is the Windows tool you need to set these units up in DIY mode. If you are interested – here is some official API information on Sonoff DIY mode. Here also is their new video on DIY mode, discussing Sonoff Mini, Sonoff Basic R3 and RFR3.
So, grab a Sonoff Mini (not as cheap as Sonoff Basic but smaller). After wasting hours following the WRONG info I got hold of the links above. The initial issue I had was this – often this kind of board has a user interface i.e. built in with a web server for initial setup – Sonoff Mini doesn’t.
Instead, they expect you to set up a router (or your mobile phone hotspot) with a specific SSID and password. That floored me initially as I was expecting to find that hotspot within the device itself. I took the approach of temporarily renaming one of my WIFI access points.
WiFi SSID:
sonoffDiy
WiFi password:20170618sn
So firstly I did the above, then turned on the un-altered Sonoff Mini – and used the EWELINK App on my phone to set the Mini to work with that access point. I then set the Mini to work with my normal access point. Easy up to now. Using the APP I upgraded the firmware of the Mini to v3.50 – you HAVE to do this as the stock software that likely came with the unit (v3.0.0) doesn’t support the DIY mode.
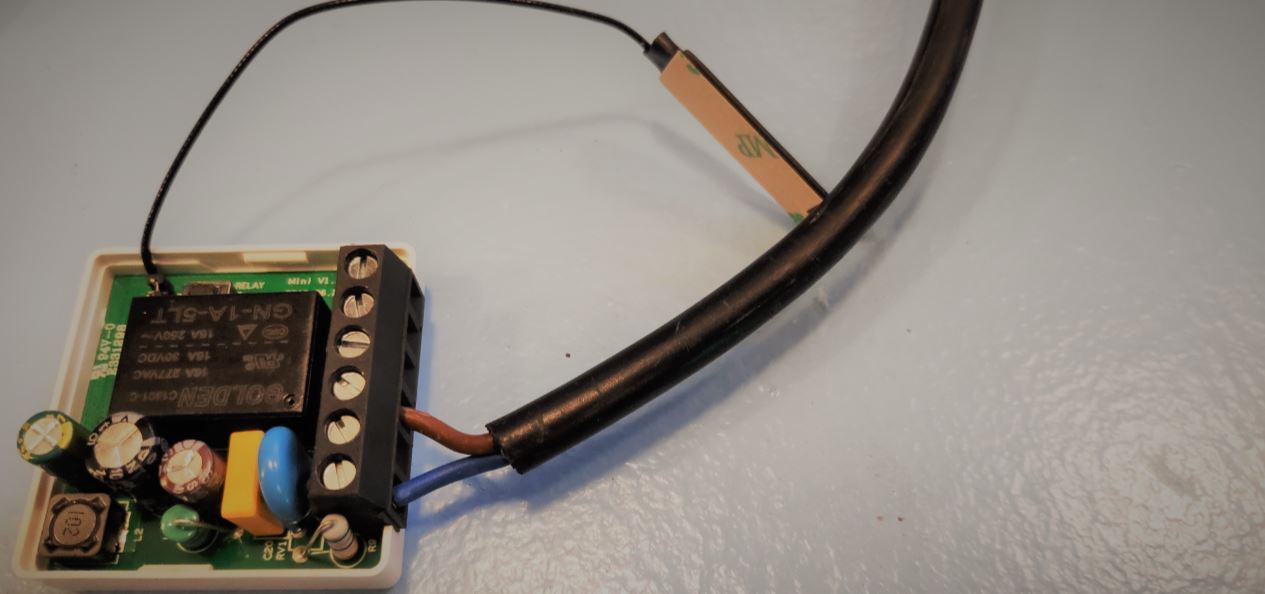
Next I turned off the device, opened it up (no screwdriver needed) and fitted the supplied “DIY” link to the two OTA pins inside – clearly marked. I put the top back on.
The instructions refer to a single flashing LED meaning you do NOT have a WIFI connection – a double flashing LED means you DO. I turned on the Mini and sure enough, I DIDN’T. WHY? Well, despite the really poor translations I eventually twigged that when you change modes to and from DIY mode and normal CLOUD mode, you lose any custom WIFI settings. Right, back to the special access point.
NOW I was COOKING. I grabbed the EXE program in the link above but frankly it is just not very good. Glaring problems (renaming the device doesn’t work, the popup dialog is faulty, changing access point options don’t show you the EXISTING access point etc. I changed the name of the Mini from the utterly useless default to myfirstmini. I also set up my normal WiFi access point.
Sonoff Mini DIY does not support MQTT natively, but it DOES have an API on port 8081 and if you get stuck into THIS page, you can supposedly easily make use of it. I had no joy. Strangely as a devout MQTT user I just recently spoke to my SHELLY 1 using ITS API – if you are a Node-Red user, that’s a lot easier than it seems. Essentially using the HTTP REQUEST node is a doodle.

Thats the yellow one above. I’m controlling a relay on my heating system with simple on off commands and THIS is the setup inside of that node.

In the Shelly I simply fire into that node a payload of “turn=on” or “turn=off”. Easy once you know how. I can also read the output of that node to see what came back… String(msg.payload.ison)
But that’s Shelly .
Thankfully what the otherwise poor Sonoff tool DOES manage is to let you flash the likes of Tasmota and Espurna – I’ve used both and I have to say, at least for the Sonoffs – for me, Tasmota wins. When I originally wrote this article I flashed Espurna onto the Mini – but since then Tasmota has come along in leaps and bounds and is now my standard go-to.
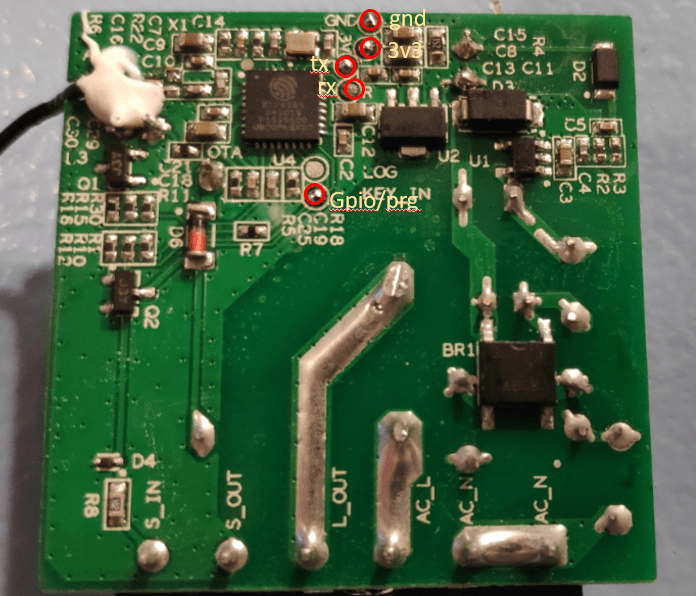
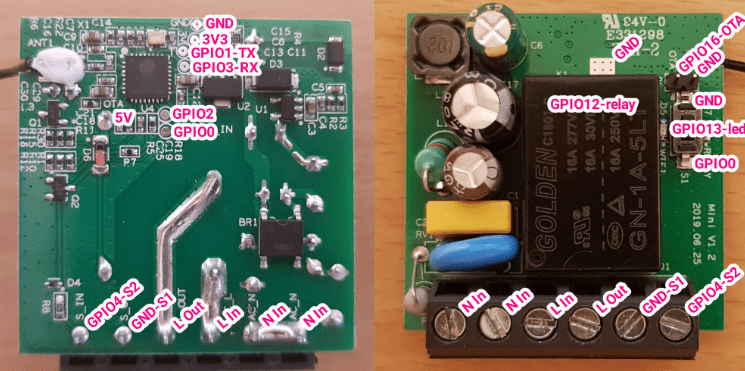
I tried the Sonoff DIY software but it simply isn’t rock solid and so eventually I pulled out the soldering iton. Wiring to the 5 pins on the Mini isn’t that hard if you take care. Using a bog-standard TFDI and TASMOTIZER on the PC, I flashed the online TASMOTA-LITE.BIN straight onto the board.
And there it is. Make sure you use 3v3 and not 5v. You need a fine soldering tip and steady hand for this but it is no-where near as hard as trying to solder, for example, an ESP8266 chip. To FLASH the board, before powering up, CAREFULLY ground the PRG pin (In the image below it says GPIO – I meant GPIO0). Once done programming – release that pin. In fact I took the lot off, put the unit back in the box, fired mains power at it and on my phone the familiar access point popped up and I then told the board (192.168.4.1 in my phone browser – configuration tab – no need to change module settings – jump straight to WIFI ) about my local access point on my network, then fed in MQTT details and that was that.

Actually some interesting stuff from the Tasmota site.

I’m sure we can find a use for the second input (on the connector) not to mention GPIO2, GPIO3, GPIO16 (output only)….


With Sonoff mini firmware v3.5.0 the protocol changes to V2.0 which is entirely different to the old method.
See https://github.com/itead/Sonoff_Devices_DIY_Tools/blob/master/SONOFF%20DIY%20MODE%20Protocol%20Doc%20v1.4.md.
I have managed to get this working with Node Red using http without any issues or changes to the firmware.
I tried https://www.thingiverse.com/thing:3767667 to program a bunch of minis was a lot quicker than any other methods if you have access to a 3d printer. Now have a bunch of tasmota’d minis.
Excellent Ian, personally I don’t have access to a 3D printer right now – mine is on permanent loan to Aidan who you will see in here from time to time, I figured I could get it back any time I needed it – that was in the pre-virus era of course.
What I CAN do with the Tasmotized Sonoff Minis is make use of the extra I/O. The external switch (on the edge connector) can be made to function as a button and the now unused OTA Link (GPIO16) can be configured as an external indicator in case the Mini is put in an external box (in which event the internal button and LED become unuseable) – either to show the relay state or as an independent indicator.
how to connect external 5v power to internal pins, converting the sonoff mini to dry contacts without doing any cut on pcb… with this mod there’s no mains on relay external screw terminals, unless you put it there, of course… the external button/switch continues to work as always, and you’ll have your dry contacts between LineIn and LineOut terminals
more info (in “pseudo” italian): https://www.youtube.com/watch?v=_SQoS7XAdnE
Good idea… it does mean you need to add a power supply of course and that must not have ground connected to MINUS.. as the relay contacts are still not isolated. but useful non-the-less.
Do you think there is any chance we could convince them to make the contacts isolated like Shelly – my Shelly is happily controlling my heating…
isn’t the connection in image safe “enough”? Just 2 wires connected there, nothing else… yes, external psu, of course… convincing them? That would be nice, but i doubt they’ll do, as they already have some other devices with this functioning, for example the very small RE5V1C:
https://www.itead.cc/smart-home/sonoff-sv.html
https://www.itead.cc/smart-home/sonoff-re5v1c.html
Hi Pete
Personally I’m impressed with Sonoff products, I’m currently working on the project “home intelligence system” I have been doing research to find a suitable controller and other smart devices that can meet the following specifications:
1.control 5- 10 lights circuits using different smart switches
2.connect up to 25A Load
3.can be intergrated with(human manual interface) HMI
4.motion sensor
5.camera
Can you please help me to find reliable smart kits that can be more or less meets above specifications and send me part no.s and contact detials of the supplier in South Africa. Thanks
soon you’ll be able to flash them with tasmota without doing ANYTHING else that loading this linux distro on whatever raspberry, turning it on and turning on a sonoff with jumper on the DIY pins… 5 minutes and you’ll see the sonoff-xxxx access point waiting for you 🙂
https://git.asperti.com/paspo/sonoff-flasher
Good video on the Sonof Mini here… https://www.youtube.com/watch?v=6ez64v_NeM4
Worth mentioning that sonoff mini is esp8285 based.
Yup was a surprise to me too.
almost every sonoff has that chip, can’t remember one with actual 8266… 8285 has memory integrated so smaller pcb footprint
With tasmota, a buck up converter to 5v and a radar module, mqtt and node-red i made the standard light swtich with with the normal terminals but with the addition of a timed person detection, even got the buck into the sonoff mini case! so if you use the light switch it mutes the radar but if you don’t it picks up movement and fires the light on for a minute (retrigerable). the tiny radar Doppler pcb is external but it could be glued to the case, i just find it better to be on a lead for ease of placement. happy to share scetch and wiring if wanted
please, share, yes 🙂
Ok i am preparing a short document
I would love to see that. Is the doc available? Did you not see RF interference between the wifi and the radar? May others seem to have.
Pete – some typos have crept into the page that you might want to fix ” and asie from some ropydesign issues, it WORKS. I changed the name of the Mini from tghe utrterly”
I’ve fixed the blog and updated it, Steve – thanks for that.