In a previous blog item here I covered the use of MQTT, jQuery Mobile and Websockets to make a controller web page for mobile phones/tablets etc. here https://tech.scargill.net/mqttjquerywebsockets-controller/
I showed just a basic and not too pretty page with buttons that would control real items, in my case via Websockets on a Raspberry Pi, firing off MQTT (also on the Pi) to ESP8266 modules (using our own code based around TuanPMs MQTT project).
Well, I’ve been doing a bit more playing around – here’s a better way to make the buttons – but all based on the previous article so you’ll need to read that first. I’ve also added a second page – merely to show you how that is done easily – and you could expand that ad-infinitum – but I’ve ALSO shown how to get information back in from the same web socket as I was asked about this aspect. It’s very easy (there was a time when I was terrified of the subject).
So first of all this time my Node-Red code is slightly different – I’ve separated off the incoming websocket node from the outgoing one – as long as they refer to the same item they don’t have to be joined together.
So in this version – the same code in “process commands” – as instructions from the web page go out to MQTT to control various gadgets. See other blog item.
Here, a Timestamp (standard Node-Red item) pushes out a timestamp every second – and another function converts that into a simple string as payload – which is then sent back, every second, to the web page. Normally you might send JSON data back for further parsing in the web page but in this case it’s a simple string.
Here’s the code inside timeConvert.
var dt = new Date(msg.payload);
var msg = { ‘payload’: dt.getHours()+”:”+dt.getMinutes()+”:”+dt.getSeconds() }
return msg;
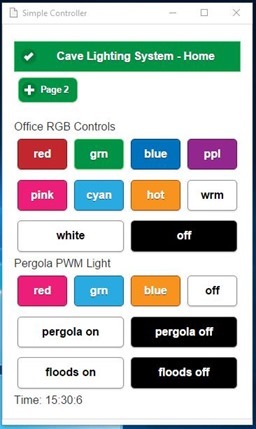
 And so to the web page itself: I’ve improved it some way as you’ll see as I figured out how to get 4 buttons wide (trivial – I just didn’t spot it in jQuery Mobile the last time around).
As you can see it is quite pretty, has a page button near the top to switch to another page (which is empty as yet so I won’t show it here but it will be obvious in the code how it works and how you can keep adding more. I’m not happy about the look of the paging button but it’ll do for now.
Then way down at the bottom left – you’ll see a timestamp – that is coming from Node-Red and is in this case updating every second. It COULD be status information – or anything – but for the purpose of demonstration (and it’s also nice to know that something is actually working by visual feedback like this) it is just a string as described above.
I wish I could figure out a simple additional class to colour these buttons individually instead of making themes for each button type – perhaps someone else could contribute here.
So now this is a quite reasonable control page with the option for more pages (not going to get any more buttons on this page). I did think of having Node-Red return a string with the states of the various outputs and changing the buttons accordingly – but that would not have made for easy reading. Anyone implementing this will soon figure out how to add such functionality. Instead of returning simple text, it would make sense to similarly send back jSon as there is a very easy to use function to split this up.
Recall too from the previous blog that I’ve implemented (in the .htaccess file) simple password protection not shown here and not of much use locally but pretty essential if you want to control from outside.
Here is the web page code for the above, note I’ve changed the name of the websocket to /myapp3 – could have called it anything, really. See the “onmessage” function – you don’t get any easier than this. There you go… https://bitbucket.org/snippets/scargill/AGMq5
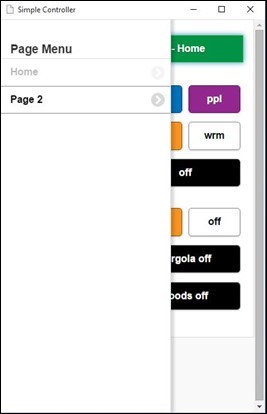
 Update: 23/08/2015 – there is a better way to do navigation in jQuery mobile (I’m still learning) but it seems incomplete. A slide-in-from-the-left menu system is easy to create – but if you try to make one menu system for all pages – there is no formatting – I guess this will be available in a future version – however, replicating a menu system for each page has it’s advantages as you can disable the current page link!
Here is a version with the awful button missing hence saving some space on the page. So this is a little like the swipe side menu in NETIO except I’ve implemented it by touching the top title bar because swiping doesn’t work too well on a PC and you might be testing this in a normal browser!!!
The title bar is sitting doing nothing anyway, so why not.
Actually I like this – on a typical phone you could easily get half a dozen pages and some explanatory text or imagery in that side menu… hell, you could even get some more buttons in there and a logo!
Here you go..


Hi Peter,
Sorry to bother you with WebSocket basics but I struggle to get my head around on this. I try to connect two node-red instances on separate Raspberry Pis on the same network. From both, I can send and receive a WebSocket request to a public relay server. No issue.
Next, I try to turn one of the Raspberry Pis into a WebSocket relay like this:
[{“id”:”68c3545.6fb02ac”,”type”:”websocket in”,”z”:”b4b72adf.e494c8″,”name”:””,”server”:”bc08145.f6d9a68″,”client”:””,”x”:350,”y”:200,”wires”:[[“a223855e.6b7478”]]},{“id”:”a223855e.6b7478″,”type”:”websocket out”,”z”:”b4b72adf.e494c8″,”name”:””,”server”:”bc08145.f6d9a68″,”client”:””,”x”:650,”y”:200,”wires”:[]},{“id”:”bc08145.f6d9a68″,”type”:”websocket-listener”,”z”:””,”path”:”/ws/watchdog”,”wholemsg”:”false”}]
No luck to connect to it from the other node-red. When I try Simple WebSocket Client extension for Chrome to connect to ws:///ws/watchdog it returns “undefined”. If I repeat the experiment by swapping the flow to the other nod-red instance, it’s the same behavior.
Any idea what is flawed here?
Cheers!
This is interesting stuff Peter. I’m following it closely since I am just about to make a decision as to whether to go for a ‘hardware’ touch screen controller or just use an old mobile phone!
Well I’ve sent off for something to do the job – got a sample coming shortly – downloadable WYSIWYG development – but that’s for local use to show thermostat, time etc, I think websockets as I’ve implemented it is a good start – you don’t have to use their buttons – you could make your own – or I’m sure before long I’ll find a decent easy to use DIAL to add in to fire back info…. it’s a shame really that the guys who made NETIO have really slowed down on it – presumably because of disappointing sales – they could easily have implemented MQTT by now and a load of new buttons etc…