FriendlyElec just sent me their latest SBC – strangely I’m currently working on the R5S with FriendlyWrt (OpenWrt) and struggling a little with our brilliant idea of converting one LAN port into a second WAN port – worked for 2 weeks then stopped – my friend Antonio and I have been working on this – his installation has been very reliable but he used an earlier version of FriendlyWrt – so the jury is still open as to why mine gave up.
Meanwhile the R6S arrived in the post this morning. How do I tell the difference? The shipping box. I can see no difference on the case that came with my combo version of the R6S.
The R6S came with 8GB RAM and 32GB eMMC – (the R5S came in options of 2GB and 4GB RAM) you can program it from an SD (or in fact run from an SD) and it needs a power supply typical of modern mobile phones – the QC variety that delivers from 5 to 20v.
The R5S and R6S sensible accept this voltage range – unlike the venerable Raspberry Pi which is picky about input voltage – this is handy as it means I can use any of my USB-C output power supplies 🙂
Of course – with SBCs like this – it’s all down to available software and I’ve been looking at the FriendlyArm downloads page already. See for yourself, there seems to be plenty of options.
When I was playing with the R5S we tried various operating systems – I may well stick with FriendlyWrt for now with this one – but let’s see how this develops. First things first….
The R6S arrived in a box inside a box with nothing but the packing note and DHL rip-off tax receipt – I HATE paying duty – nothing more or less than protectionism. It’s not as if the Spaish could make their own microprocessors – their not made of meat. cheese or olives so no chance.
Anyway the price of the unit works out not a lot different to a Raspberry Pi at current pricing for the latter and this board has 2.5Gbps WAN and a pair of LAN outputs – one of which is also 2.5Gbps (and hopefully by the time I’m done, 2 WAN inputs and 1 LAN output).
Next – power on and see what happens – the board has an HDMI output as well as a USB 3 and a USB port. There’s also a slot for microSD, 4 indicators and a reset button – just like the R5S. You can get all the specs on the FA page so I’m including just the highlights here.
The processor is a Rockchip RK3588S quad-core A76 + quad-core A55 and the HDMI 2.1 output can play H.265 8K video at 60P etc. Operating systems include FriendlyWrt 22.3. Ubunucore, and Debian Desktop with hardware acceleration. OH, this is new, there’s an IR receiver built in. Like the R5S combo, the case is a nice, black aluminium solid job.
I could see this running Debian or Ubuntu for media work – it’s certainly powerful enough – but I’m going to go out on a limb and try the Docker FriendlyWrt first.
There’s plenty of support for WiFi just as happened in the R5S but only a small number of drivers pre-installed.
Looks to me that the official images are the same as those for the R5S.
Android 12 on the R6S
Meanwhile – I noted that both Android 12 and Android TV images are available – so not being a fan of Android TV (often restricted) I installed Android 12 onto an SD and hence into eMMC just by inserting the SD applying power and waiting. Not only did Android come up but it has the Playstore. I soon realised the WAN connection wasn’t going to be suitable so I plugged my network into the first of the two LAN connectors – so within seconds after plugging in my usual USB Android TV air-mouse, I’d downloaded YouTube and checked it at 4K – no problem. Then I grabbed Amazon Prime Video – that works – put my credentials in – no problem.
Of course as this was a basic Android 12 with no frills, no Netflix and the APP store hasn’t had Netflix for ages – so off I went looking for Aptoide TV in Chrome – grabbed that (v5.12) – opened in file manager and searched for Netflix. I grabbed Netflix 3.6 and Voila – Netflix… again, very high quality…
Before I went any further, it just so happens that Microsoft Launcher is my favourite launcher which I use on my regular TV box (Ugoos) – so I grabbed that from the Playstore then set my location to UK and search engine to Google.
Next, my favourite VPN followed by BBC iPlayer. Would I swap this for my Udoo Android box? No. There is a slight judder on some YouTube videos and I’ve also noticed SOME YouTube videos refusing to go above 240p – despite knowing that they were produced at higher resolution (Supercar Blondie for example) – right now, no idea why this happens.
This of course is little more than could be achieved with the earlier R5S – just faster.
FriendlyWrt on the R6S
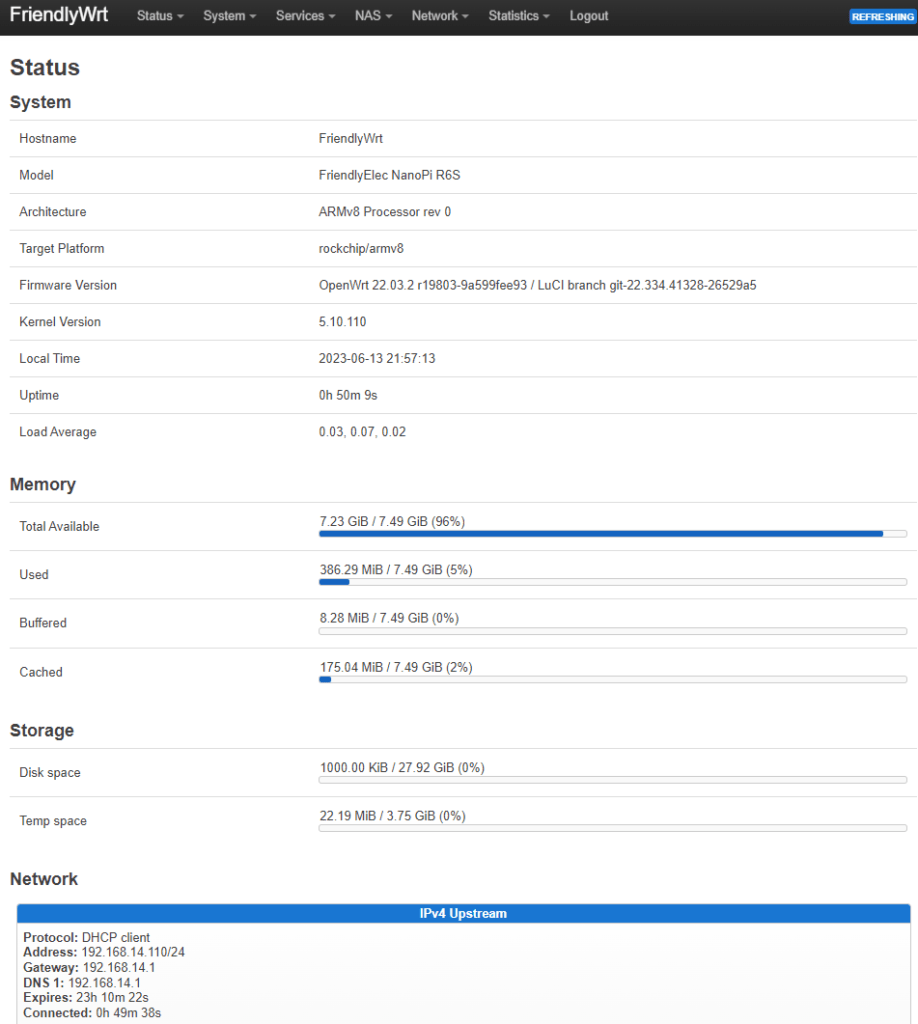
Well the starting point was easy – the R6S came with FriendlyWrt pre-installed – I plugged the WAN input into my router and LAN1 output to my PC and I was immediately up and running and able to do more on this blog entry.
At this point I got sidetracked and installed the Nano editor.
opkg update
opkg install nano
I then installed shadow-chsh from the package manager and curl needed an update to libcurl – just in case I ever needed CURL…..
FriendlyWrt (OpenWrt) with Multi-Wan
And so it was that after faffing about with Android only to realise that my UGOOS Android box does a better job than the R6S, I started re-thinking FriendlyWrt. Firstly I grabbed the older R5S and installed FriendlyWrt on that – then with my friend Antonio, we made the necesary changes to turn one of the LAN outputs into another WAN to enable Internet with failover – i.e. 2 WAN sources with automatic switching between the two.
That worked well on the R5S which has very little RAM and can’t really do much more. I used Speedtest on the LAN connection from two 4G inputs (from 4G routers). Speed was OK but not as fast as my normal GL-iNet routers. On a whim I decided to try the R6S to see if there would be any improvement.
I did see an improvement, putting the R6S output on a par with my GL-iNet routers – i.e. good. In the end, because of the increased RAM and eMMC storage of the R6S, it made sense to use the DOCKER-equipped version of the FriendlyWrt software available on the FriendlyElec site – and already I’ve installed my first Docker container (Jellyfin Media player)… but that’s another conversation. For now, here is the complete guide that Antonio and I put together for installing the software and making the configuration changes to make a FriendlyWrt-based R6S complete with multi-WAN, Docker and other facilities.
This took a lot of putting together – Antonio knows far more than me about OpenWrt, I’m good at creating readable materials for a blog – so here it is – enjoy. It looks more complicated than it is.
Setting up the R6S (or R5S) to be a dual-wan router using 2 separate WAN sources (for example a standard Ethernet modem and a 4G router – perhaps the second is a backup?) is not difficult given this guide – This will readily change the R6S or R5S from having a single WAN input and 2 LAN outputs to having 2 WAN inputs and 1 LAN output…
These instructions apply to the R6S and the R5S, I suggest getting the FriendlyWrt image from the relevant section of their DRIVE for the respective devices.
Install the latest (at the time of writing) Friendlywrt 22.03 from FriendlyElec’s Google Drive:
https://drive.google.com/drive/folders/14-INOxjPQ-b-3_EvWSk-WARlngVYqWhT
Follow the instructions in the link below to install from sd to emmc:
https://wiki.friendlyelec.com/wiki/index.php/NanoPi_R5S#Option_2:_Install_OS_via_TF_Card
With a source of Internet connected to WAN on the R5S/R6S, connect a PC to port LAN2, you’ll get an IP address in the 192.168.2.x range by default, point your browser to 192.168.2.1 with default user and pass: root, password (change password but not necessary at THIS point).
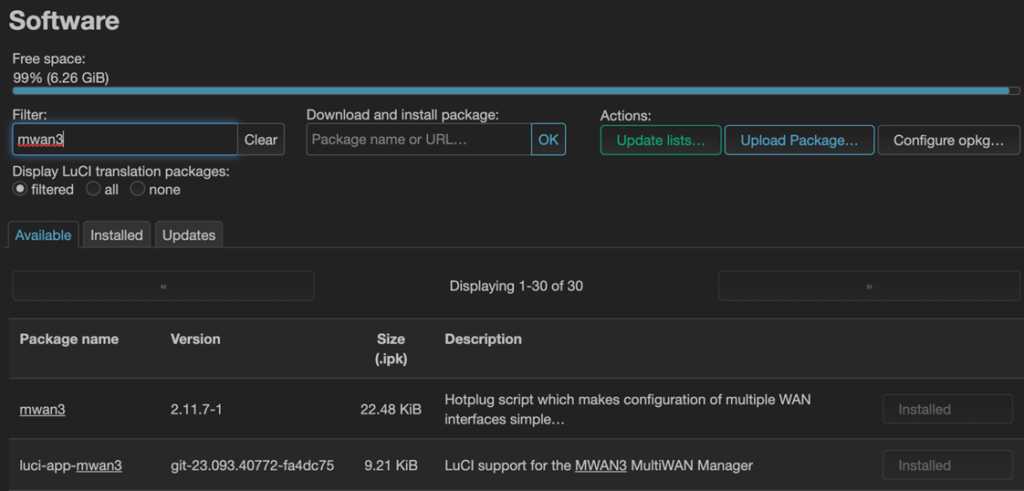
After logging into the 192.168.2.1 web-page in your browser, go to system, software, press update lists, then filter for mwan3 and install the mwan3 package then the luci-app-mwan3 package (you can install additional language packs when asked, too, we didn’t):
Logout and login again to enable the new MWAN3 addon.
Go in network, interfaces, devices, select the br-lan interface, and remove eth1 from the bridge to make it free to become a new wan port:
Back to network, interfaces, interfaces, edit the wan interface and under advanced settings, set gateway metric to 10 as in the image, then save it:
Important: Before continuing, be sure to change the network classes of the 2 wan interfaces…(nothing to do with the R5S – just make sure your 2 sources are different address ranges) – in our setup we have wan1 set as 192.168.100.1/24 and wan2 set as 192.168.14.1/24, while in the R5S/R6S, LAN will be 192.168.2.1/24 by default with a DHCP server. Just ensure it is different to either of the WAN sources.
In network, interfaces you can remove the wan6 interface, too, if you wish… then you should add a new interface, call it wan2 (if you change it, remember the name, you should use the same in the following steps, respecting lower and upper case). In edit for the new wan2, set the protocol to dhcp client, and select the eth1 port you freed above.
Reboot and ensure all changes were saved.
In network, interfaces, wan2, edit, advanced settings, be sure to set gateway metric to 20 in this case (the higher the number, the lower the priority compared to the default wan interface).
In the firewall tab of the wan2 interface (network, interfaces, wan2, firewall settings) , select custom and write the same name of the interface, wan2 in this case, to create the new zone, Be sure to press SAVE after you put “wan2” into the custom box…
And in the dhcp server subsection, set to configure, you want “ignore interface” ticked.
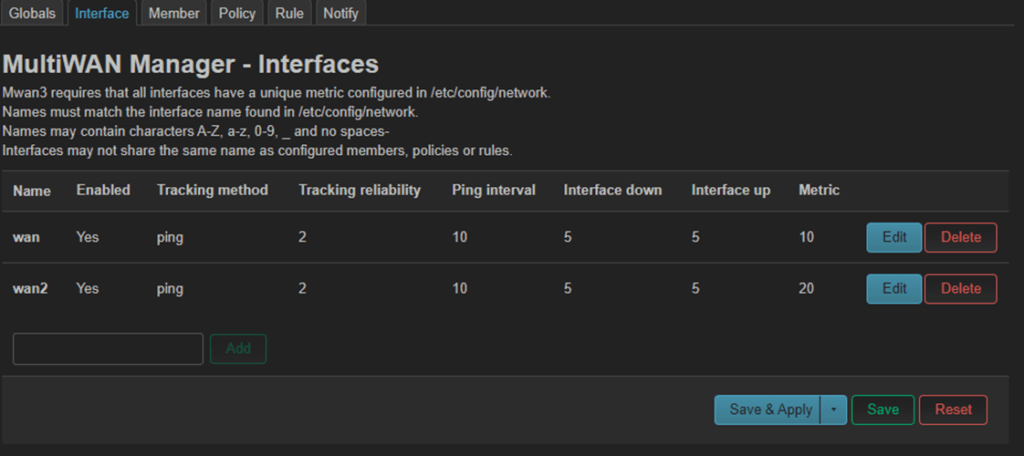
Now go to network, multiwan manager, interface, remove everything and add these 2 interfaces below, set these values (AGAIN, be sure to name them EXACTLY as the interface you created earlier).
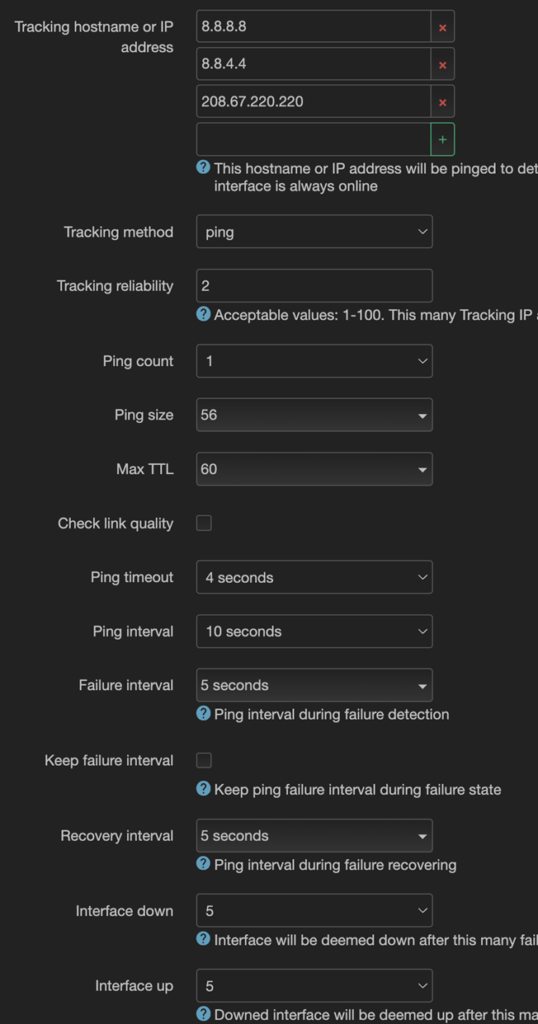
When you press add after naming them, enable them, go to the bottom, if you don’t see the metrics auto-detected from the corresponding interface, then you named them incorrectly… repeat until you see 10 for wan, and 20 for wan2.
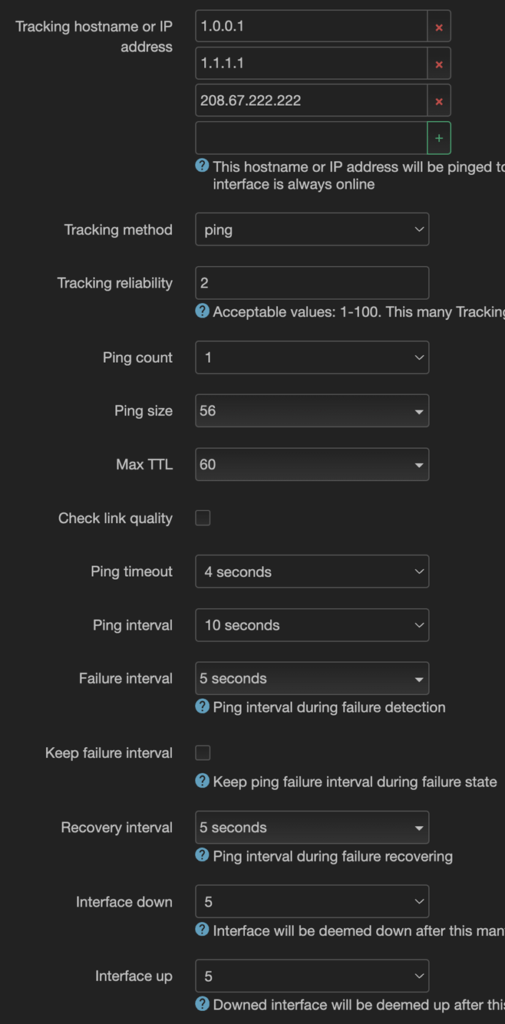
Set wan with these values below:
and wan2 with these below:
In network, multiwan manager, members, remove everything and add 2 new members with these values:
In network, multiwan manager, policies, remove everything and just add 1 policy, name it wan_to_wan2:
In network, multiwan manager, rules, edit each of the rules and leave just these 3 below, selecting the policy you just created on the bottom of each:
In network, firewall, general settings, zones, you should see the new wan2, but edit it as in the image (some reject/accept need to be changed, and masquerading ticked)… also, edit the lan zone and add the wan2 port as a destination there, too:
Done. To test multiwan failover, go in status, multiwan manager, and check the logs and other things:
Now is a good time to do a backup (system, backup/flash firmware)… Save the backup locally on your PC and when restoring from a fresh FriendlyWrt image, you should remember that the backup is CONFIG only, not packages, so restore the fresh FriendlyWrt, then install the two MWAN packages as before, then run the restore – the board will automatically reboot.
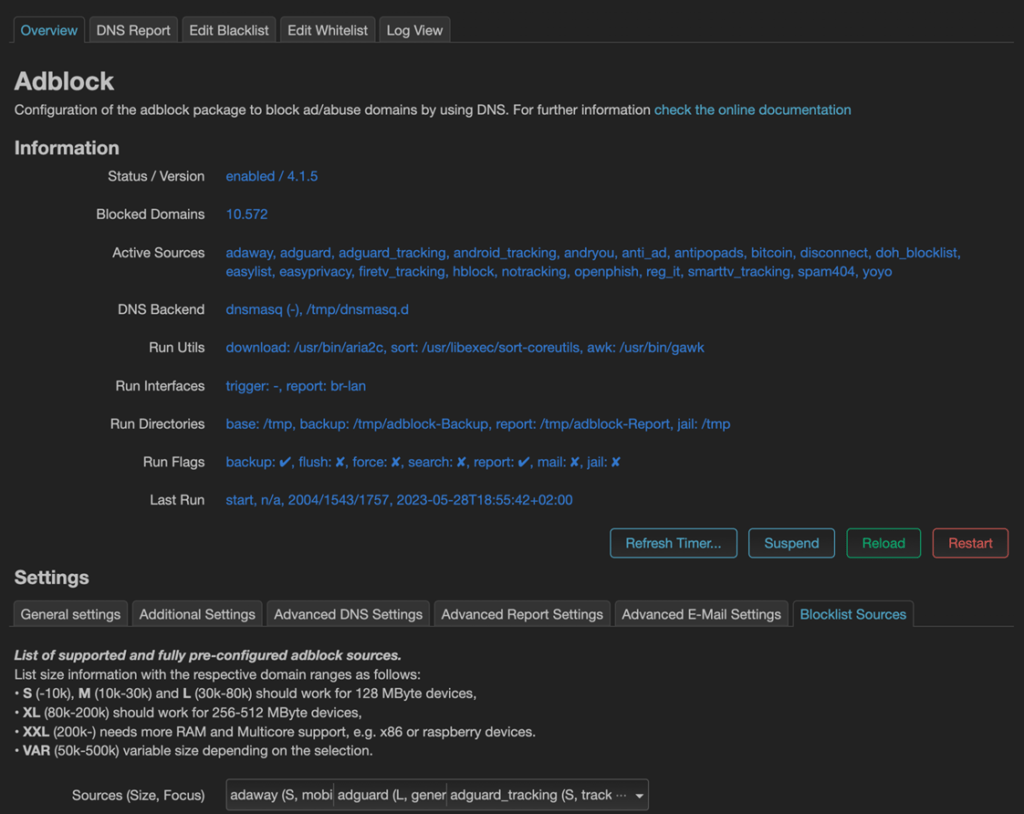
As an optional bonus, in services, adblock, blocklist sources, sources, we selected all the ones listed below:
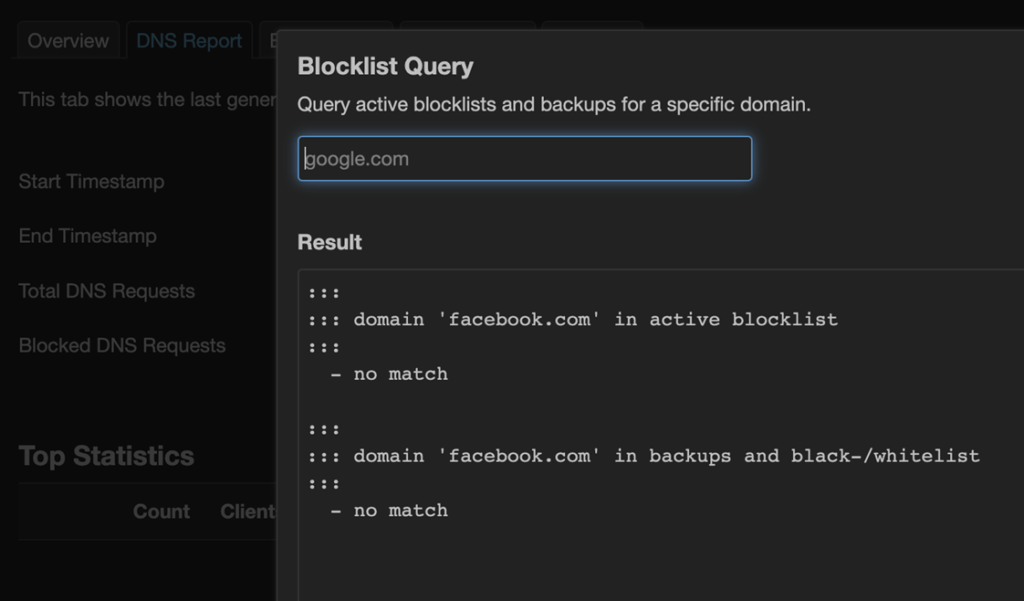
Be sure to check in subsection dns report, blocklist query if after enabling any list, some sites become unreachable:
We’re done. For me at least, this was well worth learning. Nothing is left to your imagination here.
I’ve not covered adding WiFi to this router as I did not need it – the WiFi is not WiFi 6 so for me it was easier to stick a cheap Gl-iNet travel router on the remaining LAN output – which adds WiFi 6 and a number of LAN ports. In theory I could have converted a GL-iNet router to dual WAN but there is no single source of information on how to do this – and anyway – this way I get a JellyFin server thrown in. I imagine thanks to Docker I can also put several other things on this device – it has enough memory and power.


