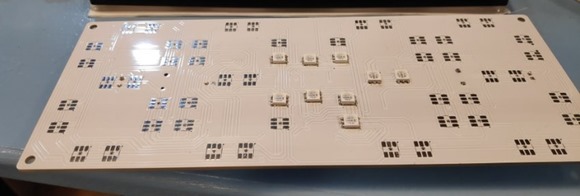
If you know me, you know I’m a sucker for pretty colours, which is why I had to have this Geekcreit Large Size Rainbow Colour Clock DIY kit. I kind of glossed over the kit bit when looking at it, but never mind, I’m up for a challenge (and if you think that a couple of SMT chips and a shedload of SMT LEDs is no challenge, I invite you to try it in your mid-60s after a couple of serious operations).
Enough blether… I need to build this.
That’s a stock photo – I’m about 20% through putting the LEDs in and I’m still baulking at the thought of putting the larger IC on the board. Now waiting for Banggood to come back with which resistor is which. My good pal Aidan is popping over this week to give me a hand with the big chip.
More later….
Geekcreit® Large Size Rainbow Color Clock DIY Kit — https://goo.gl/vEn8Mc
More Geekcreit Tech — https://goo.gl/6QzQDy


I found it difficult to assemble, even though I have air guns etc. But, it worked first time, if not properly. Three times I had it apart to reflow LED solder joints, but it is fine now.
Do I need another? No… Would I like to build another? Yes… 🙂
I’m seriously considering one. I’d like something that I could repurpose to act as an alarm for middle-of-the-night power cuts, and this looks like a convenient way of getting a large multi-colour display even if the original chip is binned and replaced with something Arduino-class. Might also try to read the original firmware…
The resistor values are in that document or (Peter?) are there additional problems?
My interpretation of the photos etc. is that the chip is preprogrammed and inaccessible (i.e. no USB serial port etc.)- can anybody confirm? Even if it is it looks like a useful display which could be tacked onto- as somebody suggests- e.g. an 8266.
At this point I (unusually) gave up but if anyone has had success feel free to discuss if it helps anyone else.
HI, I SURE HOPE YOU CAN HELP ME. I NEED TO KNOW WHERE TO PLACE THE RESISTOR’S.
I SPENT A LOT OF TIME SEARCHING LOOKING ON THE INTERNET, THERE IS A LOT OF INFORMANTION ON EVERYTHING BUT EXEPT WHERE TO PUT THE RESISTOR’S.
LOOKING FORWARD TO HEAR ANSWER.
I could not get that either and ended up putting the project in a cupboard, unfinished.
There is a manual on Banggood for this product, however I have attempted to build 4 of them and I have had no success. I’m wondering if there’s a design fault in the board or something of that nature.
http://files.banggood.com/2018/07/1323917.doc
(Manual)
I have to say, Banggood have generally been very good to me, but this one, I could find no reference to the resistors and got no response on asking so I gave up with it.
On the subject of the clock kit does it ‘remember’ the time or do you have to reset it if it gets powered down?
I’ll tell you that after I get it working.
Hi Pete,
I found the easiest way when soldering surface mount chips was to ‘flood’ all the pins on each side with a large blob of solder, then use Solderwick to take off all the excess, this left a nice clean joint. It worked for me!
Another nice way is to tack two corners and ensure the pins are aligned and then run some tacky flux along the pins and use a wide 3mm but with a flood of solder on the tip. Drag it along the edge of the pins and hey presto, a clean set of soldered pins, which if you keep a steady pace, leaves no solder bridges to clean up. Works great for 0.5mm pitch SMD processors with heaps of pins. Clean up the flux with isopropyl alcohol. 🙂
I wish I had your confidence Dave, this particular chip, the pins are half-under the chip. If I mess up, clearing the shorts between pins could be painful if not impossible… Aidan’s popping over to give me a hand tomorrow. No rush as I’m still awaiting a response from Banggood as to which resistor is which.
Tell you another way that works if you have a hot air pen. Flood full the solder pads with your iron and some extra flux. Try to get them level. Place the IC and align it. Use hot air from above being careful to not blow it away. Might need something to hold it down for a few seconds until the solder melts. Move the air in a circular motion and after a few seconds you should see it pop down into place. I do this all the time with STM32F405RGT6 with 0.5mm pitch. Best method i’ve found so far.
And the killing question : is that hackable ? 😀
Have you identified the chip on it ?
Nice
Could you post some photos of the build as it is on-going?
Yes indeed.
“It is basically no difficulty”
Microphone?
Calling out for an esp8266 to get the time?
Thank you. I must have this.
http://files.banggood.com/2018/07/1323917.doc
No difficulty as long as you are happy with SMT soldering. Yes it has a mic.