There I was, messing about with GPIO pins on my Raspberry Pi 3 B+ recently and as usual could not remember the pin numbers. I stumbled on this image below – thanks to @pinout for this handy Raspberry Pi connector layout (see link to Raspberry Pi site further down) and to readers for links for prototyping boards. Indeed this started as a simple entry and is rapidly filling up with REALLY useful content and comments.
Anyone not familiar with this should note that on the PI, I2C when used, usually works with BCM pins 2 and 3 (real pins 3 and 5) and unlike some other boards used as i2c masters, you don’t need pull-up resistors. I thought I may as well pin the connector here rather than on a piece of paper I’ll likely lose.
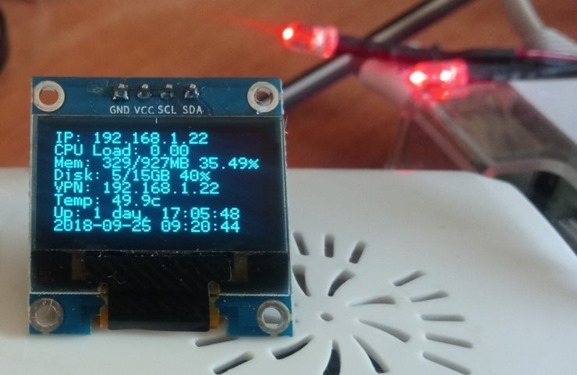
I’ve just been setting up an I2c display (128×64 pixel SSD1306) on my Pi software, running “the script” to control various IOT (ESP8266) devices. The display runs under Node-Red but this is merely turning the display on and off, the controlling software is a little Python program (Node-Red is accessing the display via an “exec” node).
Meanwhile I’ve added a couple of indicator LEDs using BCM pins 17 and 18. Normal Raspberry Pi indicators are OK in a transparent box, not much use in a non-transparent plastic case of course. It did occur to me that I’ve never seen a Node-Red node or function code to run an SSD1306-based display directly in Node-Red. Anyone out there done this?
How about some command-line parameter driven C code (for speed – as both NR and Python are interpreters). I have some such code running on ESP-GO on the ESP8266 but not on the Raspberry Pi.
I’ve been brushing up on my (pretty basic knowledge of) Python to get that handy (and cheap) display on the Pi. Note those SSD1306 OLED boards cost a wopping £1.60 or thereabouts from AliExpress. Why pay more.. Depending on your code, up to 8 lines of clearly readable text. The “up” line uses a Python built-in function to return the board up-time in a readable form – no effort involved.
And as you can see, the comments section is rapidly filling up with RPI adaptor plates and boards… this entry is going to be a useful resource. Thanks to all of you – and in particular Darren and Antonio this morning for triggering me off – MORE prototyping boards – AliExpress.
Raspberry Pi 3 Prototyping Board, compatible B+/A+ Model HAT Hole Plate Prototyping Board
On the subject of pinouts – see this useful page and resource on the Raspberry Pi website: https://www.raspberrypi.org/documentation/usage/gpio/
Command-line command “pinout” for example. Thanks for that, Antonio.
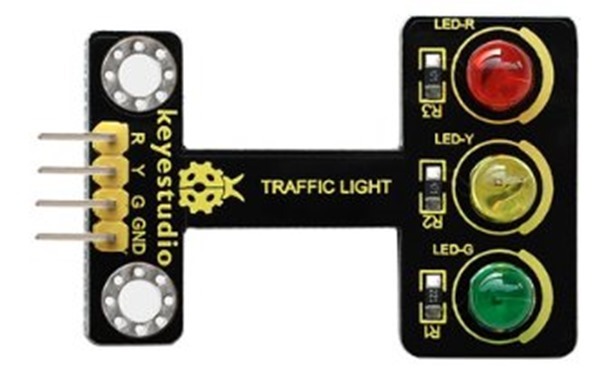
This caught my attention: Keyestudio LED Traffic Light Module 5V (Black and Eco friendly) For Arduino/Raspberry Pi
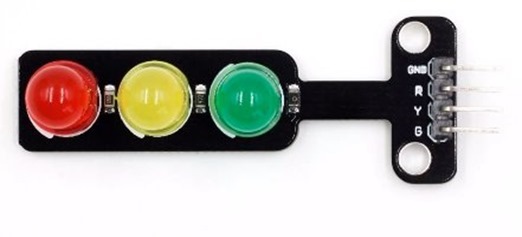
I just ordered some of these… even cheaper – 72p inc post. Mini 5V Traffic Light LED Display Module for Arduino Red Yellow Green 5mm


What about push-buttons AND leds 😀
https://www.aliexpress.com/item/4-4-Matrix-Array-Matrix-Keyboard-16-Key-Membrane-Switch-Keypad-for-Arduino-4-Separate-keyboard/1741346522.html
seen those but not added to comments because i think they’re some way multiplexed or use a resistive matrix, instead of having directly exported pins like my 1st 2 items (the 3rd one i think it’s like yours…) 🙂
usually when prototyping you need few buttons, each directly connected to gpio… even hardware debounce like the capacitors in 1st item can not fit your sketch, if you’re doing software debouncing…
well, of course it depends on each case scenario 🙂
and if you need not only LEDs, but also some buttons while fast prototyping, here it is! 4 in a row!
https://it.aliexpress.com/item/1×4-4-Tasti-Tasto-5-Pin-Tastiera-Tastiera-Modulo-Mcu-Board-for-Arduino-Studente-di-Design/32864163072.html
or 8 in 2 rows!
https://it.aliexpress.com/item/2×4-Tastiera-4×2-Tastiera-8-Push-Bottoni-V1-00-Chiave-Scheda-Matrix-Tasto-Della-Tastiera-per/32854562709.html
or even 4×4! 🙂
https://it.aliexpress.com/item/Smart-Electronics-8pin-4×4-4-4-Matrix-16-Keys-Button-Keypad-Keyboard-Breadboard-Module-Mcu-for/32488741954.html
cheap alternative, unfortunately with male headers instead of female, so not directly pluggable on gpio: https://it.aliexpress.com/item/Mini-5-v-Semaforo-Display-A-LED-Module-per-Arduino-Rosso-Giallo-Verde-5mm-HA-CONDOTTO/32913798743.html
At that price, even including postage they would make very nice LED’s in equipment panels provided one can drill the holes on the correct pitch.
Nice find.
you can have any (small) size you want, using step drill bits 🙂
https://it.aliexpress.com/item/Vastar-3-pz-HSS-Acciaio-Titanium-Step-Drill-Bit-3-12mm-4-12mm-4-20mm-Passo/32855749324.html
Those step drill are useful and I’ve had a set for years as my first career was in precision engineering. One of the many advantages is that they actually cut a very nice little radius / chamber on the hole immediately before the next step up in size. Best used in a pillar drill for good control and squareness.
I like the humour Darren! Led’s can also be fitted without the bezel using super glue and a 3 or 5 mm drill bit. I use my CAD system to draw the hole positions accurately as a cross then print on a piece of paper which I stick it to the box to be drilled. I then mark through each hole centre with a sharp scriber to get an accurate start for the drill. Using, say, a 2 mm drill first then a step drill as shown above.
I went old school and did my own traffic lights for status indication on one of my many Orange Pi Zero units. Simple standard LEDs, easy to drill a hole for a standard LED and bezel. I have loads of standard LEDs otherwise, if I was being creative, I could have utilsed a bi-colour or RGB LED and brought it into the 21st century a little.
The hole for the WiFi antenna mostly for comedy effect – the OPi Zero now has a face and looks like it’s smoking a pipe – maybe the robot love child of an Orange Pi SBC and Popeye the sailor man?
I’ve also been known to glue a smaller led to the inside of a case on a ventilation slot. You can’t see the LED from the outside of the case – until it lights up. That can work quite well. I favour blue LEDs for that purpose – often WiFi status or error LEDs on sensor nodes in my home automation setup where I don’t want to draw attention to the LED (or if I’m too lazy to cut a hole).
I’ve also been known to glue a smaller led to the inside of a case on a ventilation slot. You can’t see the LED from the outside of the case – until it lights up. That can work quite well. I favour blue LEDs for that purpose – often WiFi status or error LEDs on sensor nodes in my home automation setup where I don’t want to draw attention to the LED (or if I’m too lazy to cut a hole).
and some nice semaphore-like led indicators, directly pluggable on some gpio
Oh, I NEED these..
i was going to buy one of these… to attach somewhere for a BIG visual reference of something 🙂
i’ve NO “WAF” to comply to 😀
https://it.aliexpress.com/item/Free-shipping-HNTD-Semaphore-TD50-220V-LED-Indicator-Lamp-3-Color-Fold-type-buzzer-often-bright/32506983712.html
If you have some Wemos D1 protoshield and some 10mm LEDs, they just fit there nicely, with space on the back for the needed 330ohm resistors 🙂
Good work – almost a perfect fit. I’ve loads of those WeMos proto boards and the double/triple shields so you have inspired me now …
look at those 10mm LEDs: usually leds have a flat side corresponding to the cathode… in these led instead, red and green are completely round, while the yellow one is flat on 2 sides… so, if you put them as i show in image, they fit perfectly thanks to these 2 flat sides, otherwise you need to file them a bit…
Very nice but as usual with Tindie shipping costs kill the enthusiasm but the Aliexpress version below could have the header changed.
and if you want to go even cheaper, just print a scaled version and punch it on the pins 😀
those little cheap boards are supposed to be used as in image
there seems to exist a “pinout” command line script, that prints the pins
I have a few cheapies similar to this: –
https://www.aliexpress.com/item/Raspberry-Pi-3-Prototyping-Board-Compatible-B-A-Model-HAT-Hole-Plate-Prototyping-Board/32841508808.html
adding a photo, as other comments up here, for easier finding items
Thanks for that – how do I embed IMG tags so that I can post hyperlinked images or do I need to upload them via [Choose File] at the bottom of the comment post reply dialogue?
I hate posting links and would prefer to post images (with hyperlinks – even better) but wasn’t sure of the protocol regarding the use of the ‘choose file’ option.
Don’t know, Peter could answer that…
I’m just posting links in text box and image as attachment via the choose file button… Don’t edit a post containing an image after you publish it, or image will be lost…
Got it sussed (eventually, not without error) – thanks 🙂
https://it.aliexpress.com/item/For-Breadbroad-40-pin-blue-Raspberry-PI-GPIO-Adapter-Plate/32807119959.html
and the cheaper and smaller you can find: https://it.aliexpress.com/wholesale?catId=0&initiative_id=SB_20180924060921&SearchText=gpio+reference
MARVELLOUS – Keep them coming.
https://it.aliexpress.com/item/40Pin-GPIO-Cable-Adapter-Raspberry-Pi-2-3-Model-B-Multifunctional-Cascade-Expansion-Extension-GPIO-Board/32912563810.html
https://it.aliexpress.com/item/Raspberry-pi-3-raspberry-pi-B-GPIO-U-shaped-adapter-plate-V2-breadboard-expansion-board/32850310403.html
https://it.aliexpress.com/item/Alta-Qualit-Raspberry-Pi-3-Modello-B-Piastra-Adattatore-GPIO-Scheda-di-Espansione-Multi-funzione-di/32850755967.html
You beat me to it..
On the international site I found this one as you described originally
Raspberry Pi 3 Model B 40 Pin GPIO Adapter Extension Board 1 to 3 40 Pin Plate from AliExpress
https://tech.scargill.net/yourls/rpiplate1
and this as suggested above..
and again from AliExpress
https://tech.scargill.net/yourls/rpiplate2
https://it.aliexpress.com/item/Raspberry-Pi-2-Model-B-B-T-Style-GPIO-Module-40-Pin-GPIO-Extension-Board-for/32522410752.html
adding some nice adapter which can be found on aliexpress:
https://it.aliexpress.com/item/New-arrival-Raspberry-PI-GPIO-adapter-plate-1-to-3-GPIO-extension-board-for-Raspberry-pi/32393476134.html
I’ve got a few of these – very useful indeed for prototyping and testing as there are so many instances where you need more than one connection to a pin – particularly the power/ground.
There are some great Pi form factory prototype hat veroboard style boards available cheaply from the usual Chinese vendors that I’ve also found useful for semi-permanent one-off projects.
I like the color GPIO used in Tinker Board or the female labelled GPIO from C.H.I.P. 9$ computer. Maybe in the future the foundation decide to improve the Raspberry Pi board.