Or how to assemble a new laser engraver when your only workbench is already full…
Here’s Banggood’s link (no commission as usual – I do this for fun, not to run a business) and a variation on their description. SCULPFUN S6 Pro laser engraving machine, ultra-thin focus wood and acrylic laser cutter, high-precision, large carving area.
And now down to business… this engraver is supposed to use a super fine dot to get more power than usual out of a 5.5w output laser. It does look powerful and the manual – I can’t flaw it.
Constructing the Sculpfun S6 Pro
My thanks to Banggood for getting this to me quickly and now I’ll do the unboxing and building – but for the actual cardboard box (boring). On ripping apart the cardboard packaging the first thing I saw was a protected aluminium plate – I still don’t know what that’s for but I’ll take it.
I opened up the protective foam packaging (which did a great job). I have to say, impressed, great build quality, all metal construction and the complicated bit – the gantry – is already pre-assembled (that’s not uncommon in recent engraver designs
Simple enough (no, really) – 4 main metal supports at the front, gantry in the middle, glasses top left, connectors and pre-built metal panel top right, laser bottom left etc. All the bolts were packaged up, grouped as Step 1, step 2 etc and various tools were provided – I needed exactly one of the tools, but hey, something else for the tool-case.
So what did I mean about my workbench being full? I waited until my wife went off to yoga, emptied the living room table and…
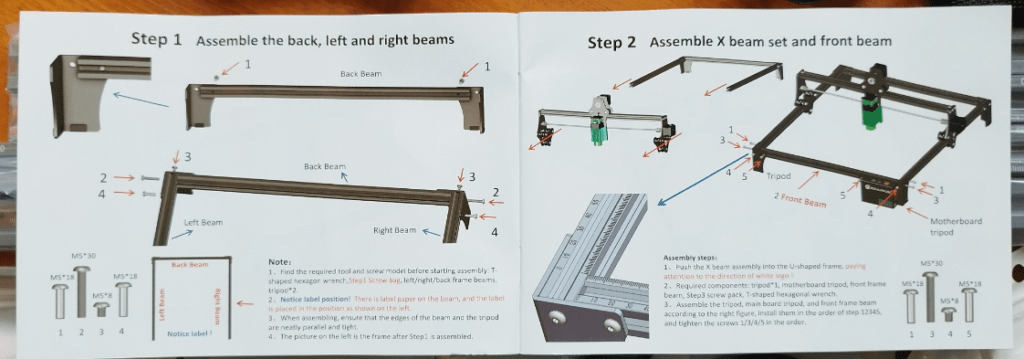
I hope you can read the text in the image above – everything is clearly marked and the manual is in English (not Chinglish) and German and French – good job. Because those bolts are packaged into part 1,2,3,4 it was impossible even for me to mess up – and a separate pack came with spare bolts instead of leaving you to wonder if you’ve forgotten something.
Above, the power supply came with an EU plug and decent length lead. In the middle you’ll see the USB lead. And that laser is BEAUTIFUL, best looking I’ve seen so far and regular viewers will know I’ve looked at quite a few laser engravers over the last few years.
The control box is no messing- just on/off button, power in, USB in and again built using substancial aluminium.
Assembling this unit on a living room table, I struggled a bit with the 4 sides + gantry sometimes using my knees for support (for just a few minutes) – but to put it in perspective, the entire construction operation was over in little over half an hour – no accidents.
Yes, perhaps a slightly bigger table would have been good but “beggars can’t be choosers”. I had a nice, sunny day for the job and it made for a pleasant distraction while waiting for the broadband repair guy to arrive.
The actual 12v laser came with a green guard already attached so when I eventually got around to doing a test I didn’t even need the provided green safety glasses (but don’t take my lead). A spare guard is provided – good idea.
The laser attachment is solid and module to install – 2 finger-tightened bolts, far more convenient than, say the laser mounting on the Ortur LM2 Pro (though that was still easy).
The first 2 pages from the manual are typical of the logical instructions and clearly show what goes where – nothing is left to guesswork though as usual I’m never too sure where you”re supposed to use the last few cable ties – it seems manufacturers don’t like to focus on the wiring of these devices – it’s the messiest part (and often left odd promotional images, though thanks to a pre-assembled wiring loom this was also an easy job….. Best so far.
Next job was the two belts – very easy and I used the same (provided) quality Allen key (with handle) to secure the belts.
The third belt on the gantry was already pre-assembled so these two went together in a couple of minutes – one on each side of the engraver (I’ve shown the right side only here with belt attached).
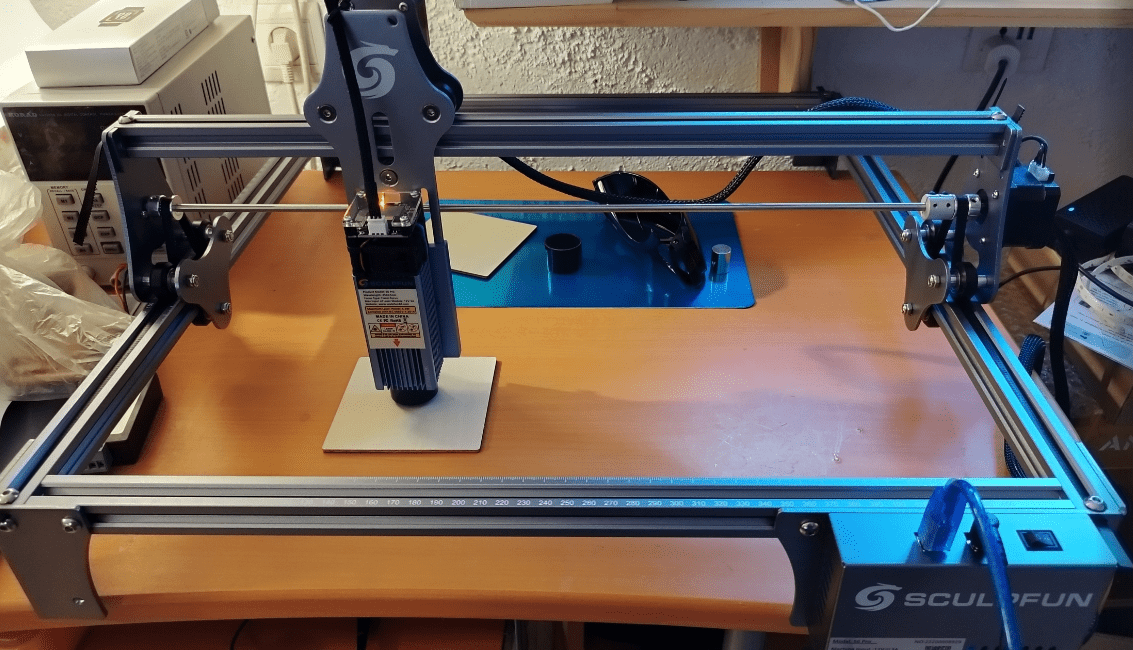
Not a lot more I can say about construction as there just wasn’t much to it – so I’ll end construction with a photo of the gantry complete with laser and with wiring loom in place (only 3 connectors to plug in).
And there we are, one working laser – almost – the unit came complete with adhesive felt pads, handy given that my actual workbench is not much bigger than the engraver – wouldn’t want it to drop off to I added 4 pads to the corner stands.
Using the Sculpfun S6 Pro
After putting a piece of thin plywood onto the work area and positioning the laser by hand in the centre, I took the plung and attached the power leadd followed by the USB lead (other end to my computer). I then powered up Lightburn software (you can user the free LaserGRBL but I’d rather not) – I checked to see if any template for this machine exists – I could not see one and so simply used the settings I’d used on my Oufero Laser 2… I turned the power on – the machine didn’t make any strange noises and I turned on the FIRE button in Lightburn (which I use for setup set to 0.5% power. Everything just worked. There is no auto-homing (not that I’ve seen anyway) and I already had “home at powerup” turned off in Lightburn.
I checked that the power was set to under 5,000mm/min and 75%, 1-pass (from my last job) put some simple text into Lightburn – and pressed START in Lightburn – and that’s it, a short time later I had my first, trivial burn (plywood tends to engrave better after applying Borax as I’ve covered elsewhere and I didn’t have it handy for my first burn) but I just wanted something to show that the Sculpfun actually works for now – it does.
Ignore the outline text at the bottom – I used a really dumb font – the text comes to about 70mm wide in total. I’ll obviously put much more in here over time, but no issues, no overlapping or uneven burning – it looks fine – the big question which may get answered over the weekend is – how well will it engrave and burn wood and acrylic. I have some decent wood set aside for this machine. Oh, the unit comes with a little aluminium gauge to help get the laser height correct, leaving the right gap between the guard and the job (a few mm).
Working area is 410*420mm – I’m not going to sit here and list all the specs – by the time I’ve copied them from the link at the top of this article I’m sure to get something wrong – but one interesting claim is that it will cut through 10mm wood – and engrave ceramics etc.
Elsewhere I saw a spec of “6mm wood & acrylic, cardboard, fabric, wood board, bamboo, acrylic, plastic board” – we’ll have to wait and see – time for pizza and beer. The photo above right isn’t mine – it’s from the Banggood ad… I’ll test that at the weekend sometime, weather permitting..
Up to now, while not having the nice LCD display of the Longer Ray 5, the Sculpfun S6 Pro precision laser engraver is looking good and certainly solid. Some day I’d like to see one of these engravers lit up with LED lighting – oh – hang on – there’s a thought… what’s a few more milliamps…
Day 2 – some actual results
Successes… 3mm very light green acrylic took 25 passes at 800mm/min,100% to go straight through – I didn’t want to go any slower for fear of deforming the acrylic. The same thickness of plywood at the same setting I set to 15 passes – I’m pretty sure it was through after 12.
In each case I was using line mode and acrylic has a tendancy to self-heal so I spent some time experimenting.
Below the acrylic hole you’ll see the previous attempt at 20 passes (in the photos the acrylic looks darker than it actually is). The first attempt resulted in a very clean cut but didn’t quite make it through the bottom. I could probably have improved the focal length to be better at the bottom. The second attempt was perfect.
At first with any new laser you need some experiment materials. I’m sure dark acrylic will be much faster, I may even reduce the strength.
Those holes above (and the wooden and acrylic cut-out pieces) are approx. 10mm dia.


I read the Banggood website that the working area is 410 x 420 mm. So how big of a working table/bench do you recommend to place this unit on?
I can give a quick answer to that: a bigger desk than mine If you have a minimum of 54cm width and 61cm front to back you’ll have a comfortable safety net.
Can you tell me the total height – I’m limited in space and need to see if I can find a box to store it in.
I found the LxW dimensions somewhere to be 520×570, I hope those are correct
I’m also looking at the S9 which has a sharper price until the end of the month (and EU shipping)
Thanks!
Sorry – in an effort to avoid keeping engravers for the sake of it, that one had to go so I can’t confirm the height now. Lovely engraver though.
Fair enough… if you happen to know of more compact models I’m all ears (eyes actually)