
Why Tasmota smartplugs? Well, I have lots of Smartplugs – Tuya, Sonoff and others on WiFi and several on Zigbee. Being unable to open these plug up and reprogram easily means you’re stuck with what you get.
Don’t get me wrong, I’ve used many and I quite like the Sonoff ones – at one time or another they’ve sent me umpteen variations. All of the above WiFi units rely on a cloud connection, at least initially and although they have improved over time so that many now handle for example dusk and dawn which intitially none did. The cloud issue is what some time ago started me looking at Zigbee – but bear in mind that Zigbee requires one or more HUBS or Zigbee2MQTT which in turn relies on a device running that (PC or Raspberry Pi etc).
I’ve been using the free Tasmota firmware since it first came out and from the start, converted my Sonoff smart switches to run Tasmota, the benefits of which I’ll go to in a minute. GREAT but you have to then cut the cord for the device you want to control – and put the small switch block in between the device and the mains plug. Simple fo me – but the wife hates wires and wire junctions even more so – also a pain if you come to sell the device (washing machine, dishwasher, toaster etc etc etc ad-infinitum).

With all of that in mind I took the opportunity to review and hence keep LocalBytes Smartplugs, available pre-flashed with Tasmota… and similarly Athom Smartplugs. Note that as you’ll see in the comments, Athom have changed brand name to IoTorero.. so it looks like AliExpress are selling old stock. Both smartplug types use standard ESP8266 or ESP32 devices – no surprises – easy to upgrade.

I’d show Athom Tech’s logo but as that is now IoTorero – here is the new one…
Before going further and telling you about my latest discovery – what’s the deal with Tasmota? Well, to start with if you buy a smartplug pre-loaded with the free, open source, well supported Tasmota, you don’t need any APP or indeed any kit at all, just a smartphone with a browser – or a PC/Laptop. The plug comes ready to run with it’s own WiFi access point which your phone can hook into.. and in a browser you simply go to a web page at 192.168.4.1
You COULD stop there (not recommended) but in reality the more likely option is that you want the device running on your WiFi router (note: 2.4Ghz WiFi – not 5Ghz WiFi).
So, level 1 of simplicity – ensure your phone or laptop is able to use 2.4Ghz WiFi, turn on the new plug, wait a minute, point your phone to access point named Tasmota-xxx or similar, then go to address 192.1.4.1 (that’s the plug) in the browser. You will then be able to tell the plug which WiFi access point it should talk to at which point it will turn off it’s own. You likely also should get rid of the default name the device comes with. I generally get the plug working on my WiFi first then do anything else on a PC – bigger screen/keyboard) but that’s just me. You’re done. Go back to your normal WiFi or wired connection. The plug will appear on your network.
Level 2 – change the name (washing-machine for example). The default name of the device will be unique but likely boring with letters and numbers – and could be confusing if you have other similar devices.
Level 3 – if you want to get REAL control – add MQTT compatibility if you have an MQTT broker anywhere at home running 24/7… just put in the address of the broker, port numbre (likely 1883) and the broker’s username and password.
I’ll go into more further down but I MUST tell you the POINT of this article…. the point is – Athom and LocalByte smartplugs are NOT cheap, especially once you add postage and depending where you live in the world, duty. This week, I bust my last LocalBytes plug through my own stupidity and when I checked – to buy another would have come to over 20 Euros.
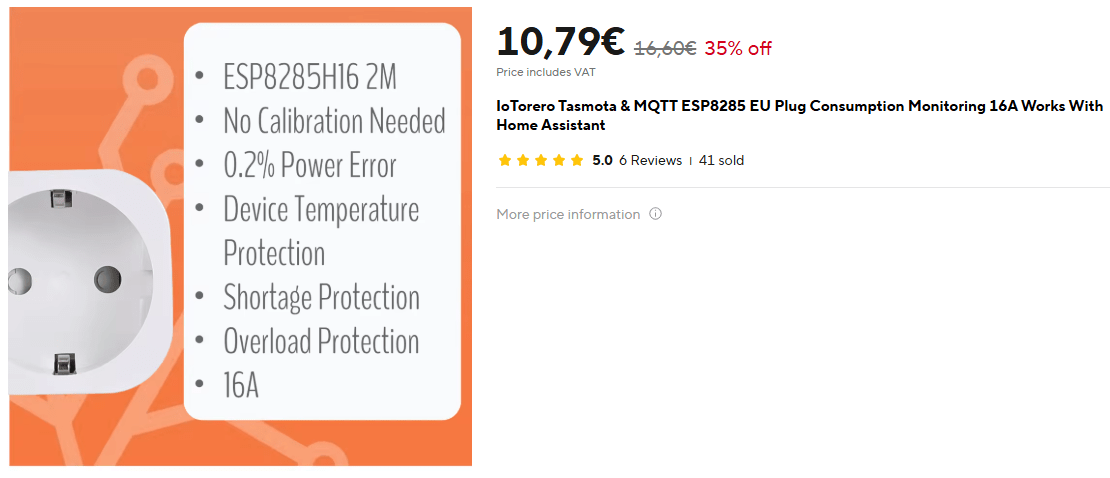
I was just about to press GO when in an idle moment I went off to AliExpress and as often happens – smart plugs magically appeared in front of my eyes. I saw a 9 Euros special (below the minimum spend for specials), a 10+ Euros and a 12+ Euros – all including postage and duty (trust me that is real – I order from them all the time, often stuff gets shipped locally as they have depos all over the world – usually I wait a week or so for delivery). Not just any smartplug but an Athom-branded 16A power-monitoring smartplug from IoTorero (explained above). If you’re on 240v that means over 2KW – so OK for a kettle – I’d stay well clear of the absolute limit with any of these plugs from any manufacturer. Maybe 2.5KW – water heater? Or just a light bulb 🙂
I’ll update this once my first one arrives – all looks fairly normal at this point. But remember – no cloud, no APP – just runs it’s own tiny local website in your browser (the web pages are generic to any Tasmota-powered device) and importantly – going beyond the basics, Tasmota has RULES easily entered on the web page – and much more. Lets take a look at one of my existing plugs:
You can see already I gave the plug a useful name (not).. http://localbytes-pm-spain.lan/
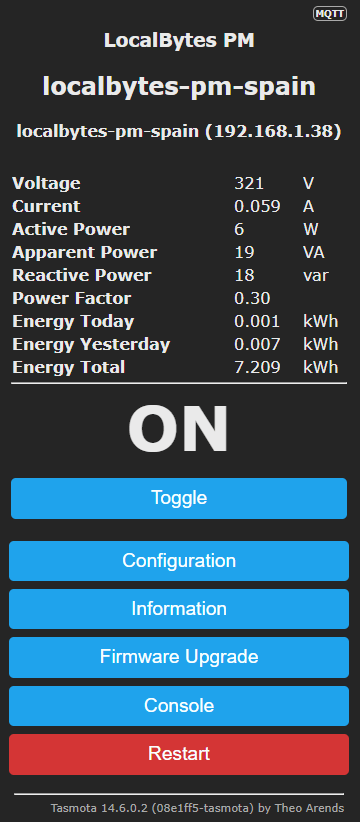
The top line with MQTT on the right is new – Tasmota put that in to clarify that I’ve set up MQTT. The next line is the “friendly name” – the one I referred to as default tasmota-xxx above. As this switch supports power monitoring – several lines then appear which would not be on a non-power-monitoring plug.
Then we have the standard “home page” contents when you go to the plug in your browser. ON is a toggle – on or off – touch or click with a mouse and it turns the output on or off. It’s a “toggle” which complements the real on-off button on the device.
Below that you have the link to the configuration page, the information page, the firmware upgrade page, the console and a restart button to restart the device there and then.
The bottom shows the current version of Tasmota. In May 2025 mine is up to date – the updating is done online and takes no effort and a couple of minutes only.
Next we go off to the configuration page which has many options most of which are not used here – but it is very comprehensive for those who need it.
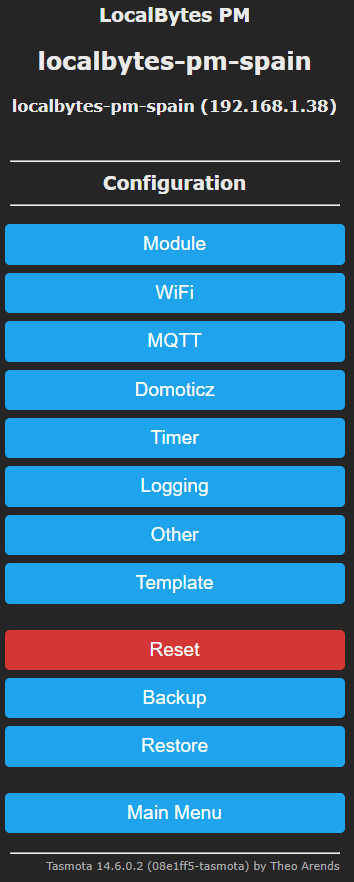
There are several options – module is already preset for the particular hardware configuration. WiFi… in there you set the WiFi access point and it’s password (you can also set up a fallback/secondary) access point and password. Finally you can set the hostname – my example is “localbytes-pm-spain”. That identical name should also be set in configuration – other but see my latest blog entry – all can be done in one line.
MQTT is simple but beyond the scope of this entry as I’m describing a plug that can be used stand-alone.
Timer page – timers are easy to set and clear… up to 16 timers with sunrise, sunset, individual days, on or off etc. That’s it – no month control in here but at another level that is do-able too.
Rules are not easy but I’m going to show you one I added here in the CONSOLE page… it makes this device power up in the ON position and every minute, check my incoming Internet and if it isn’t working – turn the output off for several seconds then back on. It also delays the next check as my router takes up to 2 minutes to come fully back to life after a power cycle. This checking is of course WAY beyond the scope of this article but it is covered in another blog entry here. I’ve written about LOTS of uses for Tasmota. All of this – no cloud, no new APP – same Tasmota web page look and feel for a whole shedload of Tasmota-driven devices – and yes I often integrate plugs like this into Home Assistant. And if you don’t like the colours, you can change those too.
In another article I’ll tell you if these cheap Tasmota plugs are any good.
Athom Tech has changed its brand and is now IoTorero