
And what’s a Shelly Button 1? Not to be confused with the sadly now defunct Shelly Button which was a white plastic case to put around the original Shelly One or similar. I have of course used the Ikea Zigbee Smart button (remember the nice plain button that they stopped producing and I’m wondering if that’s because of the crappy magnetic wall fastening) but that’s defunct. So – I was just getting all upset about that when I stumbled on the WiFi-based, rechargeable battery powered Shelly Button 1 product. Meanwhile my Aqara Zigbee buttons are doing just fine (also battery powered but using a non-rechargeable CR2032 battery).
This article was originally written in February 2022 and I’m updating (end section) in February 2023 while patiently waiting for new products to discuss following on from the recent Covid+Chinese-New-Year shutdowns – and I have to say, Shelly continue to amaze me though my experience with the buttons wasn’t at first a great success – read on… having reviewed their Shelly Plus 1, Plus 1PM and other products (at the time of the first draft of this blog entry) – easy to use and powerful – along came this button.
When I started this write-up, the only things I knew were that the button is WiFi, battery powered, has a USB input option for setup/charging and looks LOVELY. I got the white one – they do black as well.
Thankfully, like all of their products – there is a ton of English-language information out there and you get plenty of information with the device itself. As for set-up, consistent with their other devices, the Button 1 product can create it’s own access point or connect to an existing WiFi network (not .192.168.4.x as Tasmota firmware fans may expect but 192.168.33.x). The Shelly Button 1 has programmable options for MQTT should you choose to go down that route (as I’ve done). I plugged mine into USB (good idea because the built-in re-chargeable battery was at 50% on arrival) and the device created it’s own access point.
I could have gone straight for the APP at this point but chose instead to point my phone to that device access point at which time the phone acquired an address in the 192.168.33.x range. Pointing the phone browser to 192.168.33.1 gave me access to the setup for the button – I set the button client mode to point to one of my home access points and then went to play, updating the firmware over-the-air (OTA), giving it a custom name etc.

At that point I fired up the Shelly APP and immediately I could access the button through the APP. Aside from the multi-function button, that’s about it or so it seemed. I went back to the interface on my phone and was given the opportunity to update the button firmware – and that took some time during which said button was unobtainable.
Not sure why the updating takes longer than similar devices, especially given that the device was plugged into USB, but hey, ho. After 5 minutes of updating I was starting to have my doubts however.
I went off to the PC web interface and sure enough the updating was done.
I’m putting the overly-complicated version of this in purple – initially I had one hell of a time getting the buttons to work – but in the end I got there – if you get bored easily – skip down to the february 2023 update – as this was probably the most convoluted setup Ive ever done on a WiFi device – partly my fault, partly I believe, the APP.
I’m convinced some work is needed on the APP as no matter what I did, the APP continued to say the button was updating over many minutes – way more than the 5 suggested in the instructions. I dropped out of the APP and went back in after which all seemed well. At this point I left the button to charge.
Button options are long-press, single-press, two presses and three presses, pretty much like the Aqara Zigbee buttons.
Next morning
This time, checking the now-charged second button, I powered up the APP and I was asked if I wanted to add a new device – shelly_xxxx – I did, specifying only which access point I wished to use, The new button did not appear in “Office” – my default location, so I went back to “home” and noted “add discovered devices”.
Add to office? Sure, why not. Name? Sure, we’ll call this one “shelly-button-2” at which point I noted the new button was frantically flashing. I pressed the button 3 times in a row to test.

While I was on, I turned on my new Shelly Plus 1PM and pressed the in-APP button to turn it’s output on – but I digress. See pic to the right and note the image of the 2nd button has 3 dots – I like that – indicating that my last press was a triple-press.
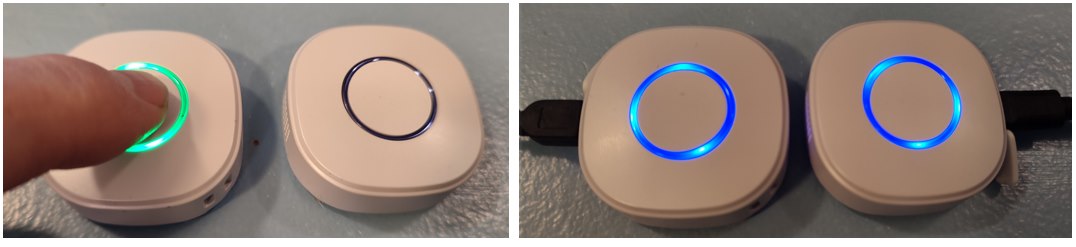
Pressing the button once resulted in a short flourish of white light then a momentary green light before going dark. You can see the result of all this button-pressing above-right – a flourish of light blue flashing followed by a steady green light for a short time. I decided to upgrade to the latest firmware (OTA). This time I noted the new button flashing blue while updating which seemed to be taking several minutes.
The instructions say “up to 5 minutes”. I’m used to Sonoffs taking about a minute but then this is primarily a battery powered device even though I did have it plugged into USB. After 5 minutes+ the device was still flashing blue and the APP still claiming the button was updating so I left them to get on with it.

15 minutes later, the button was still flashing blue and the APP was still claiming the button was updating. A little work needed here and the instructions are a little vague on the subject of updating. It can’t take THAT long…. I disconnected button 2 from USB and reconnected. No longer flashing but the APP still said the battery was at 58% charge – no way – I rebooted my phone. Still 58% but now operating normally. The update had not happened.
As the cloud was enabled on the device I was at a loss. I hit “settings” “device reboot”. Button 2 then flashed then returned to normal. Button presses worked but still 58% – still not updated. I noted that the new firmware available is a year newer than the one installed (2021 as against 2020). I set it off updating again. The button started flashing and the APP said “UPDATING”.
I had to sidetrack and update something on my phone, when I came back 10 minutes later, the battery said 100% but the APP, on hitting “settings” still said “Firmware update available”.
I rebooted the phone and started up the Shelly APP – noting that my SHELLY PLUS 1 said it was offline. Why? Meanwhile, both buttons now said “100%”. Button 1 settings indicated that the old and new firmware were now identical – 2021.
The other button was still on the 2020 update… Oh and after a minute or so, SHELLY Plus 1PM came back online. This is looking more and more like the APP needs work.
Why did one button not give me any of this trouble while the other did? I sent an email off to Allterco.
2 days later – no response from Allterco – so I checked my buttons and there’s been another software update – to ensure the devices responded I plugged them into USB (blue lights on).
In the APP I went to settings – update device – sure enough an update was available – I pressed go and the APP showed a busy circle – updating – I waited for several minutes – the APP showed UPDATING but no change in the blue light on the button (that’s bad – I would have made it do something)….. after 7 or 8 minutes I twigged that something must be wrong – as this happened on my other button I’m becoming increasingly convinced there is something wrong with the OTA update process here.
It CAN’T take THAT long to OTA upgrade a WiFi device. 12 minutes+ – erm, too long. I tried the SECOND button – this time the device flashed on and off as it was updating.
That’s more like it… I left it alone to get on with the upgrade while writing this.. 10 minutes later the APP was still showing UPDATING and the second button was still flashing. The first button was still sitting there with a simple blue light on. Backing out on the APP so I could see both buttons – both had rotating indicators, both showed UPDATING.
Time for coffee. 15 minutes later one button still flashing – one button showing static blue, then both buttons in the APP just stopped saying “Updating”. So I pulled the USB from both – plugged back in – both static blue – time to try again. Both now said 100% battery. Time to try OTA again. Button 1 “Firmware update available” “UPDATE”. “Updating”.
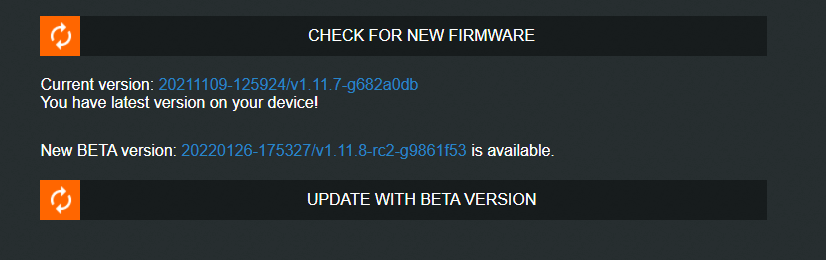
This could not be right – surely? the first button stopped updating after a few minutes and once again “update available”. Meanwhile my PC with Advanced IP Scanner (AIS) was showing 2 devices – same name – kind of – “shellybutton1-89xxxxxxx.broadband” at 192.168.14.125 and “shellybutton1-C4xxxxxxx.broadband” at 192.168.4.185 – the names bore no resemblance to the names I gave either button. Ultimately the APP showed my first button as using firmware “20211109-125924 etc” whereas the latest firmware is “20211109-125831 etc” which I would have taken to be older.
Meanwhile the second button was still showing “20201210-145729 etc” which was definitely a lot older than the new firmware version quoted as “20211109-125831 etc”.
I decided it was time to follow the suggestion in the APP to give these fixed IP numbers… 192.168.14.94 and 95 – would this make a difference? I ran AIS on my PC… the devices came up at the right addresses but now with no names in AIS – just the numbers.
In the APP I looked at the first button – settings – device info – the original IP address was still showing – WHAT? I hit reboot for the device. “REBOOTING” said the APP. Minutes later – still REBOOTING. After a while I was getting bored and told the second device to reboot – the device started flashing and stopped after a few seconds – but the APP STILL showed REBOOTING. I backed out a level and could see both devices showing “REBOOTING”.
Shortly thereafter they both showed “100%” for battery. Time to check again. Now, SURELY I could OTA without issue? Again no flashing light on the first button – the second flashed continuously and the APP said “UPDATING”. With static addresses what could POSSIBLY be causing these issues? BUTTON 1 now showed a web interface on my PC while button 2 continued to flash – minutes later.
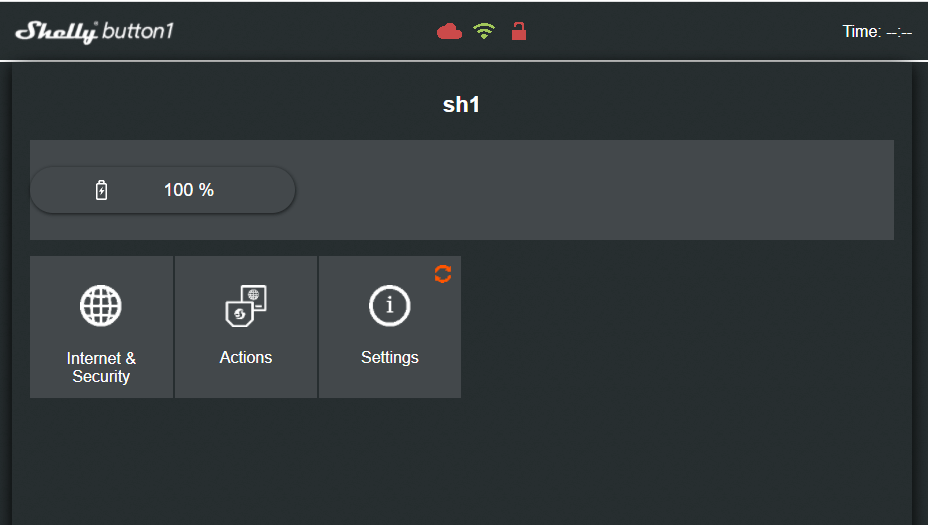
On the PC a very different result to the phone APP – button 1:
Button 2 of course was still flashing – this was another 10 minutes later. I disconnected the USB and reconnected – now a solid blue light. I checked with Advanced IP Scanner – still no web interface on button 2.
Time for factory reset on both devices. I remain convinced there is something wrong with the APP. Both devices flashing – my phone would show both had access points… I gave the first one a static IP of .94 again and the web interface appeared. I started on the second. The device may well have reset to factory settings but the APP still remembered the original device name. Back to AIS. The second device had accepted it’s new name and I could set up the fixed IP address – it stopped flashing – AIS – device 192.168.14.95 there – STILL no web interface.
This was starting to get serious – now looking at the PC web interface, despite only one device showing in AIS as having a web interface, I could see both buttons update both to the latest BETA software on the PC, neither now showed any updates available – yet after a reboot one flashed blue, the other had the solid blue light. Same power supply – same brand of USB lead. BUTTON 1 no access to the cloud, BUTTON 2 had access. That’s why the difference…

I enabled cloud in the button which did had it turned off – now BOTH devices were identical – so much for “restore to factory settings”. Now, NEITHER showed in AIS as having a web interface available yet BOTH worked on the PC by IP. Neither of course were now showing up in the APP.

I disabled CLOUD in both – now both were flashing… so THAT’s why the difference. I checked in AIS. BOTH now showed web interfaces (the little right-facing arrow (below left) in AIS – when clicked goes in deeper and lets you see what access is available on a particular IP address – invaluable tool.

NOW I could add MQTT to be able to read values without USB connected. I did that and disconnected both devices from USB after giving them custom prefixes sh1 and sh2.
Both are now up to date, neither need the APP or the cloud to operate, both are on fixed sequential IPs. THAT was HARD WORK.

So having enabled MQTT on the Shelly buttons and disabled cloud – my local MQTT broker – would it respond to a button press by looking for sh1/# or sh2/#
Hell, no.
But that’s what the web is for… I realised you have to prefix the device name topic with “shellies” – so I had the MQTT look out for (in this case) “shellies/sh1/#” and here we go, press a button and we’ll soon see what came out of the MQTT node in Node-Red:
The result could have contained S or SS or SSS for single-press, double-press or triple-press or “L” for long-press. I did a single-press. The count is auto-incrementing. Timing for multiple presses is a bit finicky and IMHO the default value for long-press should be longer but you can alter these in settings.
Obvious once you get there, but I had a long-haul getting to this point – sorry to bore you (if anyone is still with me). I expect to have lots of fun with these buttons NOW. Plugged in and pressing a button:
05/02/2022, 00:00:19node: c849e4625e32befd
shellies/sh1/sensor/battery : msg.payload : string[3]
"100"
05/02/2022, 00:00:19node: c849e4625e32befd
shellies/sh1/sensor/charger : msg.payload : string[4]
"true"
05/02/2022, 00:00:19node: c849e4625e32befd
shellies/sh1/sensor/error : msg.payload : string[1]
"0"
05/02/2022, 00:00:19node: c849e4625e32befd
shellies/sh1/sensor/act_reasons : msg.payload : string[13]
"["ext_power"]"
05/02/2022, 00:00:19node: c849e4625e32befd
shellies/sh1/input_event/0 : msg.payload : string[28]
"{"event":"S","event_cnt":22}"
What I gave you above was the output from Node-Red debug when the button was already plugged into USB and you press a button – here’s the longer version – the FIRST output BEFORE you press a button after you plug the unit in…
shellies/sh1/online : msg.payload : string[4]
"true"
04/02/2022, 23:59:34node: c849e4625e32befd
shellies/sh1/announce : msg.payload : string[135]
"{"id":"sh1","model":"SHBTN-2","mac":"C45BBE6BADEE","ip":"192.168.14.94","new_fw":false,"fw_ver":"20220126-175327/v1.11.8-rc2-g9861f53"}"
04/02/2022, 23:59:34node: c849e4625e32befd
shellies/sh1/info : msg.payload : string[647]
"{"wifi_sta":{"connected":true,"ssid":"","ip":"192.168.14.94","rssi":-39},"cloud":{"enabled":false,"connected":false},"mqtt":{"connected":true},"time":"","unixtime":0,"serial":1,"has_update":false,"mac":"C45BBE6BADEE","cfg_changed_cnt":0,"actions_stats":{"skipped":0},"inputs":[{"input":0,"event":"","event_cnt":21}], "is_valid":true,"bat":{"value":100,"voltage":4.21},"charger":true,"act_reasons":["ext_power"],"connect_retries":0,"sensor_error":0,"update":{"status":"unknown","has_update":false,"new_version":"","old_version":"20220126-175327/v1.11.8-rc2-g9861f53"},"ram_total":51576,"ram_free":40768,"fs_size":233681,"fs_free":162648,"uptime":0}"
04/02/2022, 23:59:34node: c849e4625e32befd
shellies/sh1/sensor/battery : msg.payload : string[3]
"100"
04/02/2022, 23:59:34node: c849e4625e32befd
shellies/sh1/sensor/charger : msg.payload : string[4]
"true"
04/02/2022, 23:59:34node: c849e4625e32befd
shellies/sh1/sensor/error : msg.payload : string[1]
"0"
04/02/2022, 23:59:34node: c849e4625e32befd
shellies/sh1/sensor/act_reasons : msg.payload : string[13]
"["ext_power"]"
04/02/2022, 23:59:34node: c849e4625e32befd
shellies/sh1/input_event/0 : msg.payload : string[27]
"{"event":"","event_cnt":21}"
and now what comes out when the unit is NOT plugged in and you press a button:
04/02/2022, 23:48:31node: c849e4625e32befd
shellies/sh1/online : msg.payload : string[5]
"false"
04/02/2022, 23:48:31node: c849e4625e32befd
shellies/sh1/online : msg.payload : string[4]
"true"
04/02/2022, 23:48:31node: c849e4625e32befd
shellies/sh1/announce : msg.payload : string[135]
"{"id":"sh1","model":"SHBTN-2","mac":"C45BBE6BADEE","ip":"192.168.14.94","new_fw":false,"fw_ver":"20220126-175327/v1.11.8-rc2-g9861f53"}"
04/02/2022, 23:48:31node: c849e4625e32befd
shellies/sh1/info : msg.payload : string[646]
"{"wifi_sta":{"connected":true,"ssid":"","ip":"192.168.14.94","rssi":-37},"cloud":{"enabled":false,"connected":false},"mqtt":{"connected":true},"time":"","unixtime":0,"serial":1,"has_update":false,"mac":"C45BBE6BADEE","cfg_changed_cnt":0,"actions_stats":{"skipped":0},"inputs":[{"input":0,"event":"S","event_cnt":21}], "is_valid":true,"bat":{"value":100,"voltage":4.21},"charger":false,"act_reasons":["button"],"connect_retries":0,"sensor_error":0,"update":{"status":"unknown","has_update":false,"new_version":"","old_version":"20220126-175327/v1.11.8-rc2-g9861f53"},"ram_total":51576,"ram_free":40596,"fs_size":233681,"fs_free":162648,"uptime":0}"
04/02/2022, 23:48:31node: c849e4625e32befd
shellies/sh1/sensor/battery : msg.payload : string[3]
"100"
04/02/2022, 23:48:31node: c849e4625e32befd
shellies/sh1/sensor/charger : msg.payload : string[5]
"false"
04/02/2022, 23:48:31node: c849e4625e32befd
shellies/sh1/sensor/error : msg.payload : string[1]
"0"
04/02/2022, 23:48:31node: c849e4625e32befd
shellies/sh1/sensor/act_reasons : msg.payload : string[10]
"["button"]"
04/02/2022, 23:48:31node: c849e4625e32befd
shellies/sh1/input_event/0 : msg.payload : string[28]
"{"event":"S","event_cnt":21}"
Clearly for practical purposes you might choose to subscribe to a subset of that output. See shellies/sh1/input_event/0 for example. Personally I’ll also be subscribing to get the state of the battery as well….
Update February 2023
Ok, after leaving the Shelly buttons alone for some time – here’s an update – this time things are simplified. I’m onto update 20221027 (etc) so basically the October 2022 firmware update. I’ve a new phone – I added a button to the Shelly APP no problem and with the button plugged into USB for power (hence constantly on) I was now onto day 2 of using the button with Node-Red on my Raspberry Pi – using node-red-config-shelly. It was just over 24 hours since I charged the battery fully and the APP said 90% – so I didn’t expect fantastic charge time. I was also now looking at the output from Node-Red and seeing “Battery 4.12v” – which seemed like more than 90% to me.
So what was involved in getting the button working in Node-Red with the Shelly node? Very little once I got past my own incompetence. Basically, with the button working in the APP, I first gave the button a fixed address on my network as recommended by Shelly. This can be done by fixing the addresss in the APP or, I guess, by mapping the MAC to an IP in your router – I did the former. I then looked up the IO ACTIONS option in the APP. As one example, for short push, I enabled that action (tick box) and put in “http://192.168.1.19:10000/webhook?data=shortpush_url?0?192.168.1.250” without the quotes.
Why? Well, the 192.168.1.19 is the address of my RPi on my network and the 192.168.1.250 is the address I fixed in the APP for that button.
All that remained was to install the node-red-contrib-shelly node into node-red via Node-Red’s “Manage Pallette” option.
I added a “Shelly Gen 1” node to my flow. In the edit for the node – I selected “Button – Shelly Button, I3” then in hostname entered “192.168.1.250”. In Description I entered “First Shelly Button” – Ieft username and password blank and in “Mode” I used “Callback” and selected server value 10000 (artitrary port number – as long as both the APP version – which ends up in the button – and the Node-Red value are the same and not a port used elsewhere).
For output I selected “Status” and for the retry interval I left the default 5000ms value.
I added a Node-Red function node to the output (nothing on the input) and…
msg.payload = "SH1 Event:" + msg.status.inputs[0].event+" Batt:" + msg.payload.bat.voltage;
return msg;
The result (and this was just what I wanted – you could change this around) I ended up with an output msg.payload to say, for example on a short button press: “SH1 Event:S Batt:4.12”
The key items here are the object values coming out of the Shelly node…. if you’re not interested in the battery state you only need msg.status.inputs[0].event
Easy – but as I said above – it will be some time (hopefully) before I know how long a charge lasts… it is now a week since I started this and removed USB power from the button and now I see battery 4.1v on 14/02/2023 – looking good.
I’ve included a very short video on Youtube to go with this update.
Using my phone to access the button, I first entered my mqtt info and save, then my wifi and save. Opened mqtt explorer on my computer, clicked the button, up pops the mqtt message which gave me the ip address which I then opened in a browser – 5 minutes max. I think they are great devices.