Update February 28, 2019
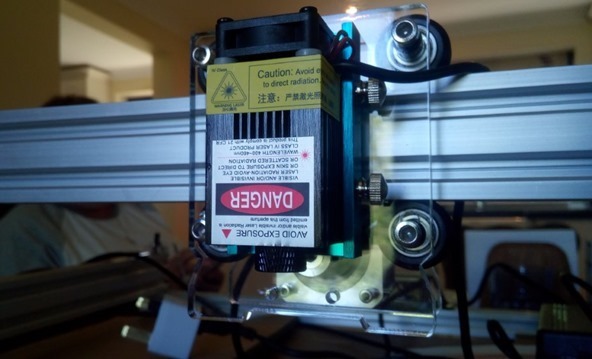
Last year year I put together this excellent A3 laser engraving machine. Originally, a 500mW laser module arrived complete with its own power supply (the laser which was not included in the basic kit). It turns out that was the wrong laser and now I have the 2300mW violet laser complete with upgraded 2.5A power supply. In the photo you also see the (important) green protective glasses that came with the kit.
With help from my friend Aidan who has extensive experience with 3D printers and similar, we’re now putting together some Perspex door signs for bedrooms at Willow Cottage using the Eleksmaker engraver (Sylvan Azure and Occitane are the bedroom names for the door signs).
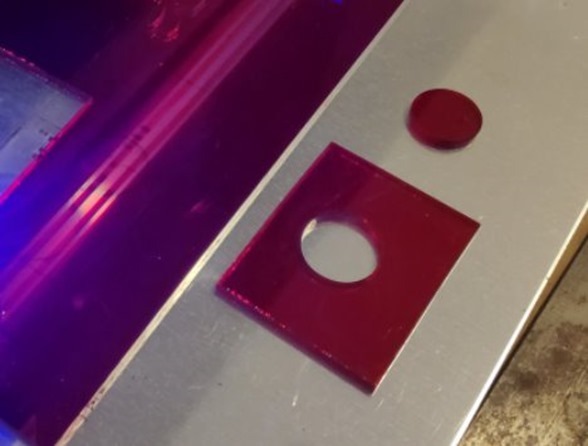
Aidan is using the laser as he has more office room than me (and I need all available hours to work on my software) – we are using the engraver to make the perspex front panels for thermostat wall units – not only does it engrave – it CUTS – CLEANLY. Hole for display, panel to size, triangular cut-outs for the touch-buttons – now I have access to this, I wonder how I managed without it.
See test below – 3mm Perspex..
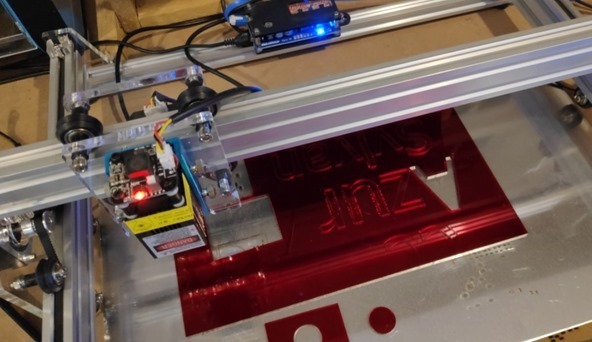
Using Perspex, I was well impressed with the ability to cut straight through 3mm in 4 passes (to avoid melting/welding issues) to cut out the letters.
Here are using 3mm Perspex, blue and red, also some black with white veneer on both sides. For the red letters for Willow Cottage, we are doing 4 passes at 100% on the LightBurn (v 0.8.04) PC software.
EleksMaker EleksLaser-A3 Pro Laser Engraving Machine — https://goo.gl/3gJux8
LA03-500 405nm 500mW Blue Laser Module — https://goo.gl/9Hcwkz
FB03-2300 2300mW Blue Laser Module — https://goo.gl/ugbCtY
Wholesale Laser Equipment — https://goo.gl/dxKCGT
EU Warehouse — https://goo.gl/QceUQM
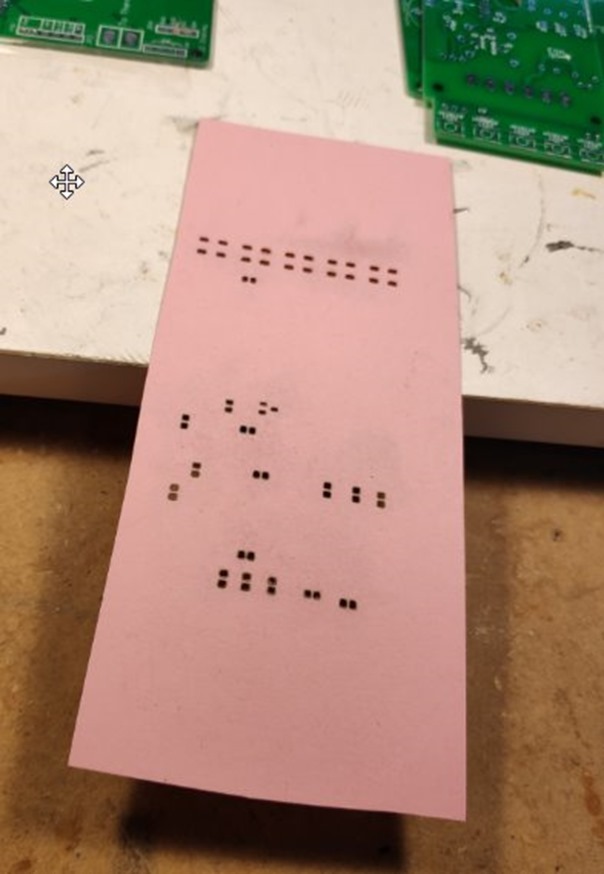
We have also now used some 160gm blue and pink card to make PCB soldering masks for boards we just had made by JLC PCB who do an excellent, inexpensive prototyping service.
Above, the soldering mask and the JLC PCB boards (second batch) which arrived late November 2018. The mask which is made using the engraver with the 2w+ laser, will make soldering these boards much easier.
See this video on upgrading the engraver.
It is important to note that this engraver is not a toy. Never fire up without the glasses and also be wary of reflective surfaces when the laser is on. It is powerful enough to do damage (obviously, it is used for engraving).
And here it is, up and running at last. I have some cardboard in there and clearly the unit has the capacity to engrave, however, it came out with vague edges so I initially had some focusing to do.
Setting up the engraver:
Attempt 1. Very small text (14pt in computer printer terms) which came out in reverse, but even using the LOW setting on the laser thinking that I might test paper for speed, I managed to go clean through half a dozen sheets. Clearly I need to master the use of speed. However, everything worked and now I know there is no shortage of available power or, indeed, resolution.
Sitting on a box, this A3 engraver has yet to be tidied up but if you want promotion pictures there are lots of websites for that.
The important thing is, this photo shows the complete Banggood-supplied EleksMaker Laser Engraver and NOW I have some decent software to run with the laser (which does not have microswitch end stops before you ask – I may add those later. I have a copy of Lightburn 0.7.02 which works a treat for me on Windows 10 64 bit. The LightBurn company were VERY helpful when I had questions.
Essentially the unit comes as a well-packed set of 3 motors, various aluminium tubes, a host of pre-cut Perspex pieces and an unfeasible number of nuts, bolts, retainers, wheels and various spacers. I opened the box maybe 9am Friday morning and spent the rest of the day constructing.
At first it all looks a little daunting but that apprehension soon goes away, It did not take long to reach the stage where a whole table was needed to hold all the parts but by mid-day I’d cracked the back of this. I also broke one of the Perspex fastener/tensioners however. Thank heavens for Gorilla glue. I hope it is strong enough. Seems to be up to now, days later.
Two of the three motors move the laser assembly forward and backward (left and right sides). The third motor is mounted with the laser and moves the latter left and right.
No documentation came with the unit but the Banggood site has construction info, software and drivers. What you see here are my own photos, in the link below, you’ll see the construction photos available, which I used to help me assemble the unit. The images in their documents are good but I was left in doubt as to where to mount the small electronic control box on the front aluminium support beam because other suppliers showed the box mounted vertically whereas in the Banggood-supplied revision, the box mounts horizontally.
This box needs some trivial assembly which only takes a few minutes. I do not have detailed wiring information but it looks fairly simple. A power supply is provided. No info as to whether to mount this somewhere or leave lying on the bench (unless I missed something). Similarly (now the laser is here) I’ve no idea where to put its supply but I’ll figure that out as I go along.
http://wiki.eleksmaker.com/doku.php?id=elekslaser_a3_pro
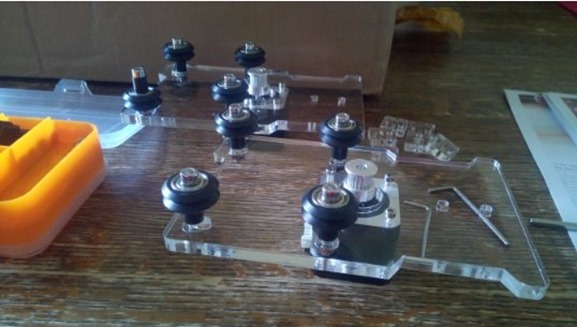
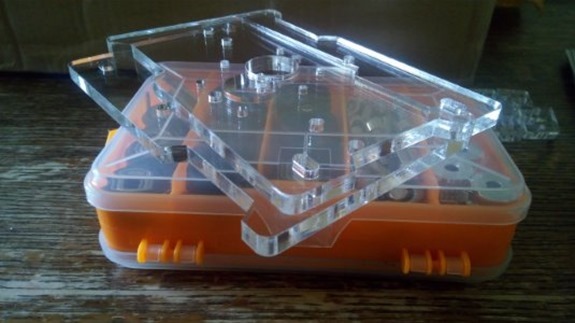
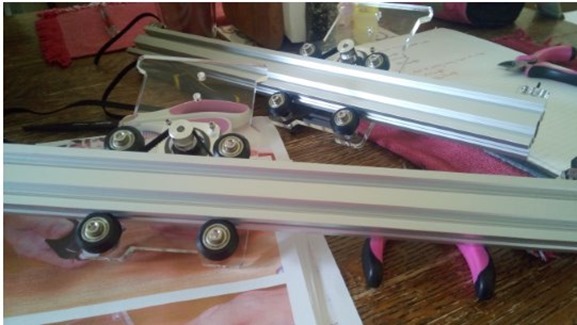
Perspex motor support
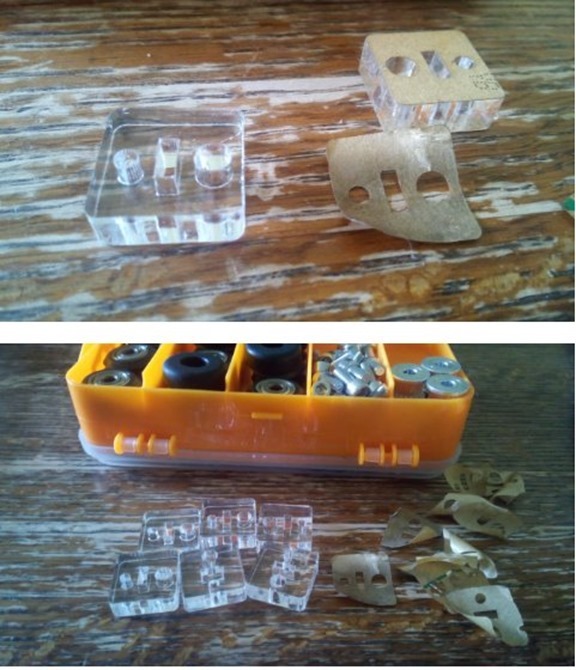
Perspex tensioners and box of wheels and assorted nuts and bolts
Motors and drive structures slide along Aluminium rods
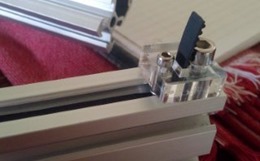
In the process of building to the kit, I assembled six of these small Perspex end-pieces, held in place by one large bolt and holding and tensioning the belt (two per belt).
One failed during construction. I am hoping this will be replaced, meanwhile I’ve had a go at a Gorilla glue repair. Note: this seems to be holding.
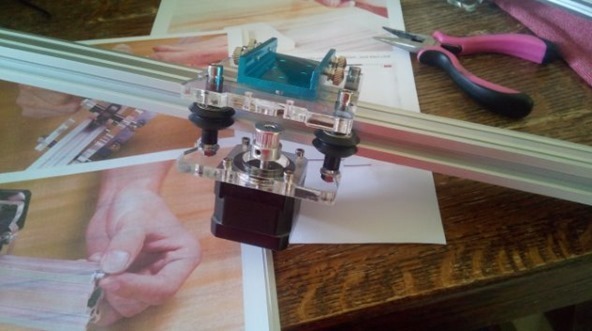
Laser Mount
Laser mount in assembly with drive motor
And here it is, assembled – (stock photo as my temporary workspace isn’t this neat (and the battery on my substitute phone is, as usual, flat – doesn’t quite last the day – I’m on a learning kick about battery charging right now). Typical of demo photos, the wires are not attached in the photo below.
Note that the above assembled photo is from Banggood. Other suppliers may have a different photo as clearly, final construction varies in different revisions as happened with the laser printer. If you are assembling one of these, make sure you follow the instructions provided by the people you buy it from and not just randomly from the web. In other revisions the electronics panel is mounted vertically and the corner supports are completely different. I found this out the hard way.
Finalising wiring and mounting the laser took half an hour in total which makes for 8 hours construction. Then there is the software, on my Windows 10 PC I tried the standard software which seemed buggy to the point of being unusable but thanks to blog readers I discovered LightBurn which (see above, using on my 64 bit Windows) seems to work a treat. That software is also available on other platforms. Simple text, shapes and images take no time or expertise to set up and burn.
My short demo video here: https://youtu.be/iiOCjXQ2tZo
EleksMaker® EleksLaser-A3 Pro Laser Engraving Machine — https://goo.gl/3gJux8
LA03-500 405nm 500mW Blue Laser Module With Heat Sink — https://goo.gl/9Hcwkz
FB03-2300 2300mW Blue Laser Module — https://goo.gl/ugbCtY
Wholesale Laser Equipment — https://goo.gl/dxKCGT
10% off Wholesale Electronics (EU Warehouse)– https://goo.gl/djjBMa (code: EUELE10)







Hi Niels, that matt grey finish would very likely be an anodized finish, basic anodize with no colour.
Doh… never realized you could also anodize without adding colouring. Might be easier to do yourself.
I’ll add it to my ways-to-blow-up-shed list.
Good idea.😛
Can the Eleksmaker A3 2500 mw engrave on steel. What will be the settings. I am using the GRBL software program. Anything better that is free?
I didn’t try steel on this engraver but given the limits of that 2300mW laser (for example it does best on darker plastics), I would imagine the reflective nature of steel would provide severe challenges. The software looked ok to me but I also ended up using LightBurn – which isn’t free, so can’t help there. Others may step in.
Not a chance. It will completely reflect.
But you can coat the steel with paint and burn it away selectively.
There’s some coating which can be ‘burned in’ but I think it’s made for bigger CO2 lasers.
Anodized aluminum might work. I’ve had success with an aluminum radiator from a car airco but I don’t know how the surface was processed. Had a grey matte finish.
You put it more elgantly than me.
Hello from Athens Greece!
I have a problem.
I bought the EleksLaser Draw Module 2019 but for whatever reason the pen doesnt lift when it moves from one point to another so it ends up messing the drawing.
What shall I do?
It only has one pug that fits the laser module that it replaces.
I have been searching for info on the elkslaser A3 or A5, I found replacement acrylic on thingiverse and printed the y-plates, I have a lot of parts laying around after building 6 or 7 3d printers so I figured I could build a copy of the elkslaser…. well I need a little help from someone with a real one, I need to know the diameter and thickness of the dual v wheels used and I believe the length of the standoffs for the M5 x 50mm bolt is 10mm and I found one to print on Thingiverse also, I have everything else in my 1000year drawer so all I need is to buy the correct size wheels. any help would be appreciated. thanks in advance
Aidan has the laser and can often be found in here.
I recieved a EleksMaker® EleksLaser-A3 Pro 2500mW Laser Engraving Machine for Xmas and started using Lightburn to burn a piece of wood with a pattern from svg file.
the overall control is great I just can not figure out how to burn a shape turn off the laser and then start on the next shape by tracing the line with no scan. Any one have any help, I have tried 2 types of the GRBL machine setting the older and newer.
Not sure if I understand correctly, but maybe you can select the next shape and click on another color to make it a new layer? Then you can select ‘cut’ for the second shape/layer/cut instead of ‘cut and scan’. (Got puzzled by the ‘how do I create another layer’ question myself last week).
If this was for me (cliff auvil) the pattern is a map with roads and streams it would be dozens of dozens of shapes. Is that the only way to “trace a new shape…make it on a new layer? As I imported the file the software is driving the laser in cut mode like an Etch-O-
Sketch. if I could trace the outline of a lake then a road then a creek of the svg outlined shapes the project would be done in minutes vs hours.
Cliff, I’ve had one layer with 2000 shapes from a single svg and it worked like a charm. There are some optimization settings in Lightburn for choosing the quickest route, maybe something’s off there? Try clicking on a cut on the ‘cuts’ tab for more details (not shown in the screen with all the cuts). Maybe it’s hidden there. Also make sure you understand the difference between ‘cut’ and ‘scan’.
I have had very good results with the scan they just take much longer. although I still am working on what make the laser turn off in some section on scan and just a light burn on other ares. the cut is fast and clean the only problem is the laser stays on then whole time from one shape to the next like cutting a stencil without lifting the knife. I will dig into the setting, thanx for the feed back. I will check back in.
Ah I get it now. There might be a ‘minimum laser power’ setting somewhere, not sure.
This might also be hidden in the firmware (GRBL?) settings in your machine. I know it’s in Smoothieware. This is intended to keep your laser from shutting down completely, or taking too much time to start again I think. I know my diode laser won’t fire up below 14% power, but when it’s running it goes down to 9% without shutting down again.
Maybe look for a PWM setting, it could be disabled so you’re always at either 0% or 100% power? Combined with the above I could imagine a scenario where a minimum setting of 1% defaults to full power, I don’t know.
You could check the g-code sent to the machine, I think the S part of the lines means the power setting. If the power in the gcode is always 100% (S1? S100? this is firmware dependent iirc) it’s not the machine playing tricks on you.
so a short follow up I by chance saw a on the console tab a note that said something about the M3 1.1 GRBL device driver if the one laser does not turn off, changed over a and the beam cut out between objects. thanks for the help.
Nice to hear! Enjoy.
Hi Pete
What blue card did you use for mask and where did you get it?
Ian
Ask Aidan, he got the card, I’m currently in the USA on holiday, writing up what I can but I don’t have that info.
Would love to try this out on the enclosures to add text to front panels. Have you tried doing this on light coloured plastics such as ABS or polycarbonate?
I’d really like one that can engrave metal. I had a local laser company with a CO2 machine to do the stainless steel for me with serial numbers etc. Came out great and wasn’t expensive.
Tried transparent plexiglass but the diode laser shines right through unless you keep on the protective stuff. I left in on on both sides and also scorched the back side for a bit. 🙂
I would not expect it to work with transparent material.
Can you make a PCB with those?
It has been done before: https://www.instructables.com/id/Custom-PCB-Prototyping-using-a-Laser-Cutter/
Hi I bought the 2.5w engraver, however while etching on MDF it is burning, what are the ideal setting
Maybe try compressed air for cooling and removing the soot?
A good video to upgrade the machine for much better resolution and quiet use if you haven’t seen it already Peter https://youtu.be/ZzO9skEYqwY
Thanks – added to blog entry.
Hi Pete et al.
I was wondering if this sort of device would be of any use for cutting fabric? I understand man-made fabrics might be prone to melting rather than a clean cut but natural fibres could work.
I’m thinking of building something for my wife so she could cut fabric shapes she uses for her quilting hobby.
I’ve had success cutting wool felt with a laser (40W C02, rather than diode, but I could run it at very low power and very fast speed and still cut it fine, so it should be fine with a 2300mW). It really, really stinks though!
My 2300mW laser stinks when engraving.
Hi Peter,
I second the LightBurn notion above. It does in milliseconds what could take half an hour in LaserWeb4. It’s better for your heart, really.
I have a comparable non-ttl laser and hooked it up via a $2 MOSFET module. Now I can switch it on and off in software, and it even works for PWM-ing down the power. (Smoothieware based controller, but it should make no difference).
It’s this board: https://www.banggood.com/0-24V-Top-Mosfet-Button-IRF520-MOS-Driver-Module-For-Arduino-MCU-ARM-Raspberry-Pi-p-1292498.html
Make sure you order some more; I have two boards which needed a replacement FET. They only fail under load, not when checking with a volt meter! Check with a motor or fan or something when in doubt.
Random tip: instead of a honeycomb I’m using an old air conditioning radiator (“condensor”) from a car which I got for free from the air conditioning guys’ dumpster.
Cheers,
Niels
PS Gijs sent me your way.
Thanks. The engraver handles pwm so no new hardware needed but it does seem up to now that the Windows software is naff. Test images crash the package, text is reversed and using the reverse button hangs the software. I don’t want to use command line software (Windows 10 64 bit) so I assume my choices are limited?
Please try the LightBurn 30 day trial. It beats the crap out of inkscape -> dxf2gcode -> bcnc or inkscape -> draftsight -> bcnc, noticing your units are messed up, saving your svg as dxf with px units and doing the rescale rain dance.
(but remember dxf2gcode because it has an overcut feature for vinyl drag knives!)
I hoped LaserWeb4 was the solution to all this but it’s EXCRUCIATINGLY slow, resource hogging and prone to die after waiting for many minutes. For simple vectors, raster engraving and live control of your machine it does kind of work. Give it a try.
Also nice for engraving dithered pictures: StippleGen2. The output completely kills LaserWeb4 though.
PS sorry for the vanity, apparently this was not the way to upload an icon. Also completely failed at removing my mugshot.
I’ll give it a whirl, thanks.
Thank you Stephen and Niels – and thanks to all for comments. I now have the 30 day trial of LightBurn – 64-bit version for Windows. After selecting the right driver, it works a TREAT.
HI Peter,
Can you also cut with Lightburn?
I’ve not tried cutting yet.
Sure, just turn the power to 100% and select a lower speed. Just enter the correct numbers for your setup. I think there’s also an option for multiple passes in combination with z axis stepdown, not tried that yet. You can try the fully functioning demo for 30 days. It made me happy. 🙂
Hi Peter,
I’m not sure if the controller is GRBL based or not, if it is then I’d highly recommend this software – https://lightburnsoftware.com it works well, good UI and is very affordable, give the trial version a go.
Disclaimer: I’m a happy paying user of the software and have no other affiliated links with the company
Hi pete, this one has power control
https://www.banggood.com/EleksMaker-FB03-2300-2300mW-Blue-Laser-Module-2_54-3P-TTLPWM-Modulation-for-DIY-Laser-Engraver-p-1266170.html?rmmds=detail-bottom-alsobought__2&stayold=1&cur_warehouse=CN
but eats up a lot more £’s
I’ve informed banggood about your proposed laser. I need to be able to have the program turn the laser on and off, not that bothered about dimming but if not controlled by software I may as well just put a live match on the table.
This probably my next purchase, a CNC cutter/engraver. Not necessarily this one, but something. Thanks for the review. Give one a starting point.
PS, How did your Tevo Tarantula fair?
It did well, but the final part of the review, actual testing was delayed thanks to the combination of a stroke from which I’m still recovering and an abortive house move which we’re still working on. Aidan is going to give it a good test soon.
Pete
Goo to hear. Mine is working quite well and I like it.
I’m still amazed as how you, recovering from a stroke, can do much more work than me without a stroke.
Maybe I had a stroke of “fiaca” (laziness in Argentine slang), a few years ago…
Peter, take a look at ItKindaWorks latest videos, he’s just starting using his laser machine and he’s talking about security issues, calibration, laser printing of PCB+etching, etc 🙂
https://www.youtube.com/channel/UCOnMlI1Si4i0O2Wkz-XReww/videos
Got the safety goggles, calibration will have to wait until the laser arrives.
I’m sure you know this but just for safety, be sure to double check your goggles are designed for the same wavelength of light as your laser module. 500 mW is not quite a death-beam, but it can cause blindness from upwards of 100 meters away.
http://www.lasersafetyfacts.com/resources/FAA—visible-laser-hazard-calcs-for-LSF-v02.png
Thanks for that. As it happens I also need to get some info from the company as I appear to have no control over the laser, i.e. on-off, dimming. It has a fixed supply and no control cable. That needs sorting.
Looking at the Banggood page, the questions say it does not have any dimming control. Perhaps you can splice in a MOSFET between the power brick and the laser module and use that, depending on how the laser’s internal circuitry is constructed. You’d probably want to disconnect the fan and wire it to the power supply separately in that case so that it’s always on.
Or, if you only want on/off control a relay would suffice. That’d probably be sufficient, you can just vary the dwell time to change the depth of cut.
In this case we’re looking at a 0.5w laser and the kit comes complete with green safety glasses.
If you fancy untethering it from your PC have a look at LaserWeb. You can run this on a Raspberry Pi (maybe other SBCs too) and give it a web interface where you can upload image/design files and does the job of converting to Gcode etc.
If you want to do boxes, I use the following:
Fusion 360 (free) to do the 3D design.
The shaper origin add-in to export a 3d plane to an SVG file.
Marco Reps has done some experiments with using one to expose UV etch resist for PCBs. His video is pretty good for tips on fine tuning to get max performance from one of those machines, plus he’s very entertaining.
Good find and a good use idea.
OK, dumb question. What can you use something like that for? Is it 3d printer related or is it a standalone gizmo for something else?
It is a laser engraver, nothing to do with 3d printing. For engraving a range of materials. Handy for Perspex front panels?
Thanks, I didn’t really understand. I’m surprised you can easily buy lasers capable of engraving though.
These cutters use diode lasers, which you can get up to about the 5W range on Aliexpress in that form factor, though they are expensive and unreliable above about 2W because of heat. That’s more than enough to actually cut things like wood and some acrylics, not just engrave. They’re legal (under USA law at least) as long as they have the proper labeling, but they *dangerous*. You *must* have proper safety glasses and having an enclosure is also a good idea because the reflected laser light can still blind you and start fires. Ventilation is also important, a lot of stuff releases toxic vapors. Even some natural woods release harmful chemicals, not to mention chemically treated woods and acrylics. Laser cutters/engravers are really useful, but they are pretty dangerous tools that need to be treated with a lot of care.
Even more powerful lasers are still legal. You can get a 40W CO2 laser cutter for something like $500, but those are quite different from what Peter is talking about.
some safety measures: https://www.youtube.com/watch?v=30ro4ybolZw
and how to calibrate: https://www.youtube.com/watch?v=QuOCu3DWhEg
Hi Peter,
I have a similar Laser kit i have been playing around with and its pretty okay, I will warn you it takes a little while to get the whole thing dialled in to your liking.
My tool chain for making a useful laser cut is the following
Inkscape
inkscape plugin that converts it to gcode
Lasergrbl g-code sender
if you are after a bit more info i highly recommend watching tech2c videos about mounting a laser module on his 3d printer
Good advice, I’ve not looked into software yet