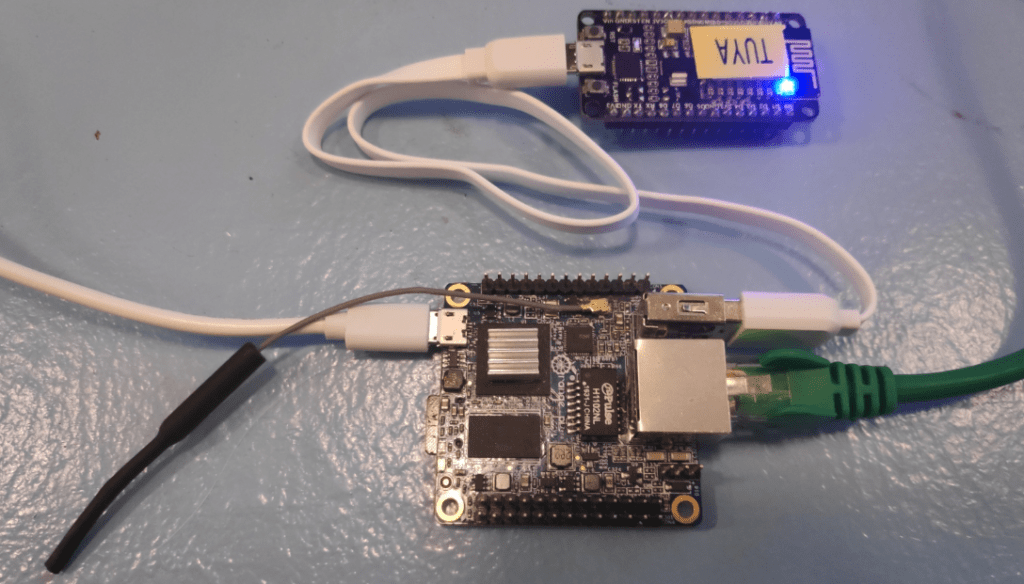
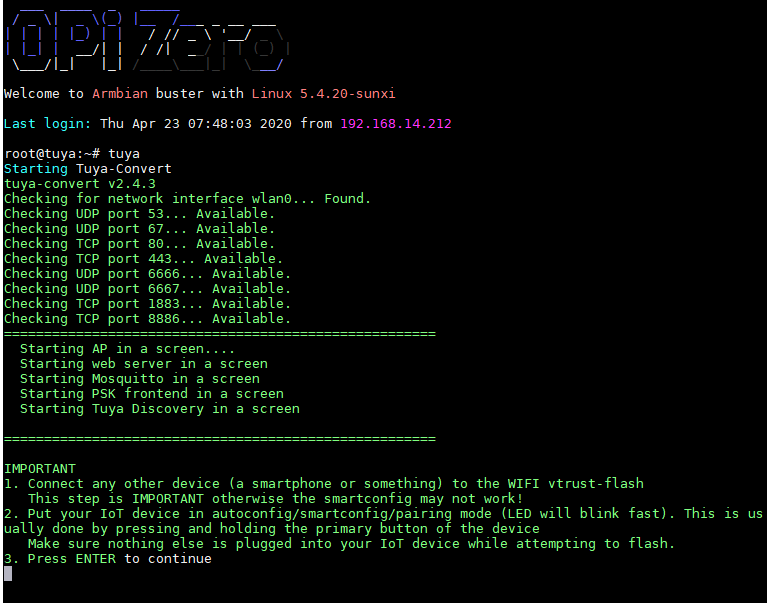
Elsewhere in the blog I’ve referred to Tuya-Convert – which I have been running on the Raspberry Pi. Today Antonio (Mr Shark – based in Italy) and I took on the MINOR task of putting Tuya-Convert on an otherwise unused Orange Pi Zero.
SO – what is Tuya-Convert? Let’s say you are working with ESP8266-based Smartlamps and you want to put Espurna, Tasmota or other non-original firmware onto them to escape cloud dependency and maybe gain some new features. And let’s say these are lamps whereby plugging in a serial FTDI lead is difficult or impossible. To the rescue comes Tuya-Convert.
Caviat: I should say at the start, that the process has been 90%+ successful (no utter failures) so far, with all the smart sockets we converted to Tasmota with Tuya-convert working first time but out of twelve ZemiSmart RGBCCW lamps, three failed to convert with Tuya-Convert – and I had to open them up and program them using wires (five including the ground, 3v3, GPIO0, rx and tx lines, conveniently brought out onto tiny PCB pads). The reason for the initial falures is not as yet totally clear. However in the end, all the ESP8266-based items we reprogrammed, worked in the end.
We originally started with a bare-bones Raspberry Pi 3 and a little NodeMCU ESP8266 board – and that worked fine but I felt guilty about tying up an RPi for this job, so then we tried a bare-bones Orange Pi Zero and the same NodeMCU-type ESP8266 board (i.e. any old ESP-12 board).
Download and “flash” the “donor” bin file onto a NodeMCU, Wemos or similar (any ESP8266 board with 1Mb Flash would do) to be able to set up and run a “vtrust-flash” ssid network
For the RPi version, start with an RPi2 or 3 with a fresh install of raspbian LITE, then create an empty “ssh” file in the boot partition (the fat32 one).
Login via ssh (on, say a PC) and run “sudo raspi-config”, go to localisation, “WiFi country” and BE SURE to select your country, otherwise “tuya-convert” will fail to bring up the wlan0 (WiFi) interface – this is important…
Alternatively as we have done now, use an Orange Pi Zero (OP0). Load “Armbian Buster” and install the microSD as per instructions on the Armbian website. The only thing to note is that Armbian-config does not set up any WIFI country on the OP0 so we had to do that by hand.
sudo nano /etc/default/crda
The last line when running Armbinan-config on a new OP0 will be “REGDOMAIN=” – that is NO GOOD for the OP0 – it MUST have a valid country – set that in the standard NANO editor to “REGDOMAIN=UK” without the quotes in the file shown above. On the Raspberry Pi an equivalent gets entered elsewhere by the initial setup when you set up the country and REGDOMAIN remains empty.
On the OP0 I installed one more program just to stop Tuya giving out a warning..
sudo apt install ufw
Downoad the latest tuya-convert and install on the OP0.
sudo apt-get update && sudo apt-get install git
git clone https://github.com/ct-Open-Source/tuya-convert
cd tuya-convert
./install_prereq.sh
Run the above lines one at a time – the first line took several minutes to run on the OP0 and didn’t install anything new or upgrade anything – lines 2 and 3 took mere seconds – the last line takes a while on either board… be patient… 6 minutes on the OP0 – the important thing here is that you can select tasmota.bin when installing – be careful if upgrading this file which sits in the tuya-convert/files folder – you MUST ensure the file you use is under 500K – once done converting you can OTA (over-the-air update) your target smart device in the normal way but this is important: if the file size is over 500KB, the conversion will fail and you may end up, as I did initially, with smartbulbs that will ONLY upgrade by opening up and getting the soldering iron out – not pleasant with only tiny test points to work with.
Start the flash process – on the OP0 as user ROOT (I arbitrarily added user Pi on initial setup of the OP0 but to avoid using SUDO, ultimately it was easier to simply use ROOT). On the RPI, user “pi” works just fine. In the tuya-convert folder you need to enter…
./start_flash.sh
and follow instructions… assuming both the PI and the ESP8266 “donor” device are turned on and reasonably close, you’ll see the blinking LED on the DONOR device (in our case the NodeMCU board) turn solid blue once it connects to the vtrust-flash ssid, then you can put the hacking device (In our case, an ESP8266-based smartbulb or an ESP8266-based smart plug) in fast flashing mode and press ENTER in the Tuya console.
In running that script – I got a message about Mosquito running and did I want to disable dnsmasq – I ran 2 commands to ensure I was never asked this again – this may or may not apply to you.
sudo systemctl disable mosquitto.service
sudo systemctl disable dnsmasq.service
Once the first part of the hack is flashed, a menu will pop up, select the option with “tasmota.bin” for the stock file shipped with the tuya-convert software.
That’s it… then power cycle the device you are hacking and you are now using your device as Tasmota (or Espurna – we only tested Tasmota in this case).
Tasmota templates used for the smart switches we converted:
 https://templates.blakadder.com/blitzwolf_SHP6.html
 https://templates.blakadder.com/blitzwolf_SHP7.html
 https://templates.blakadder.com/blitzwolf_BW-SS1.html
If using Tasmota, to have Amazon Alexa support, you need to update to latest FULL tasmota.bin file from http://sidweb.nl/tasmota/
And here’s the conversion hardware described above:

Below – with a little tidying up, Tuya-Convert on an Armbian-equipped Orange Pi Zero, boxed. My Raspberry Pi version needed a separate box for the USB-connected NodeMCU board and I can think of other uses for an RPi-3 whereas the OP0 was going to waste before this.

The only down-side to using Orange Pi Zero of course is lack of RPI-Clone. The box needs a single USB 5v supply.

Update June 2020 : the files folder in tuya-convert – the Tasmota guys recently withdrew the tasmota-wifiman.bin file – hence the most up to date suitable file now is the tasmota-lite.bin image (similar features to the old tasmota-wifiman.bin image) .. so you need tasmota-lite.bin and upgrade.bin – that’s all. You could leave espurna.bin in there but I’m not installing espurna so I left that out.


Success!
Configured as Tuya MCU and it just plain works!
Thanx Antonio, I finaly got it to flash.
Took it apart and found a little board labeled TYWE2s.
Did a little googling and found a neat picture of the TYWE2S Module with its pads. Soldered it all up and voilá I got it to flash with the MCU Python flasher.
The chip was recognized as a 8285 so I used DOUT mode.
Next trying to figure out, which GPIO triggers the relay – is there any easy way to do that.
Any Ideas ?
It looked so easy and started so good !
– A great use for my orphan OPI0
– Installed Armbian & the rest
– flashed an 8266 with donor file
– started it all
Put my E27 bulb socket into fast flash mode
And all seemed well – that is until I flashed the wrong file 🙁
I flashed tasmota-minimal.bin instead of tasmota-lite.
Now I can´t access it anymore, it shows up on my wifi, but no login or website shows up.
Any ideas – short of getting out the hammer? I have not been able to find serial flash instructions for it.
don’t mess with tuya, just stay at the supplied bin files if you don’t know what to do…
for soldering, just check the needed pins on the esp itself and follow the traces…
What is the reason for this ESP donor device? I went through the tuya tutorial and they did not mention it. It is not clear to me also from the linked GitHub page.
Thx.
So – you have the Raspberry Pi which you would talk to via SSH (for example from your PC) (I guess you could use it with a keyboard and monitor all by itself but I’ve never done that) this uns Tuta-Convert script – and you need something that looks like a Tuya Cloud – with WiFi output to talk to your device you are programming up. The donor device (a simple Wemos D1 or NodeMCU or similar ESP-12-based board) does the trick. I guess it MIGHT be possible to do the whole lot with the Pic only but no-one seems to discuss that – and for a £2 Wemos D1 why worry?
Ah, so you mean that when I am connected to RPi over WiFi, it is not possible to set it to hotspot mode for tuya device to connect? I guess that makes sense. But if the RPi is connected over wired network then wireless should be free to use for that purpose. How do you tell tuya script to use the donor device as WiFi hotspot? Can it work with serial device instead of network interface?
I will probably go with the Docker solution myself. I run all my servers in Docker already and also have multiple WiFi USB dongles sitting in the shelf.
Thanks for the answers.
OK, nevermind, looked again at the github page and this time also the instructional video and now it I understand I guess.