My wife’s Chumby is on it’s last legs – and was about to go in the bin until along came a fortunate coincidence to save the day.
 Some time ago, 4D Systems sent me one of their LCD touch-screens. As many of you know I’m interested in the range of boards that ITEAD do with intelligence built in – all you have to do is talk to them serially and send commands – they also send serial back when defined areas are touched.
With that in mind, 4D sent me one of their boards to test. Well, thanks to one thing or another and it got put to one side, until this weekend…
Recently, my wife informed me that sadly, it was time to throw her CHUMBY out. For those of you too young to remember, long before the ESP8266, Chumby came out in the USA as a cosy leather-box-glorified clock for the bedside complete with touch LCD display. You could get the time, an alarm, weather info and all sorts of other stuff – all neatly organised on a web page – the Chumby had a cult following – a bit like pet rocks (for those of you old enough to remember). Sadly over time the display got dimmer and dimmer and in 2012, Chumby Industries went into liquidation and a new company was formed to keep the torch burning – for a subscription. We never followed that up.
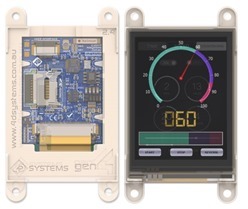
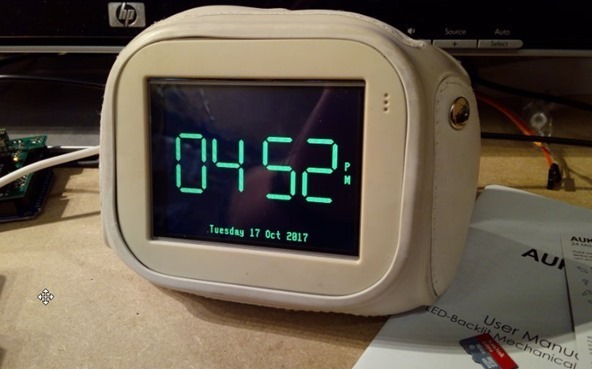
Well, I was just about to throw the Chumby in the bin when it occurred to me that the 4D systems display (Gen4-IoD-32T) seemed to be about the same size. I gutted the Chumby and… spot on – a little attack with the pliers and the 4D board fits nicely inside the case.
 This board (the Gen4-IOD-32T) has WIFI and can be programmed with Arduino-like code using 4D Systems own IDE or (with some limitations) the Arduino IDE – it is also very slim with the whole lot built very neatly onto the back of the display. Now I COULD have done this with an ESP8266 and an Itead display – but – I figured now was as good a time as any to become familiar with the 4D board and the software.
In essence the Gen4-IO-32T is an ESP8266-powered 3.2” display complete with SD card slot, on-board WIFI (plus external antenna if desired), and it is claimed that the board is compatible with the Arduino IDE (which it is once you’ve added the relevant board info and library) or you can use the company’s own Workshop4 IDE (it turns out that is only partly true as some of the features of the IDE are not applicable to this range of boards).
I plugged the board into my PC via their miniature FTDI board and downloaded the software Workshop4 IDE onto my PC.
Ok I’ll clarify that – I downloaded the free version (87MB) – there’s a paid version too.
Those of you familiar with the Itead touch-screen product will know that it is a serially controlled touch-LCD. Well, this is a WIFI controlled touch LCD. The major difference being that I had to put together a design for an ESP8266 board to strap onto the back of the Itead product to talk to the original serially while talking to the outside world by WIFI. In this case the 4D product is all in one slim product. It is also more expensive.
You talk to the board initially via a small USB FTDI (i.e. USB to 5v serial convertor) which the company supply – and you can either use the Arduino environment – or their own Workshop 4 (which needs the Arduino IDE sitting in the background) to program up the boards.
On the good side you have an all in one product that is very slim, support is excellent (even at the weekend in my case – a very helpful chap based in the UK) and the documentation is excellent. The gfx graphics primitives they supply are fast and work well. Text, rectangles, circles – the usual but more importantly, there is potential to use some pretty amazing graphical “widgets” to take the pain away from, for example putting up a large 7-segment display or a meter, keyboard etc.
On the bad side, the WIFI software, identical to normal Arduino/ESP8266 Wifi – simply would NOT talk to one of my routers even though the same code in a normal ESP8266 worked a treat – it worked just fine with the rest (I have several). In addition, they’ve only fitted 512K of FLASH on this so your software can only be up to somewhat short of 0.5MB – a little limiting in 2017 as the SDK takes up a fair bit of room. So no OTA then!
 Fonts are limited. two fonts – and being bitmapped when the size is increased they get blocky. I don’t understand this as regular readers will know I’ve fitted a variety of fonts on my ESP8266 displays – but to be fair, I only use ESP8266 boards with 4MB of Flash. See image on the right for the larger of the two fonts.
They get around this by adding widgets – some of which look great, such as the resizable, configurable 7-segment display. I say look great – I mean REALLY great – completely scalable in the Workshop and then stored on SD – and that’s just the 7 segment display – there are some fabulous widgets you can explore on their site.
I had a few issues at first getting the SD to work but it turns out that the formatting is pretty critical and I did ultimately with the standard Windows tool after ensuring the partition was small enough to let Windows 10 format as FAT16. One minor issue is that the Workshop software is designed to support a number of boards and not all features run on these little ESP8266-based boards. I was very lucky in that I managed to get quiet a bit of support from the company over the weekend.
I found this link which let me create a simple 4GB FAT16 disk on Windows 10 – and copied my files over to it. Result – a nice, scalable 7-segment display which would do JUST FINE in my new re-imagined Chumby.
The board works with standard Arduino/ESP8266 WIFI and other libraries and so getting MQTT up and running took no time at all. I managed to make it compatible with my home system which regularly broadcasts the time over MQTT – rather handy.
Presumably because of the FLASH memory limit (I’ve used half of the 43416 available bytes already just to get this far) – in order to use external graphics which are well supported by Workshop 4 (drop in code for graphical items) you need to plug a microSD card into your PC to load the graphics up – then put that into the board for general use. (So OTA with changes to said graphics is a non-starter – but this applies also to my setup with the Itead boards).
The workshop insists on formatting the cards to FAT16 so my 16GB card ended up as 4GB – that just seems daft in an age where 16GB cards are as cheap as the smaller ones and more widely available. However as stated above – Windows came to the rescue.
While the above is not as convenient as the Itead setup, this is not a Chinese product converted over to English but has very good, well produced documentation and the Workshop itself is quite polished and there is no doubt the widgets are worth having.
You need to be able to program in C# (i.e. typical Arduino-type coding) to make use of these displays – and some of the examples in the manual can look quite daunting to the beginner but after a couple of hours I was starting to get comfortable with most of it – I pulled in some standard ESP8266/Arduino MQTT code and had that running in no time. Note that in common with many libraries (due to board restrictions usually) the gfx library hardware scrolling feature only works in portrait mode – NOT in landscape. and the colour format follows the usual 5-6-5 bits for RGB.
Touch handling is as you might expect – you can get the X and Y coordinates of a touch event and use them along with your known coordinates of any buttons you may have – when using images and widgets, the ID is returned to save you some trouble. Graphics are polished and there are various buttons, dials and gauges to play with.
There is currently no sound from these units – a beep is on the wish list but not there right now – you can add in a “SomoII” module and there is software support for that but that is then pushing the price up.
So, lots you can do with the visual environment – NOT everything in that Workshop works with the small ESP8266-based boards but this manual gives an indication of what is hidden away in their libraries and I found it fairly easy to navigate and test.
The short summary? You see below you a resurrected Chumby complete with dimmable 7-segment display. Note that you can’t actually DIM the display (control over the backlight would have been nice other than on-off) but by having 2 lots of 7-segments sitting on top and selecting the brighter or dimmer one I achieved more or less the same result.
My feelings of being a “beginner” with this kit vaporised after about 4 hours and I think if I were in a hurry for an off the shelf solution for an inexpensive WIFI-controlled graphical display without soldering etc, I’d give this a shot.
4D Systems have a nice forum– with some good info, marred only by the use of FLASH – someone needs to tell their guys that Flash is dead.
That’s it for now, I’m on a go-slow as I have just returned from the doctor who diagnosed carpal tunnel – no doubt due to too much blogging – and decided to give me a cortizone injection there and then – let me tell you – it hurts.
The library for this board is under active development and there are many useful functions I could not even start to cover here- make sure you check out the docs.
More on this as I develop my reborn Chumby and in the future I’ll do a write-up about other displays in the range – for now, the links should provide plenty of information for those interested.


The chumby runs on an imx233, which is supported by openwrt/lede as mxs.
Availiable from RS. One of their UK distributors. Free delivery.
I really need to calm down and look before I click BUY NOW.
Love the look of this but, $36.00 shipping???
That has to be courier or a mistake. That’s just stupid pricing.. if someone from the company is looking in maybe they can comment.
Peter do you happen to have a close up picture of the board?
Just wondering if flash chip can be easily upgraded to a 4Mb one (same as originall Sonoff, or ESP-01)?
That would make this as my #1 fav display for some of my project!
Flash WAS dead, but he just came back in season 4 premiere 😀
http://www.digitalspy.com/tv/the-flash/news/a838007/flash-season-4-trailer-barry-allen-returns/
sorry, i had to comment 😀
That’s terrible.
like most of the comics on tv, only Daredevil and Jessica Jones were quite good, and the future Punisher 🙂
but we’re OT 😉