 Here’s a guest post by my close friend and collaborator Aidan Ruff. You’ll usually find him talking about his solar home in Spain or the kind of IOT stuff I do, in this instance, where I swear by Mosquitto MQTT and am currently looking at the even easier-to-install Node-Red-Contrib-Aedes (zero work to install an MQTT broker), Aidan has always had a preference for RabbitMQ. Here goes:
When using “The Script” to setup a Raspberry Pi as an IOT controller, you have the choice to install Mosquito as an MQTT broker. Regular readers of the blog will know that an MQTT broker is the essential heart of the kind of IOT setups we usually discuss in here. Without MQTT, there is no channel for ESP-GO! devices (our ESP8266 code) to communicate with each other.
Mosquitto is a great and robust broker, however, if you have software or hardware issues to diagnose or are just lain MQTT-enthusiastic, then it might be great to have a graphical tool to help out. After all, we use a graphical tool in Node-Red to create control flows, but it is often difficult to see what’s happening as the various devices and nodes interact. Yes, you can cover your flows with debug nodes, but what if a device simply isn’t communicating? Where do you start?
There’s another message server that csn be used with Raspbian called RabbitMQ-server. This is a message server that handles many different messaging protocols including the MQTT system that we all love. The great thing is that you can enable a web based management plugin to monitor messaging activity and change parameters very easily.
In MQTT, so long as each device has a unique message queue ID, you can use one MQTT login for everything. ESP-GO! devices base their message queue ID on the unique device name that ESP8266 devices have. However, I’ve gotten into the habit of creating an individual login for each and every device. RabbitMQ lets you look at all of the current logins and their messaging activities so you can see straight away if any particular device has (a) connected to the server and (b) what it’s doing. As a diagnostic tool it is way up there.
Getting started:
OK, first it is probably a good idea to install the latest version of RabbitMQ-server. Below are a few lines to install the Debian package list, signing key and RabbitMQ-server itself:-
echo ‘deb http://www.rabbitmq.com/debian/ testing main’ | sudo tee etc/apt/sources.list.d/rabbitmq.list
wget -O- https://www.rabbitmq.com/rabbitmq-release-signing-key.asc | sudo apt-key add –
It’s probably a good idea to do a sudo apt update and a sudo apt upgrade at this point
sudo apt install rabbitmq-server
sudo rabbitmq-plugins enable rabbitmq_management
sudo rabbitmq-plugins enable rabbitmq_mqtt
So, now we have installed RabbitMQ-server and enable both the management and the MQTT server plugins. A next step is to add a user, although there is a default user called ‘guest’, password ‘guest’, I like to add one called ‘admin’ and then when everything is up and running, I normally delete the ‘guest’ user for security reasons. Here’s how we do that…
sudo rabbitmqctl add_user admin mypassword
sudo rabbitmqctl set_user_tags admin administrator
sudo rabbitmqctl set_permissions -p / admin “.*” “.*” “.*”
We’ve now added user ‘admin’ with a password of ‘mypassword’ (obviously, don’t use this one). We’ve then set its’ tags to indicate that it’s an administrator and set full permissions to the virtual server in RabbitMQ. In fact, I tend to make all users administrators, just so that I don’t get any access issues.
Setting up users:
Now we can go to the web admin page and set up some stuff. So, it’s at http://<my Pi Ip Address>:15672. So, if you’re Pi is at 192.168.0.10, you’d open a web browser to http://192.168.0.10:15672. Log in as ‘admin’ with your password and off you go.
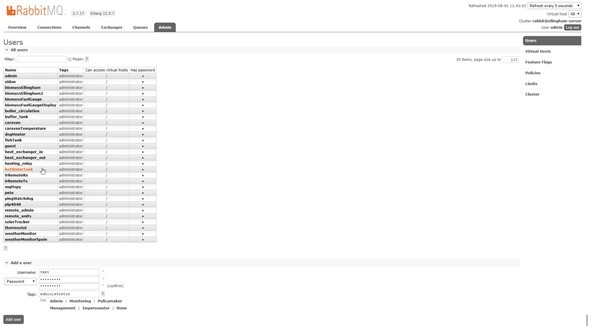
The first thing is to set some more users, so click on the Admin tab and you’ll see the ‘admin’ and ‘guest’ users – as I said, I tend to delete the guest user. Click on ‘Add A User’ and then enter a username, a password (twice) and then underneath the box marked ‘Tags’, click on ‘Admin’ and you’ll see ‘administrator’ appear in the Tags box.
Then click on ‘Add User’ and it’ll be saved – see image below:
However, we’re not quite finished as we need to give the user access to the virtual host – we did this on the command line for the ‘admin’ user.
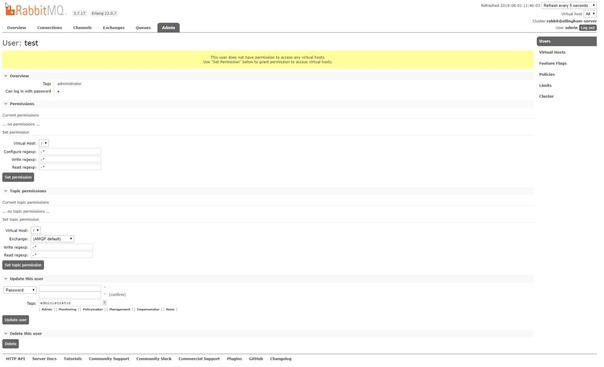
So, now click on the new user name which was ‘test’ in my case and you’ll see a screen with a yellow box indicating that the user doesn’t have any permissions yet. So, click on ‘Set permission’ and you’re done.
Click on ‘Admin’ on the tool bar to see the list of users. You can see in the screen shot above that I have dozens of devices set up. I use a fairly meaty server rather than a Pi for a lot of different things and my devices are spread across three sites and two countries. I do have a couple of Pis with an identical setup so that I can swing them into action if there’s a problem with my main server. I’ve done this by always using a domain name for my MQTT server in my IOT devices rather than an IP address so that I can simply change the NAT setting in my router to swing all of the MQTT traffic across to the Pi if a problem occurs. So, instead of using an MQTT server address of, e.g., 192.168.0.10, I have mqtt.myrouter.com (or whatever). I then set the NAT on the router for ports 1883 for MQTT and 1880 for Node-red to whichever server I want to be used.
RabbitMQ-Server has another useful facility in that you can create federations of servers whereby the servers can pass messages between themselves and other message brokers. This means that, for example, you could send messages to one server regarding data like temperature readings and they would propagate to other downstream backup servers, thereby preserving your precious readings in case your main server crashed or failed catastrophically or un-recoverably.
Message persistence
There’s another setting that also needs to be considered. By default, RabbitMQ-server keeps all messages transmitted. This is called persistence and after a while, it will become a problem as the message queues fill up.
This problem can easily be resolved by adding a couple of message queue policies to delete older messages. I set the persistence time to 60 seconds as if any device hasn’t picked up a message within a minute, there’s probably another problem which needs fixing.
So, click on the ‘Admin’ tab and then ‘Policies’ on the far right of the page.
1. Underneath ‘Add/update a policy’, type a name for your first policy. Call it something like ‘Transient Queue TTL
2. Enter the pattern ^amq\.
3. Then select ‘Apply to’ and chose ‘queues’
4. Ignore ‘priority’
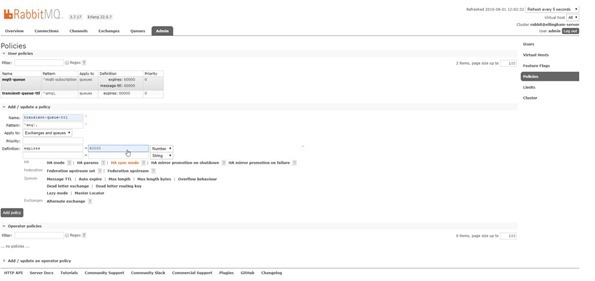
5. Underneath ‘Definition’, you’ll see a number of options. In ‘queues’ click on ‘Auto Expire’ and you’ll see the word ‘expires’ in the definition box. The next box to the right is empty. Enter 60000 (60 seconds in milliseconds) and then make sure that the drop box to the right has ‘Number’ selected.
6. Click on the ‘Add Policy’ button
You’ll see something like this:-
Repeat the above process with another policy called ‘mqtt-queue’ with a pattern of ^mqtt-subscription and an expiry of 60000, but also add another definition using ‘message-ttl’ – also set this to 60000 with ‘numbers’ selected. You can see both of those policies in the screen shot.
If you click on the ‘Queues’ tab, you can see that all of the message queues for the MQTT devices start with ‘mqtt-subscription. The pattern in each policy is just a Unix regular expression which matches up with the relevant message queues, in this case any MQTT queue. If you don’t add these two policies, the message queues will eventually fill up and your Pi will run out of disk space.
At this point, RabbitMQ-server won’t even start up and I imagine that a number of other processes that need virtual memory will also object…I tested this by doing a set of race-around nodes in Node-Red to fill up the message queues. It ended up sending about 6000 messages per second, which is actually astonishing when you think of it.
After a few hours the disk filled and it all fell over. I had to delete RabbitMQ-server and re-install it as I couldn’t figure out how to remove the message queues. No great deal, but to be avoided!
In conclusion, Mosquito is fine but in my personal opinion, RabbitMQ is way better.
Backing it all up
Finally, what happens if you want to replicate or simply backup all of the settings in your RabitMQ-server? Maybe you want to make a duplicate setup of just want a backup in case of a crash.
It’s easy to do a manual backup of all of your RabbitMQ users and settings by going to the RabbitMQ ‘Overview’ page. At the bottom of the page, there are two options marked ‘Import definitions’ and ‘Export definitions’ and just make sure that you back stuff up whenever you make a change. Or, you can do it the easy way and automate the process.
I have a Node-Red flow that does exactly that once every day. It also sends me an email to confirm that the backup has been done.
The ‘RabbitmqBackup’ node makes use of the command line tool rabbitmqadmin. If you ever need to setup a new server, you once everything has been installed once again you can then simply type ‘rabbitmqadmin import mybackup.json’ and then you are back up and running. The flows above generate a new file every day with the date embedded in the name. This means that if you completely cock-up an installation and it gets backup, you can always go back to a previous one.
Here’s the actual content of the flows:-
[
{
“id”: “77bc89ae.3fa2f8”,
“type”: “function”,
“z”: “d70b0ab1.ce01b8”,
“name”: “Rabbitmq backup filename”,
“func”: “msg.filename = \”/my_backup_path/my_backup_\”+(new Date().toISOString().replace(‘:’, ‘_’).replace(‘:’, ‘_’).replace(/\\..+/, ”))+\”_rabbitmq.definitions.json\”;\nmsg.localFilename = msg.payload;\n\n\nreturn msg;\n”,
“outputs”: 1,
“noerr”: 0,
“x”: 600,
“y”: 260,
“wires”: [
[
“ae44c11d.e87cb”
]
]
},
{
“id”: “2c2bdf54.f02b7”,
“type”: “exec”,
“z”: “d70b0ab1.ce01b8”,
“command”: “rabbitmqadmin export “,
“addpay”: true,
“append”: “”,
“useSpawn”: “false”,
“timer”: “”,
“oldrc”: false,
“name”: “Rabbitmq Backup”,
“x”: 350,
“y”: 360,
“wires”: [
[],
[],
[]
]
},
{
“id”: “586364c1.27d9bc”,
“type”: “inject”,
“z”: “d70b0ab1.ce01b8”,
“name”: “Send at 6AM”,
“topic”: “”,
“payload”: “/home/pi/.node-red/rabbit.definitions.json”,
“payloadType”: “str”,
“repeat”: “”,
“crontab”: “00 06 * * *”,
“once”: false,
“onceDelay”: 0.1,
“x”: 140,
“y”: 340,
“wires”: [
[
“2c2bdf54.f02b7”,
“8b1a42da.0e7cf”,
“661da7e4.2d8258”,
“ebefaa2f.49e858”
]
]
},
{
“id”: “8b1a42da.0e7cf”,
“type”: “delay”,
“z”: “d70b0ab1.ce01b8”,
“name”: “”,
“pauseType”: “delay”,
“timeout”: “5”,
“timeoutUnits”: “seconds”,
“rate”: “1”,
“nbRateUnits”: “1”,
“rateUnits”: “second”,
“randomFirst”: “1”,
“randomLast”: “5”,
“randomUnits”: “seconds”,
“drop”: false,
“x”: 340,
“y”: 280,
“wires”: [
[
“77bc89ae.3fa2f8”
]
]
},
{
“id”: “ae44c11d.e87cb”,
“type”: “ftp in”,
“z”: “d70b0ab1.ce01b8”,
“ftp”: “ea2ed29a.98bf7”,
“operation”: “put”,
“filename”: “”,
“localFilename”: “”,
“name”: “FTP Backup”,
“x”: 880,
“y”: 260,
“wires”: [
[]
]
},
{
“id”: “899a4ffa.af001”,
“type”: “ftp in”,
“z”: “d70b0ab1.ce01b8”,
“ftp”: “ea2ed29a.98bf7”,
“operation”: “put”,
“filename”: “”,
“localFilename”: “”,
“name”: “FTP Node-Red Flows and Creds”,
“x”: 630,
“y”: 420,
“wires”: [
[]
]
},
{
“id”: “661da7e4.2d8258”,
“type”: “function”,
“z”: “d70b0ab1.ce01b8”,
“name”: “Node-Red Backup”,
“func”: “\n// Backup the flows\nmsg.filename = \”/my_backup_path/my_backup_\”+(new Date().toISOString().replace(‘:’, ‘_’).replace(‘:’, ‘_’).replace(/\\..+/, ”))+\”_flows.json\”;\nmsg.localFilename = \”/home/pi/.node-red/flows.json\”;\nnode.send(msg); \n\n// Backup the creds\nmsg.filename = \”/my_backup_path/my_backup_\”+(new Date().toISOString().replace(‘:’, ‘_’).replace(‘:’, ‘_’).replace(/\\..+/, ”))+\”_flows_cred.json\”;\nmsg.localFilename = \”/home/pi/.node-red/flows_cred.json\”;\nreturn msg;”,
“outputs”: 1,
“noerr”: 0,
“x”: 350,
“y”: 420,
“wires”: [
[
“899a4ffa.af001”
]
]
},
{
“id”: “ebefaa2f.49e858”,
“type”: “function”,
“z”: “d70b0ab1.ce01b8”,
“name”: “Email Confirmation”,
“func”: “var date = new Date().getDate();\nvar month = new Date().getMonth();\nvar year = new Date().getFullYear();\nmsg.topic = \” Server Backups\”;\nmsg.payload = \”My Server backups done to ftp.myserver.com/my_backup_path/my_backup_ \” + date + \”/\” + month+1 + \”/\” + year + \”<br>\”;\nreturn msg;”,
“outputs”: 1,
“noerr”: 0,
“x”: 380,
“y”: 520,
“wires”: [
[
“d36d27d1.9cbfb8”
]
]
},
{
“id”: “d36d27d1.9cbfb8”,
“type”: “e-mail”,
“z”: “d70b0ab1.ce01b8”,
“server”: “smtp.gmail.com”,
“port”: “465”,
“secure”: true,
“name”: “myemail@mydomain.com”,
“dname”: “Backup Confirmation”,
“x”: 630,
“y”: 520,
“wires”: []
},
{
“id”: “ea2ed29a.98bf7”,
“type”: “ftp”,
“z”: “”,
“host”: “ftp.myserver.com”,
“port”: “”,
“secureOptions”: “”,
“user”: “my_ftp_login”,
“connTimeout”: “”,
“pasvTimeout”: “”,
“keepalive”: “”
}
]
You’ll need to have access to an FTP server on another machine, maybe your Windows PC or a back up Pi so that each can do cross backups. I use Proftpd for my FTP server as there’s a nice GUI based interface to control it known as GAdmin-PROFTPD
You’ll then have to enter your own credentials into the FTP node in Node-Red. This isn’t installed by default, but just add it using Node-Reds palette manager and then enter ‘ftp’ in the search box under ‘install’.
In conclusion, Mosquito is a great, simple messaging broker, but if you want something a bit more transparent and configurable, then you’d be hard pressed to beat RabbitMQ-server. It well be that we’ll add this an option to “The Script”.


Hi ,
I agree with you saying rabbitmq is way better than Mosquito plugin. Rabbitmq is even simpler to setup from server side using amqp.
But I am worried about the rabbitmq architecture of one queue per consumer if the message needs to be sent uniquely to it.
If I take a real world scenario where I have 1 million devices, then this will actually create million connections million channels and million topics. Will the server handle so many ?
How many clusters will be required and by increasing the cluster wont I reduce my TPS ?
Hi Pete,
first of all thank you for all the great articles you’ve written so far! I enjoy reading your blog!
Anyway, im curious about the memory consumption of RabbitMQ with MQTT support. At the moment im running mosquitto on RPi3B+ with about 5MB of RAM (see ps output below) with 7 connected clients. How about RMQ?
USER PID %CPU %MEM VSZ RSS TTY STAT START TIME COMMAND
mosquit+ 541 0.4 0.4 5752 4236 ? S Jul02 202:44 /usr/sbin/mosquitto -c /etc/mosquitto/mosquitto.conf
Ask Aidan about RabbitMQ – I’m quite happy with Mosquito.
One thing to bear in mind is that the RabbitMQ MQTT plugin does not support QOS2 and automatically downgrades any QOS2 pubs/subs to QOS1. Can be important if you are relying on messages being delivered exactly once.
Good point Steve, I don’t know if Aidan has checked that.