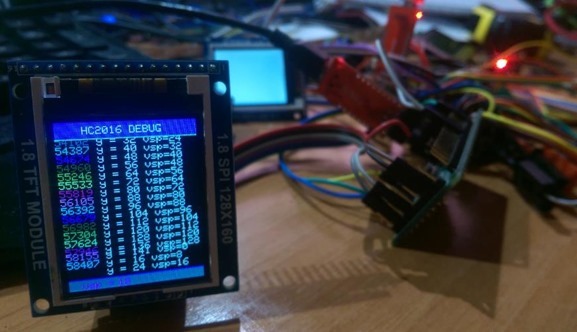
Throughout the development of the Home Control 2018 project I’ve constantly had the software tied a via a serial umbilical to my PC to monitor passing messages, make sure all is well etc. and to periodically check on RAM space to make sure nothing I’m doing is running away with precious memory.
You may have seen elsewhere that I’ve been working with a prototyping board which is basically an ESP12 with a prototyping area in which I’ve put rows of pins for ground, 3v3, 5v and the two lines I use for I2c as I add various peripherals culminating in the recent idea to use an Arduino 328 chip as an “ultimate peripheral”.
Well, we’ve taken that one a stage further and we’ve been discussing making our own prototyping board (Aidan’s a whizz at PCBs and of course we use the likes of Dirty PCBs in China so it is quite cheap to knock up a few boards) and the last few days I’ve been formulating a planas Aidan puts together the schematic. What I’ve realised is that I always run out of the power and ground lines no matter what I do. Add to that the FTDI so I can monitor serial Comms and it all gets a bit messy.
So right now we’ve been discussing a board with the ESP-12 module with lots of pins and additionally a 328 SMT chip with Xtal. Of course that means 2 serial monitors. I’ve been playing with the old QDTech 128*160 displays since I discovered that they work pretty well when driven from the proper SPI pins on Arduinos (don’t even think of using software SPI on them) and ramping up the SPI speed – and so it was that in conversation, we were saying “if only you could scroll them” – that led to thoughts of having a RAM buffer larger than the total available on the ESP8266 or Arduino and… well, I thought I’d use our friend Google to go take a look. It turns out – I was completely unaware of this and VERY pleasantly surprised to find – that the QDTECH chip has the ability to scroll up built in – all that is needed is to scroll up an area then paint a fast horizontal black line after each scroll.
There is a version of the driver for the board here and at some point in 2014, it turns out that an M J Sage added this scrolling ability. Well done. I wonder if he or she realised what a useful addition this could be.
So now we have a display, easily driven by the 328 which can scroll constantly (I’ve had it on several night’s test) and hence provide a boatload of status info. Top and bottom can if needed remain static.
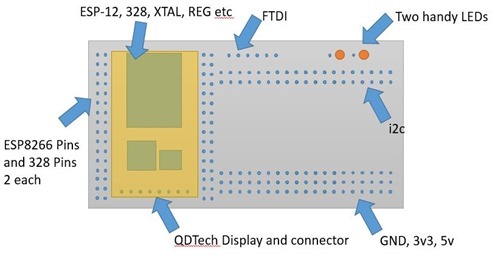
We’re going to incorporate the display onto the prototyping board and it won’t take any additional space as it will sit neatly over the other components! The image above probably bears no relation to the final board but I’m just trying to convey an idea here. The prototyping area on the right of the board will be chock-full of PTH holes but there will be long runs of connected holes for power and I2c as these end up being needed the most with connector wires. All 0.1” of course.
With the QDTech display you can connect the reset line to the 328 reset and hence here are my first thoughts at the use of the 328 which will have access to A6 and A7. I’ve pretty much got this working – just need to add in the temperature handling code I already have for Dallas and DHT chips.
D0-7 – general purpose port extender – inputs or outputs or any mix
D8 D/C for QDTECH
D9 16- BIT PWM out
D10 16-BIT PWM out
D11 MOSI for QDTECH
D12 MISO
D13 SCLK for QDTECH
A0 CS for QDTECH
A1 Temperature
A2 Temperature
A3 Debounced input
A4 I2C to ESP
A5 I2C to ESP
A6 Analog in 1
A7 Analog in 2
Aside from losing GPIO2 and GPIO14 inputs (as they’ll run the I2c) the ESP use will remain the same. The only restriction being that we cannot run ESP PWM at the same time as the I2c due to timing interference– a pain but not something I can see away around. The I2c 16-channel PWM controller does seem a good way around this as it offloads all PWM work onto a cheap board – for single colour PWM lighting the new 16-bit PWM on the 328 works fabulously.
Given that the 328 can handle inputs for the main board we can do away with our normal GPIO2 and GPIO14 and they can have the job of I2c, leaving all normal outputs as for the existing system.
I guess the end-game here will be the smallest possible board that contains both the 328 and the ESP wired to this spec for general use. But that comes later after we see how well all of this works in practice. First the prototyping board. Watch this space.
Sadly in the link I’ve enclosed, the author refers to Banggood who used indeed to offer these displays for under £3 at a time when there were no software drivers for them – (I think we paid £2.60) but I’ve noticed recently that Banggood have been getting greedy and jacking their prices up – a cursory check of the link shows they now want £5.48 for these simple LCD displays – well good luck with that Banggood.
The only ones I’ve found up to now – and the price is good – as usual – is AliExpress.
Someone have another link? the board has an 8-way connector at one end and a larger connector at the other – with a full size SD socket on the underside. See the AliExpress link.
This blog entry could well change dramatically as we spot fatal flaws in the plan above ![]()


I’m almost expecting the next thing you do is flashing the arduino through the esp via the i2c interface. If you plan to do so, this is a good summary tlisting a lot of related resources: https://code.google.com/archive/p/raspy-juice/wikis/Bootloader.wiki
Tip: You can shorten AliExpress URLs by removing everything after the “.html” and by replacing the variable text between “http://www.aliexpress.com/item/” and the final “xyz.html” by a short text of your choice, I used “sku” but anything will do.
Here is the exact same display, 20% off:
http://www.aliexpress.com/item/sku/1822931267.html
Can you clarify as it does not have the same connectors – are you saying it works the same but without the opposite end connector?
Sorry, I thought you were using the ubiquitous 16-pin Nokia 5110/3310 LCD Display port, but it looks like you are using the good old 1602 LCD one, as you have a D/C line in your pinout. This should be the RS (Register Select) signal on the Nokia port.
Mine only has the Nokia port and no built-in 5V/3.3V LDO, but $0.75 cheaper…
Do you think it still has a chance to work with your driver?
here is the exact one with both connectors like yours @ $3.10:
http://www.aliexpress.com/item/sku/32647015552.html