

The A3 Pro is proving to be a MARVELOUS engraver. Some of you may recall back in 2018 I wrote about the original Eleksmaker Pro engraver – it came with a 400mW laser module which was rapidly replaced with a 2300mW laser and very nice too. I left that with a friend in the UK when we came over to Spain and so I’m delighted to NOW have an upgraded version with an even more powerful laser – called the EleksMaker®A3 Pro 3500mW Laser Engraving Machine. I also have the Eleksmaker Draw Module XY Plotter. NOte that I’ve NOT put links here for them because right now, Banggood are it seems out of stock. Here however is a link for the 3500mW laser module itself (para updated September 2021).
To start – construction – as is often the case, the Eleksmaker Pro comes as a kit of parts – and it’s a DIY job putting it all together (took me just under hours including power-up test to ensure the laser works – but not including using the software). The photo at the top is a stock image, of course the engraver doesn’t actually look like that – it has wires all over – they usually miss those off on the stock shots. Other pics are mine and I just (May 16, 2021) added a photo of the finished job – thanks to reader STEVE for that prompt)…

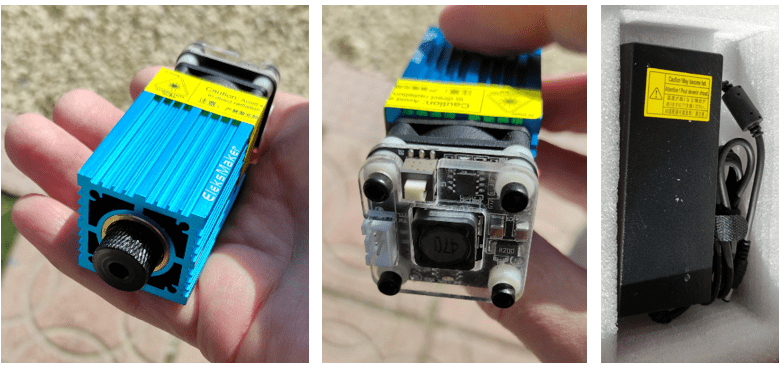
Above you see 5 aluminium sections, the actual laser is in the box on the top left, the power supply is in the box on the top right, various perspex parts plus cables in the centre, 3 stepper motors at the top centre, safety glasses and laser clamp left, wheels and countless nuts and bolts on the right (double-sides box). Yes, it is intimidating for the first hour but construction went ahead without a hitch, really.
In this case Eleksmaker don’t supply instructions, just a small card with the relevant links to their website – the visual assembly instructions are good but not perfect – as with my original Ekesmaker A3 Pro reviews in 2018 and 2019 (earlier model), the mounting of the control panel was left a bit vague and they could have done a better job of explaining connector orientation but it’s good enough.
Oh and I found out what the little PCB was for – the one I found spare and showed in the video. It’s a “PWM-TTL” module – and if anyone knows what that is for – please do drop a comment in here or in the video. I didn’t get any spare leads so I’m not sure what if anything to do with it.
In total I spent just under 5 hours from opening the box to having a working engraver. A little more time went by as I experimented firstly with their own software Eleksmaker 3.1 (which does not seem to have been updated for some time) and Lighturn 0.9.22 (which was last updated recently).
My first engraving with Lightburn at a small fraction of full power:

The Banggood site contains links for assembly of the Eleksmaker as well as full specifications – and links for the Elecscam software – which works well enough (and will be needed to test the (optional) Draw module but I’m currently using Lightburn – an upgraded version of the software we used when I reviewed the original Eleksmaker.
It has to be said that Eleksmaker have made worthwhile improvements to the design of the A3 Pro and of course there are variations with different laser power.
Video below.
In the video you may notice that I commented I was not too impressed by the (perfectly working) belt tensors – well, for anyone with a 3D printer – there are DIY versions here on Thingiverse – I plan to take advantage once I’ve completed my reviews on a pair of 3D printers.

I plan to take advantage of the new tensors once I’ve done my reviews on a pair of 3D printers but meanwhile I’ve created a setof these on my Anycubic Mono Resin 3D printer. And as if by magic, 20 minutes later..

Now – whether or not these will make strong enough tensors using water-cleanable resin – only time will tell – but first I need six of the right nuts and bolts from somewhere.
Meanwhile, more photos…
If you’re interested in my video about the original Eleksmaker A3 Pro back in 2018 – check out this YouTube link. The video could be better as the microphone and lighting at the time were less than perfect and that was my first intrduction to engravers but there’s some useful info none-the-less.
Below, pics of the optional Draw Module..


The screwdriver and Allen key were not provided with the Draw Module but I had those and other tools left over from building the engraver. Easy. This draw moule will make a great addition to the engraver.

Finished and working with optional draw module sitting inside.. Not TOO shabby wiring… power supply and USB plug into the front control panel.

Hi Peter,
I also use Eleksmaker A3 Pro Engraver (2500mw). It use to work very well just a cable which connect the Laser and the main board is way too shot and causing some tangling problems. so I try to change it and then nightmare begin!
When I changed the cable I saw a blue light flashing I don’t know what it mean. Then I turn on the engraver but the laser did not turn on. so I change back the original cable. I can only command it to move but the laser can never turn on anymore.
I have been reading some forums, asking people, update the firmware, watching YouTube still cannot find the answer. then I found your youtube video and your blog. notice you got a same machine I do and seems like you are very experienced so may be I just ask your opinion.
Do you think my Laser head is already dead just simply because I test a wrong cable? It worked perfectly before the test!
Or do you think it is a software setting problem I might still have a chance? if you think so do you mind have a look of my setting to see if you can find incorrect setting?
Thank you very much!
Ken
Hi Ken
Sorry I no longer have the Eleksmaker. It is indeed a fine machine but I only have so much room. It was the best I’d come across but now have the (more expensive) Ortur Laser Master Pro. So in this instance I can’t help.
Regards
Pete
Never mind Peter, I am giving it up anyway 🙁
Thanks you for your reply
Shipping is listed now to GB and is at $29
Except of course in GB it would not be in dollars 🙂
Could we see a photo of your completed model…wires and all 🙂 ?
Done – finished photo added to end of blog – thanks for that… some of the wiring slots into that aluminium channel neatly, thank heavens.
Nice device at a nice price … shame it doesn’t ship to the UK. 🙁
Hi John
Yes I just spotted that and I’ve just sent a note off to Banggood to ask why – as it is coming from China directly and not Europe – I don’t understand… I received the first version of this in the UK… I’ll update the blog as soon as I get an answer.
Regards
Pete.
Nothing from Banggood yet, I can only assume the UK shipping issue is somewhat awkward for them. I usually get quick responses to queries.
Thanks Peter
I assumed it was the same Brexit tax/documentation problems that caused a lot of EC companies to stop exporting to the UK.
Hopefully, not all Banggood has done the same!
John