

When I started the blog entry for this new entry-level laser engraver from Ortur, shipped to me by Zbanx back in November 2021, I thoroughly expected to spend half the day putting it together. I’d even thought of doing a video of the assembly process. Well, I was wrong – the Ortur Aufero Laser 1 comes pre-assembled – there’s a breath of fresh air. See January 2022 updates at the end. I also invite interested readers to take a look at my Ortur Laser Master 2 Pro blog entry – that (lovely) device took some time to get up and running (but it was worth it and is currently my favourite engraver over in Spain. I’m currently in the UK.
Please note, I have included links for Zbanx and Ortur above – but I am not in any way affiliated with either company. Also see 2022 addendum at the end for info including update on improving engraving on this and other engravers.
When I say pre-assembled, I mean the Laser 1 Engraver is 95% pre-sssembled. A small Allen key is provided to help attach the laser head.

In this case I received three heads. Normally you would get one. Even the electronics is pre-assembled and mounted. The instruction manual is basic but don’t let that fool you as it links to an online manual and two online videos which you can grab by copying the links – or the easy way using their QR codes. The user manual links to the Ortur website – the two videos link to YouTube. Seems sensible.

And here, below, we have all the bits with plastic packaging suitably removed. Despite the “entry level” tag, the Aufero has a lot going for it – the small footprint means you can fit it on a (deep) shelf instead of it taking up desk space – and I find that MOST of the items I engrave are small enough to easily fit. If space is limited, this device may well find a welcome home – and as you’ll see later, the available lasers are anything but toys.

Bear in mind that amongst the supplied bits you see above are fittings for all three laser heads as well as the lasers themselves, safety googles, power supply, safety guard, some samples and a pair of tools – so actually there isn’t much to this – all the work has been done at the factory.

Like most devices of this class the Aufero Laser 1 talks to your computer by USB which COULD mean you’ll need a USB extender depending on where you put everything.
In Spain my PC is on the opposite side to the window – and the laser is next to the window so I don’t get gassed. Remember we are effectively burning material here so adequate ventilation is a GOOD IDEA.
I was about to say that the quick-guide English is technically perfect when I noted how they spell LASER over on the right image – but by the time you read this, they will have fixed that (trivial) mistake. Other than that, it’s just fine. Note that information for all three laser modules is included in the manual.
The guide goes into detail about ensuring adequate ventilation and the dangers of using lasers. Note that these are nothing like your little domestic laser pointer lasers so be careful (that advice of course applies to any laser engraver).
The lasers operate at 400-445mn and the supplied goggles are designed to protect your eyes from the output of such lasers.
The online manual is new (as is the product) so at the time of writing, is more complete than the printed guide but still needs a few bits and pieces.. but things they HAVE included are for example:
Engrave Area: 180×180
Construction Material: Aluminum Profile + Acrylic
Motherboard: OLM-PRO-V1.2 Motherboard, 32 Bit ESP32 MCU
Available Laser Modules:
LU2-2 Laser Module – Optical Output – 1,000-1,600mw
LU2-4-SF Short Focus Laser Module – Optical Output – 4,500-5,500mw
LU2-4-LF Long Focus Laser Module – Optical Output – 4,500-5,500mw

Here’s a link to an unboxing video (and much more) on the Ortur site – I’m so glad I didn’t spend ages on an unboxing video or my own. The three lasers have their own special features – the first is the cheapest and well suited to low-power engraving, the second will cut but is optimised for engraving, the third is better optimised for cutting. Don’t confuse the figures above with INPUT power, often quoted but ultimately irrelevant.
As for software, I like to use LIGHTBURN. The free LaserGRBL also works but I prefer Lightburn which is great and works with many other laser engravers I either own now or have done in the past. With the basic LU2-2 laser module in place, I connected Lightburn to my PC via into the USB lead and turned on the engraver. Lightburn recognised it as a GRBL device with 180mm * 180mm working area (correct). Again in Lightburn I went looking for the FIRE button – nothing – it seems it is still disabled by default. So – in the main menu I went to EDIT – DEVICE SETTINGS, enabled the FIRE button and closed then re-opened Lightburn.
FIRE was now available in the MOVE panel (odd place to put it but there you are). Before touching that button, I checked next to it – there’s a non-volatile power % selection. 0.1% is as good as anything for checking the laser without destroying your workbench:-)
I dropped some simple text onto the work area using layer 0 (it’s a bit like using Corel Draw, really but more dangerous 🙂 ), clicked the properties of the layer and set the burn % to 100% and speed to 6000mm/minute. You see the result below (first engraving). Clearly it worked first time – that’s the simplest setup I’ve had for an engraver to date – but a slower speed and/or maybe using the higher power laser would be good. Still, better to start off lightly than put a hole in the bench. I learned that the hard way in my spanish office… there’s a nice, deep black mark permanently engraved in the bench over there. And yes, I did use the supplied green goggles.
WELL, this was easy. It goes without saying to do a test firing first (0.1% in my case) – mechanism doesn’t move – you just need to adjust the laser height manually for the smallest spot – simple.
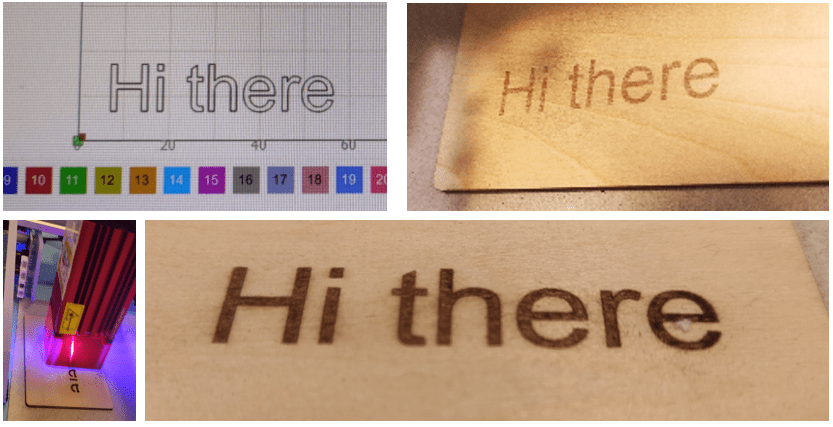
So THEN I tried the short focus, more powerful laser LU2-4SF at exactly the same settings (second “Hi there” above) – I invite you to compare the results. For general light wood engraving I’m happy with the second result as-is. No goggles were needed with this laser as it has a magnetically-mounted protective section at the bottom (no idea why it isn’t green like the goggles). Note the darker “Hi there” just above – in the short time since puting that up here (and similar engravings using my Ortur LM2 Pro) I’ve learned more. pasting dissolved Borax onto the wood before engraving can darken the brown to nearer black – see ADDENDUM for more. Also – the slight burning around the sides – use of air assist helps eliminate that. I’m awaiting a cheap pump delivery for the air assist. I’ll go into more depth on all of that later, probably in a separate blog entry.
As for burning – now for the LU-4-LF laser and it’s a monster as you’ll see below:
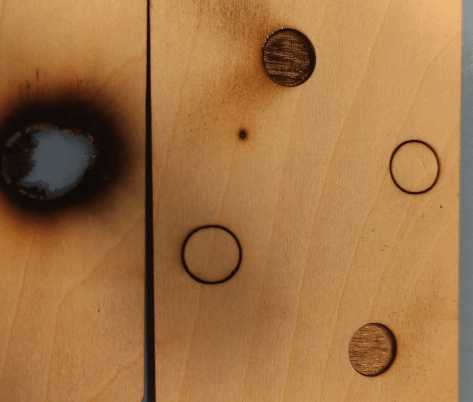
Leftmost hole – CLEARLY reducing the speed to 3000mm/minute was NOT a good idea… bang goes my pristine worktop – good job it’s painted.
Second from the left, that’s about half way through the 2mm thick plywood… 6000mm/min, 5 passes, line mode.
Top, nearly through, 3000mm/min – slight sign of burning.
Bottom right, back to 6000mm/min, 10 passes, fill mode – as you can see just about perfect – maybe 15 passes next time to go straight through.
So – too slow using line or fill mode and you get nasty burns, line mode, nice and clean if you just want to cut out a hole, fill mode if you want a deep engraving. It gets easier by the third wood or perspex sample. See my attempts with the Ortur LM2 Pro linked earlier.
There are of course all manner of settings but that’s down to the Lightburn software (the simplest stuff as above takes no time to learn but theer is no much more to this software) – what’s important here is that the Ortur can manage many passes with precision and despite not having 4 support legs, does a great job of staying still on the bench. I’ve had engravers that were not so keen to stay put.

I do think an air extractor could be my next acquisition. And if I had a choice of only one laser it would be the LU2-4-LF but then, I was never subtle.
The only limits to this beauty are the maximum dimensions of 180mm by 180mm and depending on your requirements that might not be an issue. I like it.
Was it worth it? YES – handly little gadget…
6000mm/min, 100%, 1 pass – fill mode – no problem.

I’ve made “Linen Room” and “Office” signs. Bear in mind if these were used outside, a quick coat of transparent lacquer might be useful. AND NOW, I just went off to Amazon and solved my used-up-samples issue, I have ordered a pack (for £4) or various sized rounded plywood rectangles as above as well as some rounded wooden tags – handly for keyrings – I’m going to have some FUN with this engraver.

In the sign above, perhaps slightly less exposure would have been good – but learning is all part of the experience (that’s what I tell myself) – good enough. All I need now is some decent wood.
And I used the one and only perspex sample that came with the Laser 1.. OK so I blew it… ever so slight movement… the hole was in there already -I just did the engraving – 3000mm/min. I need more samples…
And now, one weekend and 2 long power cuts later, I have my samples – and the first one is done.
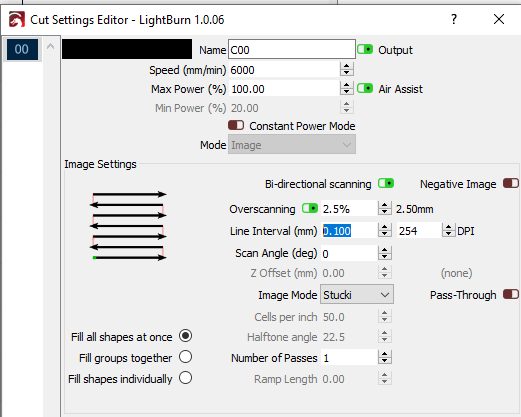
As well as speed and burn power, in, for example, Lightburn you might want to take a look at LINE INTERVAL (under CUT SETTINGS in Lightburn 1.0.06) as that defines the resolution.
I found the default settings to be 0.1mm which is fine but it is possible to see the individual lines when engraving a fine image, so I altered that to 0.05mm – which of course slows down everything to 50% of the default but with that change there was a definite improvement in the image I was engraving.
Finally, for now, I should point out that with the aufero comes some pipe and although you could of course use any of a variety of air blowers to extract fumes, it is handy to have this built into the laser – but not, Ortur do not provide any kind of air source for this. An air positon with say 40ml/min or higher capacity would likely do the trick.

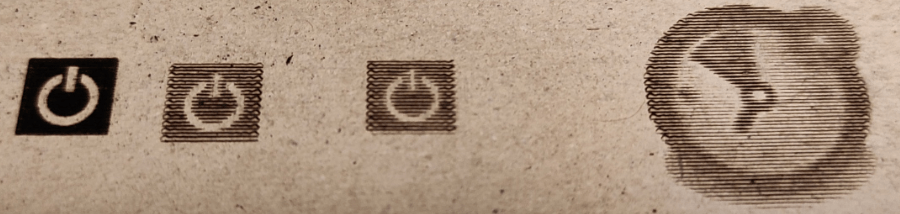
Oh, and if you don’t want to pay for software to use with one of these inexpensive lasers, then for Windows at least, there is LaserGRBL. As will become immediately obvious, I’m still learning here. Tonight I opened up LaserGRBL for the first time and imported a 48px*48px .png POWER symbol from my PC.
For the life of me I could not find any scaling or quality controls in the main LaserGRBL dialog, that is until I went back into the “Open File” dialog and paid a bit more attention. By paying careful attention to the options therein, you can adjust “Quality” lines/mm and more, then after hitting NEXT you can control power and size… to cut a long story short I started off with pretty awful results on a TIMER image then a POWER symbol but within minutes of tinkering was very happy with the little POWER icon (leftmost in the image below). See the second-from-left image – the lines per mm defaulted to 3 – I simply changed that to 10 and reduced the power from 100% to 40%. The material in case you were wondering was a pertty rubbish piece of card I use to protect my bench when engraving. And now, it’s decorated. After initially dismissing LaserGRBL I’ll try some text next (not immediately obvious) – or I may just take this new knowledge back to Lightburn (follow up – I did)..
Ok, so, despite me not being on any kind of commission, Zbanx asked me to make links using their Zbanx web page – good luck with the links below – apparently they lead to a discount for users, not me. The links take you to Ortur and remember to check the discount code at the top of the Ortur site which says (and I quote) “10% discount for all products during Nov. 25-Nov. 30 – Coupon code: ORTURBF (with 10% off for all products at ortur.net)”
Great products (I have both the the Laser Master 2 Pro and the Laser 1), not the clearest website in the world – not sure what they mean by VAT FREE… the translation could be better. If the links below aren’t that clear, they weren’t to me either.
Ortur.net Flash sale price – Aufero Laser 1 Engraver with LU2-2 laser head 2pm-3pm November 25-30 UTC (5 units per day) (original price $239.00 Flash price $199.99) – apologies for U.S. pricing – that’s what they gave me. UK time is UTC-8hrs.
Laser with the LU2-4 head Original price: $339.99 Flash price: $299.99
Ortur Laser Master 2 Pro Original price: $479.99 Flash price: $399.99
AliExpress link – Product model: Aufero LU2-2 -Original price: $195.68 – Price after code: $193.68 – Coupon code: AUFEROAL1 (Get US $2.00 off on orders over US $100.00)
Addendum January 2022 – ALL CHANGE for the better
So – I’ve been checking on how to improve engraving on the web – and it seems that several substances added to wood will make for a darker result while using less power. In this YouTube video the author confirms what I’ve seen elsewhere, Borax powder is better than Citric Acid is better than baking soda – slight hitch for non-Americans (like me) – the nany-state EU has apparently banned Borax (I checked – Amazon have a probably useless substiture) and as Britain is guaranteed to keep the worst of EU reg while abandoning the best – it is banned in the UK according to Amazon – and here’s me thinking this was found in every kitchen. In short, Borax-treated wood – much blacker engraving using less power. I ordered some Borax from here (picked at random – thanks Aidan).

And NOW – RESULTS – my world of engraving has just changed IRREVOCABLY. See photo (right) of the Borax (99.x% pure). Having seen enough videos to know I HAD to try this – but like everyone else, having seen enough videos to be skeptical – I got very excited this morning when my £7 huge tub of Borax appeared in the post. There’s enough here for all my needs and plenty to spare fro household needs (bearing in mind the EU mustve’ had a reason to supposedly ban this white powder – so be careful).
In the least scientific experiment I’ve ever done – I took one of my think plywood samples – about half a teaspoonful of Borax (if that), put that in a tad under 10mm water in a cup and, taking a 10mm paint brush I had lying around, mixed up the Borax and water and painted one side of the sheet – the whole operation took maybe a minute or so.
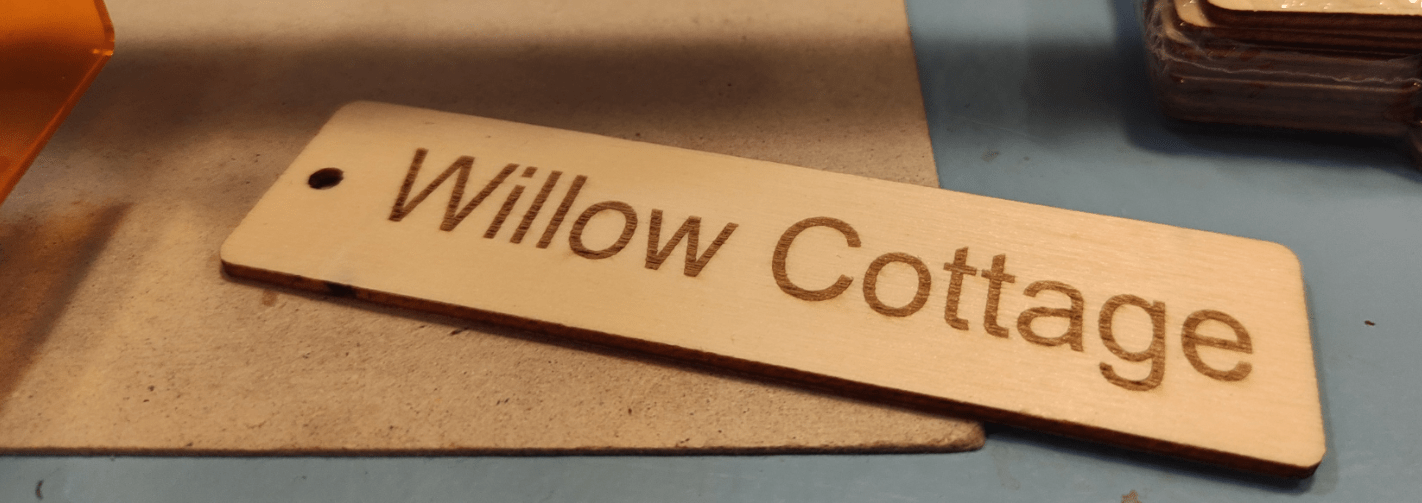
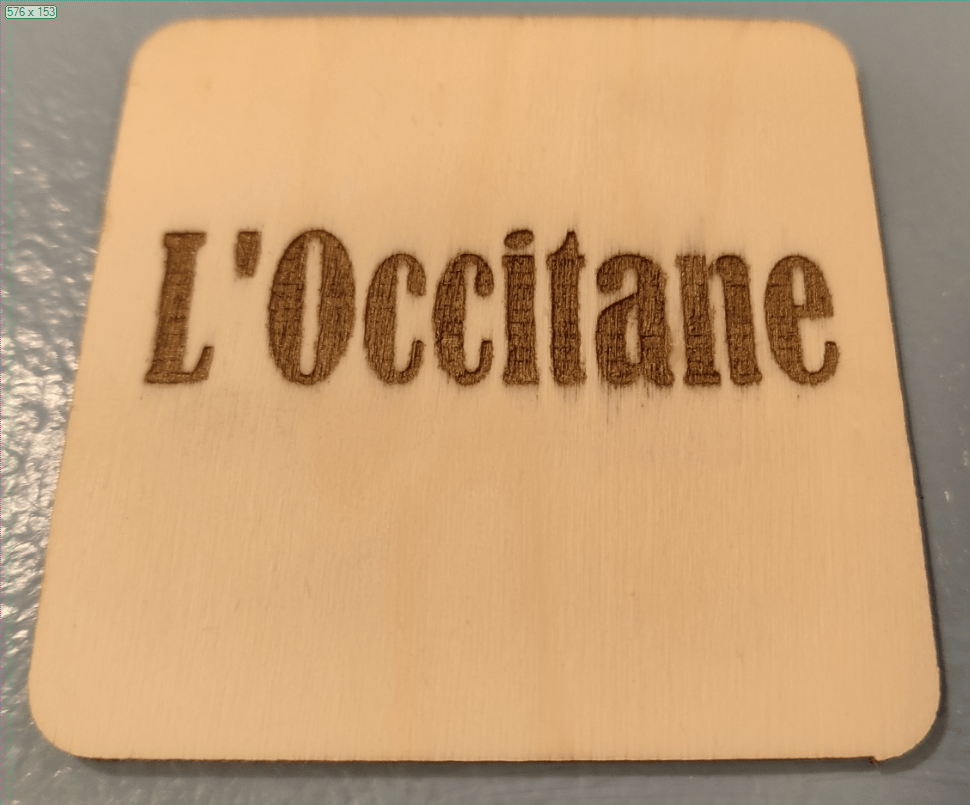
I left the piece of ply to dry for 20 minutes while I prepared some text on my Ourefo Laser One (and made some coffee for me). I set the laser to 50% power and 6000mm/minute – single pass. Look at the text below-left – it looks a little lighter than my very first “Willow Cottage” engraving you see further up – the tag I made – same wood. Well, it would as I made that first engraving at 100% power – same speed.
NOW – look below RIGHT – see the DIFFERENCE – I’m not kidding – the ONLY change here is the Borax pasted onto the wood and left to dry. That’s not just good – that’s AMAZING. Not only is the result more solid – it is more BLACK and darker than my 100% original “Willow Cottage”. Expect more examples soon. For me this is a no-brainer – cheap, does a great job, more quickly, no catches. More when I do some proper tests but I just HAD to show this to you guys.

More updates – January 20, 2022
In the time period from my last update I’ve been using the Laser 1 regularly and just now I had my first attempt at painting the engraving using a technique I picked up from YouTube. I engraved some lettering on the same kind of ply you see above, 3 passes at 500mm/min 100% using the LU2 fine detail laser – through masking tape I picked up from Ebay. I did 3 passes as the output didn’t seems that even after the first pass, most likely due to the masking tape (I’ve made LOADS of “Mind Your Head” signs so it’s definitely the tape).
Anyway I then sprayed gold paint onto the finished job. As the paint was starting to dry I peeled off the masking tape. Thinking about it, gold wasn’t the best colour I could have used (and there’s a little bit of spread visible)…
Above… not TOO bad for a first attempt: The second attempt isn’t perfect positioning wise but better. And yes I do spray clear lacquer on my signs so they are finger-print-proof.
And FINALLY


My wife has been after decent bedroom signs for ages – I found a guy on Ebay selling blanks in all shapes and sizes…
And now between the Borax, figuring out how to turn off overscan in LightBurn – and some decent lacquer – my first actual proper project.
Done – jet-black lettering – lovely. I need more blanks…
.