In July 2021, Madethebest shipped me the Ortur Laser Master 2 Pro laser engraver with fixed focus 20W (input) laser – important specs include the ability to engrave wood board, paper board, black acrylic, leather, food, stainless steel, powder coated metal and more with claimed cutting ability including the above and felt cloth. I must stress that at the time of writing I’ve only tested wood engraving. For those, like me still grasping the subject, note that the specs include engraving speed of 40-10,000mm a minute. I need to check that. I wrote the original article on the OLM2 Pro in July 2021 but then updating it in August 2021 as further down I’m also covering optional extras for the OLM2 Pro – supplied to me by ZBANX.
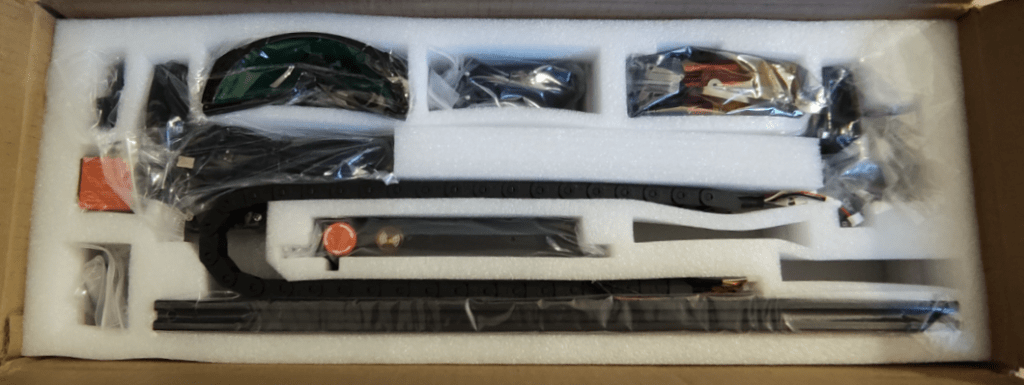
So – what’s the first thing you notice about the Ortur? The box is substancial. On opening, everything is well packed. In the photos you’ll first see the parts minus the plastic protection packs. I’d have liked to show all the parts “fully jacketed” but the camera wasn’t so keen on the reflections. Here are the contents of the box, minus the user manual, CE certificate and various other forms.
I’ve assembled several semiconductor laser engravers over the years and this is the most substancial I’ve seen so far. Let’s look and see what everything appears like, laid out on the bench… at the back, the power supply (EU plug in my case) then in the bag – wood and plastic samples (a nice touch) and belts, then cables and on the right – the green protective goggles. (The laser ALSO has a yellow guard – handy as I keep forgetting the goggles).
Moving forwards, a pretty substancial cable cover, the main laser gantry already pre-assembled minus the laser. Further forward some brackets, the laser, a VERY impressive-looking Ortur fully-boxed control panel and then at the front, 4 lengths of aluminium section (pretty much identical to other engravers I’ve put together but with ruler markings printed on 2 sides – not seen that before).
Front right, a collection of fittings including bolts – all very intimidating but no-where near as bad as it looks! The important thing to note here is that the manual is printed in several languages with QR codes leading to Ortur technical support. I suggest looking at the MadeTheBest links at the end of this article as a starting point. I’ve not included technical specs here because they are well covered on both sites – this entry is more about my initial experience of opening, constructing and initial using of the product.
I was quite horrified at the size of the manual until I opened it and realised only 6 pages are in English, the first page being devoted to safety warnings, the second clearly showing all the parts. The LAST side is a “thank you” with more contact info which leaves a mere 3 pages devoted to actual assembly.
Pretty much every other laser I’ve built up to now has had an unmounted PCB and most have left you to figure out how to mount it – often with a fairly basic cover over the electronics – not the Ortur. I LIKE the big red emergency STOP button – and as for the FLAME ALARM – I’m impressed. This was one of many things missing on the original Laser Master 2.
I did notice something on the Ortur site suggesting 15 minutes construction time – time must move at a different rate in China compared to here in Spain as I spent from tea-time until 1:30am at which point the construction was largely done but no wiring or bands attached – and having gotten the bulk of the work done, I gave up for the night. It’s possible I misread the construction time of course.
Next morning I got out of bed, popped to the gymn for an hour of yoga followed by coffee and sandwiches (it’s a tradition). At the end of all that I was ready for more challenges. Right then, the laser was simply sitting on my desk, and you can see on the left above the armoured-looking cable loom – well, actually things got better from that point and the whole lot went together quite smoothly.
There are only two belts to fit as the X-belt is already fitted to the overhead pre-assembled laser/x-motor gantry though I did have to tighten up the top belt. Laser engraver kits are never trivial to put together but clear instructions help a lot.
On occasion where the photos in the manual were less than ideal, the Ortur site had additional photos which helped, the key points here being that the belts must be fitted smooth-side-up and should be finger-tight so there is no flexing in operation.
At first sight, fitting the belts seems complicated but there is actually plenty of room to get around – and my hands are not small by ANY definition. Having a small standard flat screwdriver lying around helps.
Back to that top gantry for a moment, although it looks completely pre-assembed, because I’d totally assembled the bottom frame earlier, I found I had to take off the bottom rollers to get the gantry fitted, a great time to ensure everything fits together tightly.
As you can see above, I kept that manual close to hand all the time and also had my PC across the room with a browser open on the Ortur and MadeTheBest sites.
Belts in place, fitted through the end-slots (see slot on the photo on the left below) and held in place by dual-purpose bolts (only 2 sizes used so impossible to get wrong) and tightened up I began to work on the wiring – simple enough as I found it impossible to put the wrong plug into the wrong socket. Comparing this to my other large engraver (the Eleksmaker A3 Pro Engraver) I found the belt fastening on the Ortur to be better – and of course the Ortur has (in my case) a 5500mw output laser as against the 3500mW on the Eleksmaker.
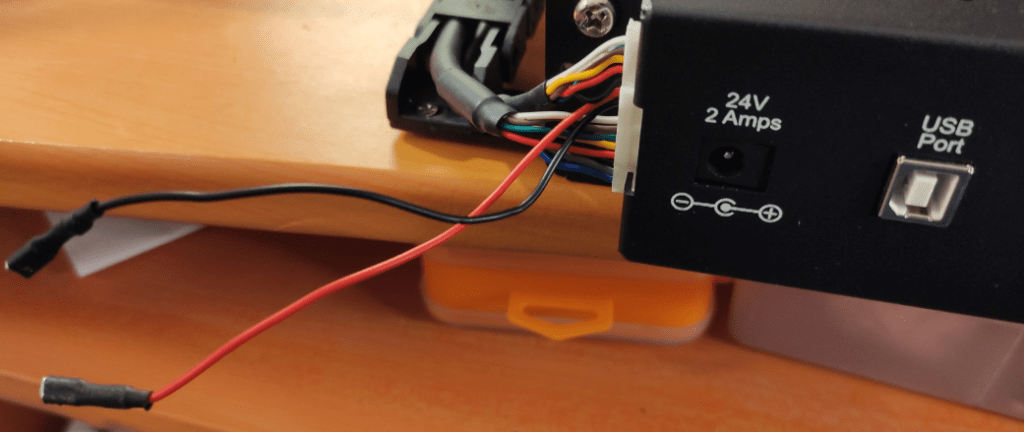
When it came to wiring, it was mostly a case of pushing non-reversable plugs into sockets, a couple of ground wires and 2 sets of contacts for limit switches. See the red and black wires in the photo below.
All pretty much straight-forward, but now of course I had to make sure it wored – there are a ton of links available on the MadeTheBest site and of course Ortur’s own site – including software, one option being LightBurn (trial) – I already have a registered Lightburn from my experiences with the Eleksmaker and other engravers – and I plan to use that. Lasergrbl is another option. I gave that a try as well.
The laser module incidentally was really easy to fit – 2 long screws, one simple connector and an earth wire. This is one of the more powerful semiconductor lasers at 5500mW (the headline claim of 20w is of course the input power, not output).
So I tried the free LaserGRBL (not for the first time) but wasn’t impressed. I now have the Ortur working with Lightburn with an initial issue with the limit switches for homing – but I wrote to Ortur tech support (ticket) and had a response in hours – while waiting to hear back, I went on the web, lots of others have had the same issue and there are lots of solutions out there, I eventually closed my browsers and decided to use come common sense: were the limit switches wired securely? Yes. Was the connector at the control panel wired securely? Yes. Could the limit switches be wired incorrectly?
With 3 connections on each limit switch, with only 2 of them used, of course there’s a chance of getting it wrong. I read the wiring in the manual for one of them and guessed the other. I disconnected the wires to the limit switches and got my trusty multimeter out and checked which TWO connectors short out when you depress the limit switch – in both cases I had them wired INCORRECTLY – to the N.O. and N.C. contacts (which when used as a pair do NOTHING). I reconnected both properly and VOILA – all works a TREAT. I’ve added photos here of the CORRECT wiring (red/black – doesn’t matter which way around, it’s a SWITCH for heaven’s sake.)
Ensure when wiring to the limit switches that you connect to the C (common) and N.O. (normally open) connectors. These are typically marked in tiny letters on the limit switches.
And now we’re cooking… in Lightburn, to test the limit switches, move the laser to the middle of the working area. Add a little text, In Cuts/Layers select your text and set Spd/Pwr to , say 5000mm/1.0 (i.e. 1% power so you can’t do any harm), set the text printing and if you manually close either of those limit switches, everything should stop and the engraver will go into alarm/jog state (see console above)… That’s it, all is well. Press STOP and you are good to go.
I went from a state of complete fear to complete mastery in minutes as all of this started to sink into my brain. Feel free to comment in the blog comments area – anything I’ve learned, you are welcome to. Oh, STOP PRESS: in that MOVE tab below, hides the FIRE button for testing focus (at low power – say, 1%). That can be made available (or not) in the main LIGHTBURN top menu – EDIT – DEVICE SETTINGS)
My first tentative steps with a piece of thin chipboard below. Attempt 2 would be a lot more ambitious. I like it already.
Ortur Laser Master 2 Pro Links and info below – from MadeTheBest.com who have both US and EU warehouses – shipping time is apparently around one week (two methods – Standard and Express)
If you decide to buy this engraver – here’s the Ortur group which I’ve joined and have commented in – sounds like it will be a good resource for the OLM2PRO as well as their official support. Also, here’s the online manual (part is apparently a work in progress) in English – which does a FAR better job of showing construction than my efforts AND now shows the correct wiring for the limit switches (I didn’t discover this until I was all done). Beware though, it is already 62 pages long
Having gotten the OLM2PRO up and running – and having learned how better to use the impressive Lightburn software in the process (see the Lightburn forum), I figured now was as good a time as any to upgrade the adequate (but only just) manual Z-Lifter on the Ortur.
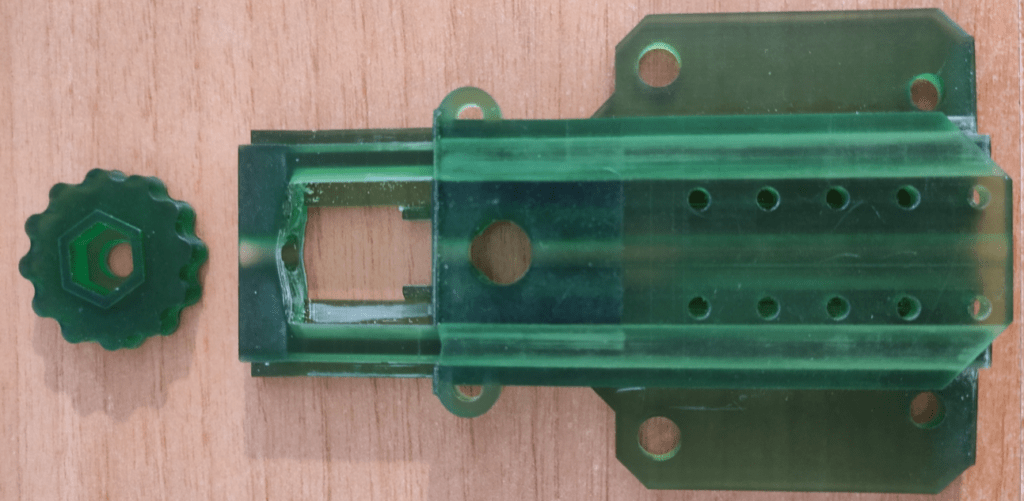
Enter Thingiverse: 6 hours later, my Anycubic Mono 3D resin printer had finished this transparent green 9-part masterpiece – it turns out I jumped in too quickly as the z-adjuster is for the PREVIOUS engraver model – and even then I only needed 3 parts.
Oh, well it was fun trying and would probably work a treat in the right engraver – might have been better if I’d read the notes FIRST. Nothing like a spot of home-brew engineering gone wrong
I really hate to throw this Z-Lifter model in the bin but by the time I ship it from Spain to some lucky OLM1 or 2 owner and they source the needed metal nuts and bolts, it would be more practical to simply order the lot from China.
Still, a great opportunity to remind myself how 3D printers and laser engravers can help each other. Next time, RTFM FIRST.
Back to the engraver, this Sunday morning after recovering from the shock of realising I’d just turned a load of resin into land-fill, I re-fitted the 5500mW laser to the Ortur and had my first attempt at engraving my one and only 3mm thick black acrylic sample.
I have to say I’m still completely novice at laser engraving (and 3D printing for that matter) I just took the black acrylic, set the laser to 100%, 5000mm/min and printed some decent outline text on the acrylic, but WAY more importantly (having learned from my friend Aidan not to try too deep a cut at once) I then set the laser to 100%, 1000mm/min and 15 passes – that was SHEER guesswork – and guess what…
3mm black glossy acrylic, 27mm round hole – PERFECT, no problem, no slope, smooth edges. I’m quite chuffed. 27mm RED hole, not QUITE so flawless and all else being equal, needed 25 passes.
I need more materals to play with – I’m not even going to TRY my clear acrylic sample – though I did read something about leaving the backing on the clear acrylic and engraving it on a metal sheet. To be fair I DID focus the laser to the TOP of the acrylic, maybe the centre would have made more sense – this is where a better Z-Lifter would come in handy I guess (read on). The black – I’m very happy with. Next stop, maybe my very own DIY case for RPi + PSU + twin SSD board… but first, some time in the lake…
OLM2 Pro Information, pricing and links from MadeTheBest – below:
Coupon over $400 save $20: MA20
Ortur Laser Master 2 Pro
Here is a link to an older model Laser 2 – I have NOT built or tested this one.
Update August 11, 2021
As you can see above MadeTheBest sent the Ortur itself. Since then I’ve been using the Ortur (I love it) and decided I needed some extras to go with it. As MadeTheBest sensibly are waiting for results – I talked to ZBankx which I believe is another marketing company for Ortur – anyway the Offline Remote Control recently arrived. And here it is:
What I REALLY wanted was the improved Z-Axis Controller and that arrived just hours ago.
Well, I say that, there was no paperwork whatsoever with the remote and I’ve been desperately hunting around the web for information on what it does and how to mount it on the OLM2 Pro.
I found this page only so helpful. I now know you plug the remote into the engraver – but not much about using the controller. I emailed Ortur support over Christmas – nothing. I’ve emailed again now… let’s see what happens.
Meanwhile – the Z-Lifter
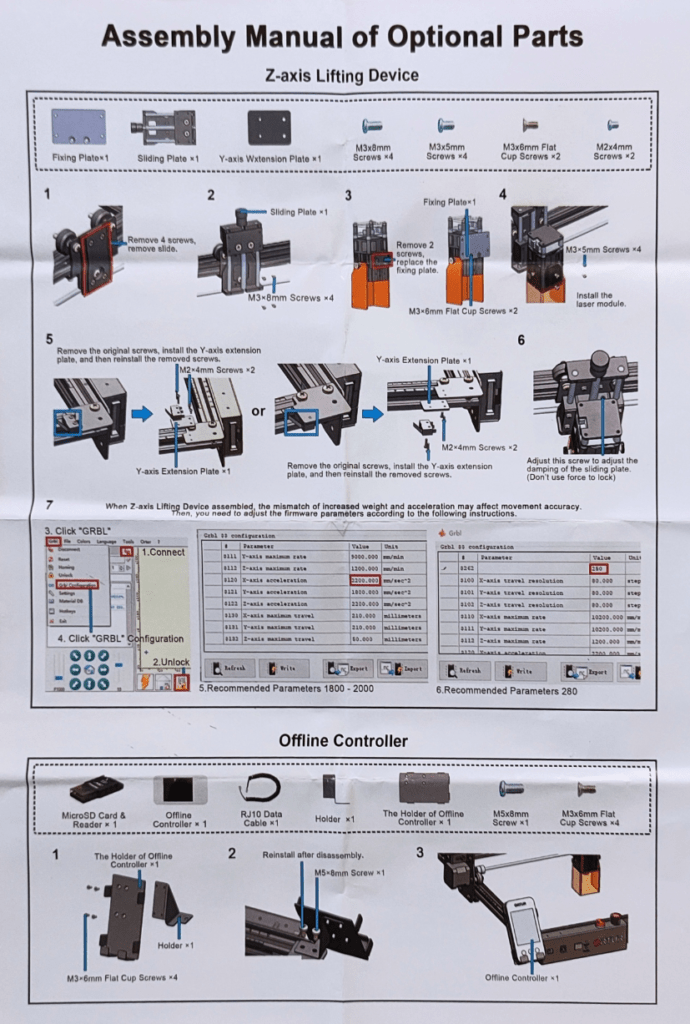
Ok, here’s some clarification: the Z-Lifter (for raising and lowering the fixed-focus laser head to handle different material thicknesses) arrived, again very well packed and with an assembly sheet that included instructions for both the offline controller and the “Z-Axis Lifting Device”. A good start but still no word on what to actually DO with the remote control. I’m pretty suer what to do with the lifter having used the rather naff basic lifter that came with the otherwise excellent OLM2 Pro.
All that remains is to actually fit the lifter, get more information on using the offline controller – and document all of that in here. Bear with me on that – it is August after all and I’m in need of a short break at the beach – Covid permitting. Meanwhile, does that lifter look sturdy or what!! Bang goes my one gripe about the OLM2 Pro. Here’s the link to ZBANX and the Ortur.
Here is the combined instruction sheet I received which contains installation info for both the Z-Lifter and the Offline Remote Control. I’m still waiting for OPERATING instructions for the latter.
The Offline Controller
And here is the Offline Controller base as described above being installed using the 5 screws supplied with the controller – no nuts – easy.
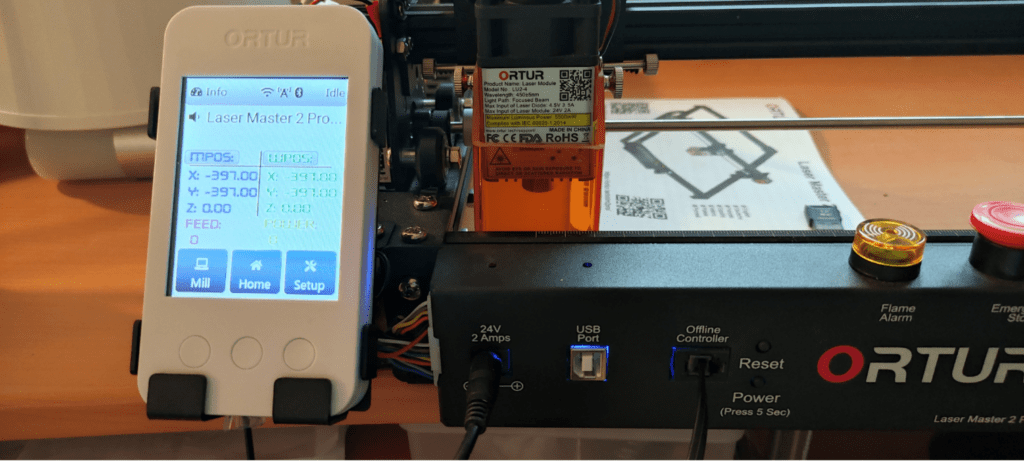
That took all of a few minutes – and the next photo shows the actual offline controller itself which plugs directly into the Ortur control panel.
I’ve no operating manual for the offline controller and I had no initial idea how to turn it on – but as it’s for offline use by definition, it should work simply plugged into the printer (which is powered by a 24v 2A supply that gives off quite a spark on first connection – I figured out that you’re supposed to plug in power THEN turn on the mains).
Anyway, HERE IT IS, I did nothing more than turn on the power to the engraver – and the Offline Controller WORKS! Wheeee. Well, when I say works – not too sure what to do with it due to lack of instructions – but it will connect to WiFi which means you can download grbl files to it from, say, Lightburn and hence burn files without connecting by USB – though I didn’t find doing that very useful due to lack of local editing. Shame they didn’t think to give the controller a name – easier than remembering IP addresses. As they are using an ESP32 in the controller, that would have been easy to include.
Next on my list – the optional enhanced Z-lifter (ever so slightly more complicated to install by the look of it).
I’ll likely fit that tomorrow – we’re in the middle of a gargantuan heat wave here in Spain so I’m staying next to my air-conditioning through the weekend. But first – one of my gripes with many of these lasers is that they work on USB only and that’s how I connect the OLM2PRO to my PC.
So, the offline controller is better than nothing but to me it’s not an essential.
March 19, 2022 Update
I’m still not seeing a manual for that ofline controller – however in the meantime I’ve been working with the LM2 Pro and other lasers and returned to the LM2 Pro today to have a play with 3mm red acrylic – as you can see the results for a small (25mm length) “battery” icon are quite ok. I’m showing below the battery icon cut out of the acrylic and the pieces which ended up on my bench. Several passes, 500mm/min, 75% power.











Hi there, liked your review of the Ortur. Talked a lot of common sense. I’m getting to know my new Laser Master Pro 2 at the moment and looking for help from someone who is further down the line at using one of these. I’m getting breaks in my lines (see pic) and can’t work out what is causing it. I’m not on facebook, so can’t us the official forum, so am looking around elsewhere. Do you have any suggestions, or know anyone who might be able to help. Thanks
I don’t have my LMPRO2 here – it’s back in Spain, otherwise I could try to replicate the issue. The Ortur group on Facebook is well worth looking at.
Hello,
great instructions. I’ll get to work a.s.a.p.
One question: I want to rearrange my cables, they are however too short.
I could not find any new, longer (or extension) cables anywhere in the net.
I did order some where the plugs looked like being the same on the picture but they were not. Do these plugs have any standardized part number?
Do you have a source or do i have to solder…?
Best regards
Amazon have extension cables – at least, Amazon.co.uk do – also Ebay – all cheap.
I’ve just order one of the same machine, interested to see how you are getting on with it and any experience of cutting other materials?
I’ve not used any materials not already covered on the blog.. the LM 2 Pro is in Spain and I’m currently in the UK so can’t do much for the moment – as you’ll see elsewhere I do have a new Ortur Laser One here in the UK, I’ve been off to Amazon to get various wood samples.