
A small package of Seeed XIAO ESP32 boards arrived here in sunny Galera for me late September (2026) and the first thing that caught my eye was the provision for a battery and an external RF antenna.
In case anyone is wondering, XIAO is pronounced “SHYOW” or near enough.
This is a very interesting little board for battery-powered projects, particularly where the device can spend most of its life asleep and wake only when something happens.
The board
This is the Seeed Studio XIAO ESP32-C5. The ESP32-C5 is a single-core 32-bit RISC-V device running at up to 240 MHz, with 8 MB PSRAM and 8 MB Flash. I suppose the headline should be “DUAL-BAND 2.4Ghz and 5Ghz WiFi” as this is one of very few IOT chips than can run on both 2.4Ghz and 5Ghz bands. No pretty blue sky photos this time – the AI completely messed them up so back to old-school photography 🙂
The XIAO C5 supports:
- 2.4 GHz and 5 GHz dual-band Wi-Fi 6
- Bluetooth 5 LE
- Zigbee 3.0
- Thread 1.4
- I2C, SPI and UART
- Up to 11 GPIOs
- Five ADC channels
- JTAG connections on the rear pads
- On-board battery charging and battery-voltage measurement
The board is the familiar XIAO size, just 21 × 17.8 mm.
The external antenna
These boards have a tiny U.FL-R-SMT1 connector for the RF antenna. I’ve always thought of these as painful but when making my recent letterbox alert it did occur to me that and external antenna for the LoRa would be handy instead of putting the while lot outside of the letterbox – but I digress.

The good news is that the boards are supplied with an antenna. The antenna supplied with these is marked “XIAO FPC Antenna A-01”.
So, in practice, I don’t need to go hunting for a suitable antenna before testing them.
The antenna connection is important for normal RF operation. Although the ESP32-C5 itself will obviously power up and run without the antenna connected, I would not deliberately operate the radio without a suitable antenna attached.
The ESP32-C5 supports both 2.4 GHz and 5 GHz Wi-Fi, so the antenna needs to be suitable for the frequencies being used.
Those battery pads
On the underside of the board are two clearly marked battery pads: – BAT + These are intended for a 3.7 V lithium battery.
The board includes an SGM40567 battery charging IC, and Seeed also provides circuitry for measuring the battery voltage. The battery voltage measurement uses GPIO6, with GPIO26 controlling the measurement circuit so that it can be disabled when it isn’t required in order to save power.
Seeed states that the XIAO ESP32-C5 can remain connected to a computer over USB while a battery is connected, thanks to the board’s built-in battery protection/management circuitry.
Obviously, the battery polarity needs to be observed carefully when soldering to the pads.
Is the battery connection really for sleep mode?
Not specifically. The battery pads simply provide the means of powering the board from a battery. Sleep mode is a function of the ESP32-C5 firmware, however, the combination of a battery connection and the very low deep-sleep current makes this board particularly interesting for battery-powered sensors.
Seeed provides a working deep-sleep example in which D0 (GPIO1 / LP_GPIO1) is used to wake the ESP32-C5. The board also supports timer wake-up.
One useful warning from Seeed is that the JTAG pins — MTMS, MTDI, MTCK and MTDO — should preferably be kept for JTAG rather than being used as deep-sleep wake-up pins during development.
Also, once the XIAO enters deep sleep, its USB port disappears. It has to wake again before the USB port becomes visible.
Power consumption
This is where things get interesting…the ESP32-C5 datasheet gives the following typical chip currents:
| Mode | Typical current |
|---|---|
| Light sleep | 0.25 mA / 250 µA |
| Light sleep with the additional power domains shut down | 0.06 mA / 60 µA |
| Deep sleep | 0.012 mA / 12 µA |
| Power off | 0.002 mA / 2 µA |
These are ESP32-C5 chip figures, measured from a 3.3 V supply under the conditions specified by Espressif. They should not automatically be treated as the complete current consumption of a finished battery-powered project.
The awake current is a completely different matter. For example, the ESP32-C5 datasheet gives peak Wi-Fi transmission currents as high as approximately 339 mA at 2.4 GHz and 381 mA at 5 GHz, depending on the transmission mode and power level.
That means the important figure for a real battery project is the average current over time, not simply the deep-sleep figure… for example, a sensor which sleeps at around 12 µA for most of the time, wakes for a short period, connects to Wi-Fi, sends a message and immediately goes back to sleep could have a very low average consumption.
That’s precisely the sort of application I have in mind for these boards.
A useful distinction: light sleep versus deep sleep
Light sleep leaves considerably more of the system available and can wake quickly. Deep sleep shuts down the CPUs and most of the digital peripherals, leaving the RTC system and low-power memory running.
For a simple battery sensor that only needs to wake when a switch changes state, or at regular intervals, deep sleep is the interesting mode.
The ESP32-C5 also contains a separate low-power RISC-V processor, which opens up some interesting possibilities for applications that need low-power processing while the main processor is asleep.
What I want to test
Rather than simply accepting the 12 µA figure from the datasheet, the obvious next step is to measure one of these actual XIAO ESP32-C5 boards.
I’d like to establish:
- Current consumption while running normally.
- Current consumption in light sleep.
- Current consumption in deep sleep.
- Current drawn when waking and using Wi-Fi.
- How quickly it wakes from deep sleep.
- How practical it is to use a GPIO as a wake-up input.
- Ultimately, the average current of a real battery-powered sensor.
That will give a much more useful battery-life figure than simply dividing battery capacity by the advertised deep-sleep current.
Why this board caught my attention
The combination is rather compelling: a tiny 21 × 17.8 mm board, dual-band Wi-Fi 6, Bluetooth LE, Zigbee and Thread, battery charging, an external antenna connection and a quoted ESP32-C5 deep-sleep current of only 12 µA. For Zigbee, I guess that side of it will have to wait until there are more than just switch/bulb examples floating about – I have trouble envisioning using this board with Zigbee to turn a light on and off as smartplugs are SO cheap (though I could well be missing the point). Seeed have lots of information on the subject of Zigbee if you want to dig deeper.
For something which normally has to be awake all the time, that power deep sleep power value isn’t particularly exciting but for something which might sit in a letterbox, gate, shed, garden, cupboard or other remote location for months and only wake when required, it could be very interesting indeed.
The next step is therefore obvious: get one onto the bench, put a battery on those BAT pads, and measure what the complete Seeed board actually consumes.
Attempt 1 – 2.4G or 5G WiFi
One has to start somewhere – and with ESPHOME that’s quite easy. I made sure I had 2 WiFi SSIDs available: myoffice and myoffice-5g (for obvious reasons) – same password which I keep in an ESPHOME secrets file.
Here is my test code – which seemed to work a treat first time around (with ESPHOME you flash the chip over serial the first time – and from then onwards you can use WiFi) but actually took a few revisits to get right… and after switching from 2.4Ghz to 5Ghz – you do have to wait maybe 30 seconds and hit refresh on the browser (WebUI page) to see the final result.
###############################################################################
# Seeed Studio XIAO ESP32-C5
#
# First test firmware
# Pete Scargill October 2026
#
# What this version does:
#   - Connects to my 2.4 GHz "myoffice" Wi-Fi network initially
#   - Provides a Web UI
#   - Provides the Home Assistant ESPHome API
#   - API encryption is deliberately NOT enabled
#   - Measures the voltage of a connected Li-ion battery
#   - Provides a Web UI selector to switch between:
#         myoffice    = 2.4 GHz
#         myoffice-5g  = 5 GHz
#   - Displays Wi-Fi signal strength
#   - Displays firmware version
#   - offers deep sleep at a button press
#
# What this version does not do:
#   - No external I/O
#   - No sensors other than battery voltage
#
###############################################################################

substitutions:
  device_name: xiao-esp32-c5
  friendly_name: "XIAO ESP32-C5"
  firmware_version: "0.17"
  wifi_ssid_24: "myoffice"
  wifi_ssid_5: "myoffice-5g"

esphome:
  name: ${device_name}
  friendly_name: ${friendly_name}
  comment: "Seeed Studio XIAO ESP32-C5 - Wi-Fi and battery test"
  project:
    name: "pete.xiao_esp32_c5"
    version: ${firmware_version}

###############################################################################
# ESP32-C5
###############################################################################

esp32:
  board: esp32-c5-devkitc-1
  framework:
    type: esp-idf

###############################################################################
# Logging
###############################################################################

logger:

###############################################################################
# Global variables
###############################################################################

globals:
  - id: wifi_connected_since
    type: uint32_t
    restore_value: no
    initial_value: '0'

###############################################################################
# Wi-Fi switching script with diagnostic logging
###############################################################################

script:
  - id: switch_wifi_network
    mode: restart
    parameters:
      target_ssid: string
    then:
      - text_sensor.template.publish:
          id: wifi_switch_status
          state: !lambda 'return "Switching to " + target_ssid + "...";'

      - delay: 2s

      - wifi.configure:
          ssid: !lambda 'return target_ssid;'
          password: !secret wifi_password
          save: true
          timeout: 30s

      - wait_until:
          condition:
            lambda: |-
              return id(wifi_ssid).state == target_ssid;
          timeout: 45s

      - if:
          condition:
            lambda: |-
              return id(wifi_ssid).state == target_ssid;
          then:
            - text_sensor.template.publish:
                id: wifi_switch_status
                state: !lambda |-
                  return "Connected to " + target_ssid;
          else:
            - text_sensor.template.publish:
                id: wifi_switch_status
                state: !lambda |-
                  return "Not confirmed: requested " + target_ssid +
                         ", current SSID " + id(wifi_ssid).state;

###############################################################################
# Home Assistant API
# Deliberately NO encryption.
# Reboot timeout 0 to stop it rebooting if no clients while testing
###############################################################################

api:
  reboot_timeout: 0s

###############################################################################
# OTA updates
###############################################################################

ota:
  - platform: esphome

###############################################################################
# Wi-Fi
#
# We start on the 2.4 GHz network.
#
# AUTO allows the ESP32-C5 to use either supported band. The Web UI selector
# below chooses which of our two SSIDs it connects to.
###############################################################################

wifi:
  ssid: "${wifi_ssid_24}"
  password: !secret wifi_password

  on_connect:
    then:
      - lambda: |-
          id(wifi_connected_since) = millis() / 1000;

      - delay: 2s
      - lambda: |-
          if (id(wifi_ssid).state == "${wifi_ssid_5}") {
            id(wifi_network).publish_state("5 GHz");
          } else if (id(wifi_ssid).state == "${wifi_ssid_24}") {
            id(wifi_network).publish_state("2.4 GHz");
          }

  on_disconnect:
    then:
      - lambda: |-
          id(wifi_connected_since) = 0;

  band_mode: AUTO

  # no timeout while testing.
  reboot_timeout: 0s

###############################################################################
# Web interface
#
# Version 3 is the current ESPHome web interface.
# "local: true" means the supporting web files are stored on the ESP itself.
###############################################################################

web_server:
  port: 80
  version: 3
  local: true

###############################################################################
# Basic status
###############################################################################

text_sensor:

  - platform: template
    name: "WiFi Switch Status"
    id: wifi_switch_status
    icon: "mdi:wifi-sync"
    update_interval: never
    web_server:
      sorting_weight: 13

  # Our own project/firmware version.
  # This is deliberately separate from the ESPHome version.
  - platform: template
    name: "Firmware Version"
    lambda: |-
      return {"${firmware_version}"};
    update_interval: 60s
    icon: "mdi:tag"
    web_server:
        sorting_weight: 10
    entity_category: diagnostic

  # Shows the Wi-Fi network to which the C5 is currently connected.
  - platform: wifi_info
    ssid:
      name: "WiFi SSID"
      id: wifi_ssid
      web_server:
        sorting_weight: 10

    ip_address:
      name: "IP Address"
      web_server:
        sorting_weight: 11

sensor:

  - platform: template
    name: "WiFi Connection Uptime"
    id: wifi_connection_uptime
    update_interval: 1s
    unit_of_measurement: "s"
    accuracy_decimals: 0
    icon: "mdi:timer-outline"
    lambda: |-
      if (id(wifi_connected_since) == 0) {
        return 0.0f;
      }
      return (millis() / 1000) - id(wifi_connected_since);
    web_server:
      sorting_weight: 12

  ###########################################################################
  # Wi-Fi signal strength
  ###########################################################################

  - platform: wifi_signal
    name: "WiFi Signal"
    update_interval: 10s
    unit_of_measurement: "dBm"
    accuracy_decimals: 0
    icon: "mdi:wifi"
    web_server:
      sorting_weight: 20

  ###########################################################################
  # Battery voltage
  #
  # Seeed's XIAO ESP32-C5 uses:
  #
  #   GPIO26 = enable battery measurement circuit
  #   GPIO6  = ADC battery voltage input
  #
  # The hardware uses a 1:2 voltage divider, so the ADC voltage is doubled.
  ###########################################################################

  - platform: adc
    pin: GPIO6
    name: "Battery Voltage"
    id: battery_voltage
    attenuation: auto
    update_interval: 10s
    unit_of_measurement: "V"
    device_class: voltage
    state_class: measurement
    accuracy_decimals: 2
    filters:
      - multiply: 2.0
    icon: "mdi:battery"
    web_server:
      sorting_weight: 5

  # How long the C5 has been running since its last restart.
  - platform: uptime
    name: "Uptime"
    update_interval: 10s
    icon: "mdi:timer-outline"

###############################################################################
# Define battery management
# GPIO26 is battery management enable
###############################################################################
output:
  - platform: gpio
    pin: GPIO26
    id: battery_measurement_enable

###############################################################################
# On-board LED
# GPIO27 controls the user LED.
###############################################################################
  - platform: gpio
    pin: GPIO27
    id: onboard_led
    inverted: true

###############################################################################
# Battery measurement enable
#
# GPIO26 controls the battery-voltage measurement circuit on the XIAO C5.
# We leave it enabled in this first version because we are not yet trying
# to minimise battery consumption.
###############################################################################

switch:
  - platform: output
    name: "Battery Measurement Enable"
    id: battery_measurement_switch
    output: battery_measurement_enable
    restore_mode: ALWAYS_ON
    web_server:
      sorting_weight: 2

###############################################################################
# GPIO27 controls use LED - add a control into the WebUI
###############################################################################
  - platform: output
    name: "On-board LED"
    output: onboard_led
    icon: "mdi:led-on"
    web_server:
      sorting_weight: 1
###############################################################################
# Deep sleep
#
# No automatic sleep time is configured yet.
# The Sleep Now button below allows us to test deep sleep manually.
###############################################################################

deep_sleep:
  id: c5_deep_sleep

###############################################################################
# Manual deep-sleep test
#
# Pressing "Sleep Now" immediately puts the C5 into deep sleep.
# At this stage there is no automatic wake-up timer, so the board will
# remain asleep until it is reset or otherwise given a configured wake source.
###############################################################################

button:
  - platform: template
    name: "Sleep Now"
    icon: "mdi:sleep"
    on_press:
      - deep_sleep.enter:
          id: c5_deep_sleep
    web_server:
      sorting_weight: 4
###############################################################################
# Wi-Fi band/network selector
#
# This is deliberately simple.
#
# Selecting "2.4 GHz" connects to:
#     myoffice
#
# Selecting "5 GHz" connects to:
#     myoffice-5g
#
# Both use the same password stored in secrets.yaml.
#
# Changing networks will temporarily disconnect the Web UI and Home
# Assistant API while the C5 reconnects.
###############################################################################

select:
  - platform: template
    name: "WiFi Network"
    id: wifi_network
    icon: "mdi:wifi-cog"

    # Display the network the device is actually connected to.
    lambda: |-
      if (id(wifi_ssid).state == "${wifi_ssid_5}") {
        return {"5 GHz"};
      }
      if (id(wifi_ssid).state == "${wifi_ssid_24}") {
        return {"2.4 GHz"};
      }
      return {};

    # Re-evaluate the actual connected SSID frequently so the dropdown
    # does not remain on the previous network for the default 60 seconds.
    update_interval: 2s

    options:
      - "2.4 GHz"
      - "5 GHz"

    set_action:
      - if:
          condition:
            lambda: 'return x == "2.4 GHz";'
          then:
            - script.execute:
                id: switch_wifi_network
                target_ssid: "${wifi_ssid_24}"
          else:
            - script.execute:
                id: switch_wifi_network
                target_ssid: "${wifi_ssid_5}"
    web_server:
      sorting_weight: 3
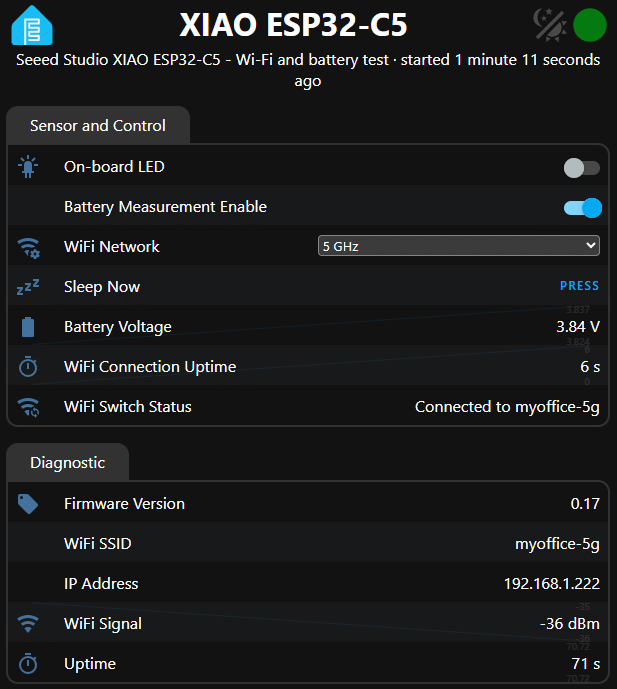
and the resultant WebUI which works in a browser – same address as the ESP32 itself – port 80 unless otherwise specified.
And it WORKED. The board powered up on ssid “myoffice” and when I changed the dropdown to 5Ghz it switched to the 5Ghz WiFi “myoffice-5g” (browser refresh needed at that point). Battery voltage, signal strength, ssid, IP address – signal strength – all you need to start the ball rolling. Unimpressed? Most ESPs and other IOT devices cannot access the 5Ghz band and that 2.4Ghz band gets crowded quite quickly.
Of course I wanted to be complete – so flicked back to 2.4Ghz – I then waited maybe 30 seconds – then another refresh to see the results..
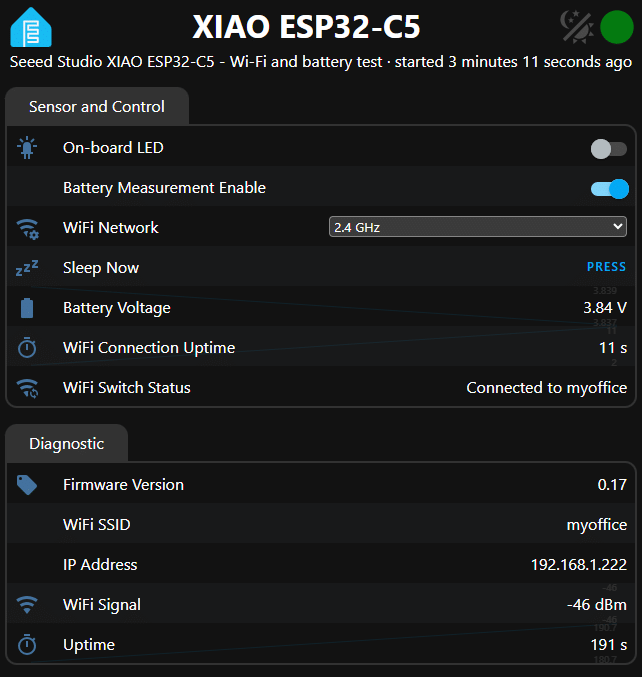
Note the signal strength… Next I’ll do some low power testing but not bad for a simple start…
Then I discovered in the log – apparently there are default ESP settings which time out the ESP32-C5 if no clients – I don’t want it turning off when I’m testing so… slight mod to API and WiFi sections…
Note that while the ESP32-C5 seems like a big upgrade, the ESP32-S3 has more RAM but the former is still streets ahead of the likes of the common ESP32-C3.
If you read my article about the C3-based Abrobot unit with tiny display – I have it running side by side with the C5 right now on test – if both are on 2.4Ghz WiFi fairly close to my office router, note that I’m getting a -17dBm WiFi signal on the C5, but a -50dBm signal on the C3. I originally had horrendous problems getting a signal on the (internal antenna) C3 from my hallway and had to introduce a WiFi access point actually in my office to get satisfactory operation. That’s absolutely not going to be needed for this Seeed C5 module – OK the external antenna would be a pain in space-limited projects to be sure but that’s a CONSIDERABLE signal difference if space isn’t an issue.
My 3v6 Lithium ION battery – which would be too much for an unregulated ESP as it peaks at 4.2v – is wired directly to the BAT pads on the C5. Seeed website says that because of the efficient buck convertor – this is just fine. With the battery securely wired to the C5, my 5-digit meter shows a voltage a few percent higher than the uncorrected voltage reading from the C5 board itself.
Deep Sleep
Next experiment… add deep sleep capability in software and a WebUI deep sleep button for testing…
With the above, nothing happens until I hit the deep sleep button in the webUI then the C5 goes to sleep with no wakeup time set.
Meter on mA range in series with the power and a quick check before putting the C5 to sleep. I’m seeing typically 120ma in normal use – battery at 3.73ma according to the WebUI. And now, 15uA. I’m guessing cycling the power will bring it back up. Indeed 94ma for a few seconds then 120ma when the WiFi and hence WebUI come online. Ooh-err… after several more seconds I’m seeing 30ma or so. D0 to ground momentarily also wakes up the C5.
I’m on 2.4Ghz WiFi incidentally up to now. I can switch to 5Ghz WiFi on a whim so I will. Use of the 5Ghz network makes only a small difference to power consumption and of course in sleep mode it won’t be relevant. One thing I just noticed – with the USB-C connector at the top and with a 18650 battery (unknown charge state) powering the C5, I left it running for several hours after which the board died – no amount of button pressing would bring it back to life. When I plugged in USB for a few minutes it became obvious the USB was charging the battery – as soon as the board sprang back to life, I removed the USB connection and after a while the board died again – at around 2.75v on my meter (2.55v on the internal charge indication). I reconnected USB and that was when I noted that the red light to the top left of the USB connector, rather than the fairly useless POWER indicator you often find on such boards, was flashing to indicate CHARGING. I like that.
Note that with a fully charged 18840 battery and the ESP32-C5 fully awake for a little while, the latter does seem to get quite warm even with the USB power disconnected.
If this interests you – have fun.
Sources
Seeed Studio – XIAO ESP32-C5 Getting Started:
https://wiki.seeedstudio.com/xiao_esp32c5_getting_started/
Espressif ESP32-C5 Series Datasheet:
https://files.seeedstudio.com/wiki/XIAO_ESP32C5/res/esp32-c5_datasheet_en.pdf
Nice little board!
With the PSRAM it should meet the criteria to run tailscale in ESPHome as I mentioned in the M5Stack post.