

Prelude
Before I go off on one, talking about Itead’s recent gadgets which arrived on my doorstep this week, let’s take a quick step back: Sonoff is a brand name, Itead is the Shenzhen-based company who make various devices using the Sonoff brand and very often relying on the APP called eWeLink to control their various devices. So going back in time as far as I can, we have the low-cost Sonoff BASIC, a small, inexpensive mains-controlling WiFi device, based, like so much Sonoff kit, on the ESP8266 controller.

Because of the use of this micro-controller (or it’s relative, the ESP-32), much of Itead’s kit can be easily converted to run “Tasmota”, a VERY popular free and supported firmware alternative to the currently popular “cloud” offerings (including eWeLink). Going back even further, I and my friend developed “ESP-GO” which coincidentally ran well on the Sonoff devices (I still have a few devices running ESP-GO to this day) – but I digress…
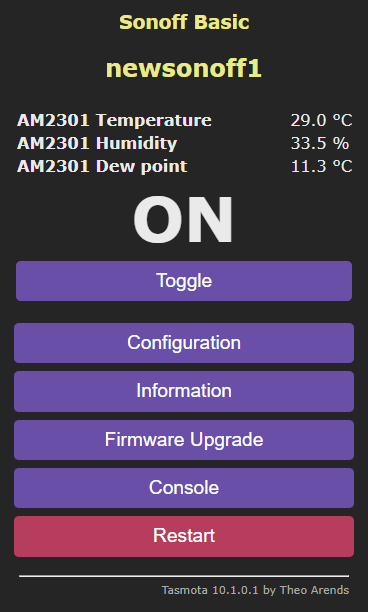
Coincidentally I was just about to start this write-up when I realised one of my original Sonoff BASIC devices (above) was running a very old version of Tasmota. Within minutes of realising this, I successfully used the online Tasmota OTA facility to bring this old but perfectly fine device fully up to date (dev version of Tasmota 10.1.0.1 at the time of writing).
This original Sonoff BASIC (with mains in one side, switched mains out the other side, tiny on-off button on the top) is amenable to making SOME use of GPIO pins and I plugged in a DHT22 sensor to add temperature/humidity monitoring. That ability to handle a DHT22 is built into Tasmota using one of a couple of usable pins on the Sonoff BASIC units. I chose GPIO3 (a serial IO pin). The Tasmota colour customising is one of my favourites.
Enough of the history lesson – I have a large bag of goodies from Itead here, let’s get down to it.
The Christmas Goody Box – ZBMini

Firstly, I received a couple of devices. These are rather handy if you are into Zigbee as they act as simple mains controllers but also as Zigbee routers – Zigbee uses a MESH system to allow for pretty much unlimited expansion – battery powered devices are clearly NOT used as routers so it makes sense to have the odd mains controller dotted around to keep the mesh in good order.
So, I took out the first of the devices, held in the reset button for a few seconds and… nothing. Maybe a bit late at night – it helps if you plug the device into the mains first.
I plugged the into the mains and… a flashing green light appeared around the button. I didn’t have to do anything other than tell my Zigbee setup to look for new devices. and there it was. A couple of quick button presses (on – off) confirmed the new was now part of the Zigbee network.
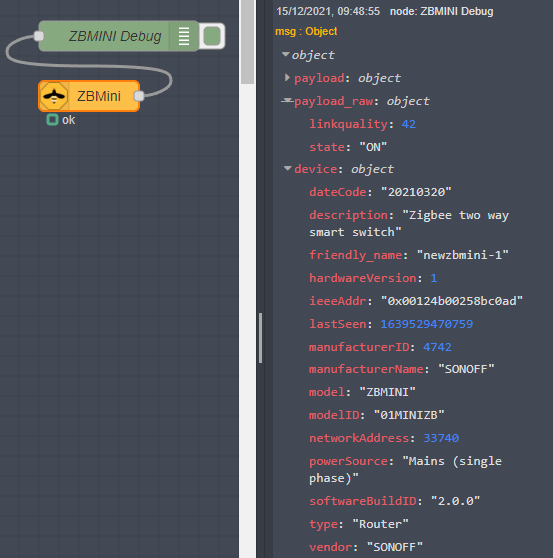
On the right you see the status of the ZB-Mini as shown in the Node-Red Zigbee node for that device. You could not ask for more info, only partly expanded here (the Zigbee nodes are a convenience thing, you can just read and control devices using MQTT and function nodes if you want). Also Zigbee2MQTT has it’s own control panel by default at port 9099.
All that remained now was to give the device a nice “friendly” name. It doesn’t get any easier…. The works with the Sonoff Zigbee dongle and Zigbee2MQTT but is not limited to working with the Sonoff dongle or their Zigbee hub – I use these minis in my other main installation with non-Sonoff hardware and Zigbee2MQTT software.
Right – that’s this neat little unit running as a power controller and router as an added bonus. As you see in the photo above left, as well as a couple of neutral connectors and live in + live out, that button can be brought out to a real button or switch. For scale, the is (a truly mini) 41 x 41 x 19mm (approx).
Coming up next: Sonoff , Sonoff Smart Stackable Power Meter (Main unit) and 4-relay unit , Sonoff Soil Moisture Sensor – but first – some Christmas shopping!
Switchman M5 Wall Dual Switch panel


is a neat (in this case) dual smart wall switch. On the back we have live and neutral in, then a pair of live outputs (for the two switches). Of course, Switchman works with the eWeLink APP out of the box. Setup is simple – apply Live and Neutral to Switchman (which may not be suitable for some UK wall switch replacements if no neutral is available) and the two LEDS at the bottom front will light up with the left LED alternating red and blue to indicate the switchman is in setup mode.
I did my best to get a photo showing the blue flashing on the left – but the ON time of the blue LED is very short and I simply could not capture it on camera, though obvious to the naked eye.
In the eWeLink APP on my phone, I went into “Quick Pairing” and tried adding a device. I put in the password for one of my 2.4Ghz access points. No luck. Next, Bluetooth pairing: I clicked the APP to confirm the blue light was flashing on the Switchman – and hit NEXT. The App said “Bluetooth devices nearby” – “Search devices”…”search failed” – time to get the manual out. Ah, turn off – on and instead of a steady blue flash you get 2 short flashes and a long one – repeated. This time, device “ck_1001xxxx” was found – I hit CONNECT.
NOW it wanted to know about WiFi – so clearly the Switchman and APP were talking to each other by Bluetooth (thanks to the ESP32 inside). I selected my main office WiFi, ensuring the password was correct. “Device added successfully”. Name “M5-2”. That’ll do for now. DONE.
The very first thing I noted on the App was “New firmware available. I opened device settings to update it”. I noted in “Device Settings” that the firmware was 1.1.0 – so I hit the right arrow to get the update. “General performance improvements and bug fixes”. “Update Now” – “Confirm”. I did and moments later I noted “Current version 1.1.0” – erm, that’s where I was when I started… I rebooted the APP and power cycled Switchman. This time around, I still got the same version number. Maybe I’m taking this the wrong way “Current version” to me means the currently installed version. Hey, but now I could not update so perhaps I have it wrong and my Switchman DID update. Never mind – it works.

So now, the left button LED was solid blue and the right button LED was really dim red. Pressing the two buttons changed that to purple and bright red. Well, I’d rather the dim red than OFF – at least you can find the switch in the dark – makes sense. Turning the two switches on and off in eWeLink had the same effect.
At the bottom of the APP page for Switchman, you have SCHEDULE, TIMER, LOOP TIMER, ALL ON and ALL OFF. Back for a second to settings and you can change the name of the device and also the default names of “Channel1” and “Channel2”. If you have more than one device you can add them to a “group”.
You can control the brightness of the OFF position LEDS (not individually) and you can turn the blue network indicator on and off. You can set “power-on” state to off, on or last state. There are “Inching” settings to allow or auto-turn-off after a while – that is for me ESSENTIAL – if I turn a heater on – I invariably forget to turn it off. In Tasmota I always use a timeout on such controls – well, now, Sonoff Switchman can do that natively.
You can turn LAN control on and off – by which I assume that means operation works without “phoning home” to China. One thing I noticed, with the LAN (blue) LED off and both switches OFF, the left LED is slightly dimmer than the right – I wonder why.
One last thing, for size, is a good match for NSPANEL if you happen to have them side by side (see below). And yes, I know you can use an FTDI to install Tasmota onto Switchman – but for now I’m having fun getting to grips with SWITCHMAN as-is.
And now, NSPANEL
I plugged the (rather neat-looking) into the mains at which point a message appeared on the ILI93420based touch-screen – “Please add devices with Bluetooth pairing in eWeLink APP”. I did that and…. no change. After a few minutes the APP said “unable to join the network”.
So, I tried “Quick pairing”. “Looking for devices” – nothing. Meanwhile the was still showing a rotating wheel and “Please add devices with Bluetooth pairing in eWLink APP”. Nothing. “Pairing failed” according to the APP.
I tried again in Bluetooth mode – this time I realised I’d put in the wrong WiFi password (my fault) – and all was well – not very intuitive though.
The initial name given to the device was a not particularly helpful series of letters and numbers. I renamed it to NSPANEL2.


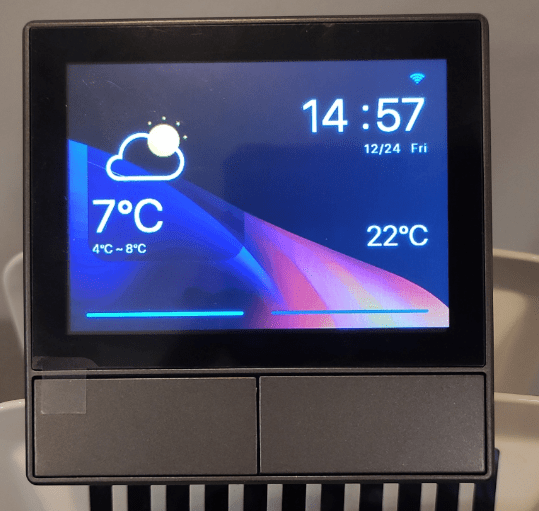
Now I was cooking – the device as I’ve noted elsewhere in my review of an early model in Spain, comes with a pair of front panel (real) rectangular buttons controlling 2 internal relays by default and seemingly uses the internal temperature (it’s own sensor) and a weather-forecast-based outside temperature on the VERY nice touch display (I’m waiting to hear of support for this display in ESP-HOME and Tasmota).
Now, being able to turn a couple of devices on and off is nice, but what I’d like next is a proper thermostat. You can also expand operations with more screen pages and widgets.
It TURNS OUT that you can use one of the internal relays to control heating or cooling – and set up multiple times and temperatures… or use an external unit.
I have yet to figure out if you can use the internal sensor and an external relay (as my thermostat needs to be at the other end of the house to the actual relay). More on this later…..
Indeed as you’ll see in the photo on the right, I’m not really sure WHAT’s happening – the unit is clearly showing the desired temperature in the middle but I seem to have no control over the limits of heat and cool that it can use and that same display is not showing the ACTUAL temperature.
16C is fine as a minimum but in a holiday rental I’d hate to give people the ability to turn the heat up to 31c so this SEEMS to be something of a gimmick at this point? Air-source heating systems generally won’t go that high anyway. Clearly just a matter of a firmware upgrade to make those settings flexible.
Also once the unit is set up to use the first output as a thermostat, the only indication of anything on the actual NSPANEL is the usual on-off button and indicator until you swipe the screen right to reveal the stat control (no current temperature in that, either) – what kind of thermostat is that, I wonder? If someone not used to this stuff is using the building – will they need written instructions?
December 30, 2021 Update
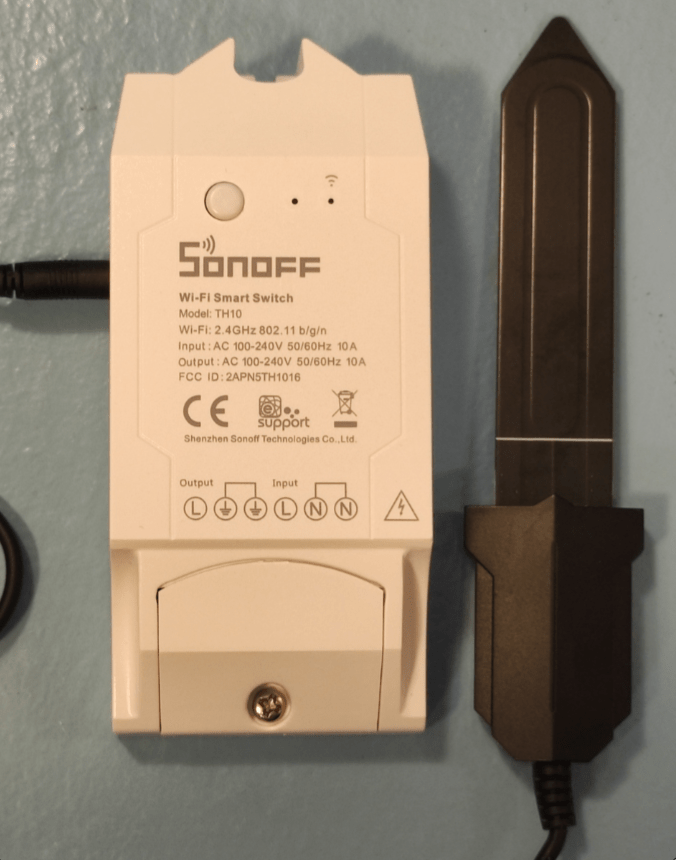
Right – after a slight delay I can now check out the MS01 Soil Moisure Sensor as I now have an un-modified Sonoff DIY Sensor (the sensor add-in is not yet supported in Tasmota so I’ll check it out from the Sonoff eWeLink App). I’ll not type out the spec as it’s all in the photo below – suffice it to say it is waterproof, capacitive and weather resistant though I’d rather a longer lead back to the which is NOT weatherproof.

I’ve had lots of sensors in the past including the resistive ones which don’t last 5 minutes outside either here in the UK Norhtheast or at my location in Southern Spain (AliExpress have several – some even have an exposed circuit board attached to them – how mad is THAT?). I also have one of the Bluetooth sensors and have considerable difficulty getting the BT signal to go to my plants outside through a stone wall even with a window nearby. From my Raspberry Pi, in order to use Bluetooth at all I have a USB extension which ends up at the sensor near the outside window – you’d think that was ideal – but no. I could write a book on the subject so Let’s take a look at the Sonoff MS01.


The supplied lead is 0.5m (not really much use for me) but the quoted maximum for an extension is 30m (absolutely fine so a simple 2.5mm male/female extension lead will do the trick – see photo for the plug end). The sensor can be plugged into both Sonoff and TH16 mains controllers. As Itead knew I’d Tasmota’d my devices they were kind enough to send another so I could check out the garden sensor – fair enough.
To test, I plugged the into the mains and started the eWeLink APP well within 3 minutes and set it to QUICK PAIRING mode. The blue light on the TH10 started flashing 2 on, then solid for a second then 2 more flashes etc… but pairing failed.
I changed WiFi access points and tried the same again, ensuring I power cycled the . Nothing. SO, I rebooted the phone and started again – perfect this time – I’ll put it down to the phone.
This time around a device called TH10R3 (TH10 revision 3) appeared almost immediately on “quick pairing”. I hit DONE and that was it. The blue light on the TH10 stayed on and toggling the button turned the red light on and off as did using the control on the APP.
To the left of the icon on the APP are icons of various sensors.
I plugged in the moisture sensor and the APP returned “0% RH”. For a scientific test I put the end of the sensor in my mouth at which point the RH value went up to 15% – and dropped to 2% on removing. Perhaps something more valid? Don’t worry – no-one else will get to play with this sensor so no risk of transferring Covid.
The remains of my coffee? 42% RH. I’d try something really scientific like a plant but it is almost freezing cold and pouring with rain outside, so maybe not, given the muddy state of our garden right now.
Suffice it to say for now, this fibreglass unit seems to have a durable coating on it and the electronics are actually sealed in black plastic. I think it’ll last. Time will tell.
Flashing the Sonoff NSPanel with Tasmota!
The only smart devices in my home that rely on a cloud are my Amazon Echo ones. I won’t have anything that can’t be flashed. At least the Amazon cloud isn’t Chinese (yet).
https://templates.blakadder.com/sonoff_NSPanel.html
Also https://blakadder.com/nspanel-hacking/
Still needs work
Very informative post shared learned a lot and it is very interesting thanks for share.
Initial support for the NSPanel has been added to ESPHome. The display is a Nextion so the UI can be created in the Nextion editor.
Looks VERY initial to me. Meanwhile Itead have all my recommendations for improving their currently incomplete stat implementation. Think I may wait and see.