Way back in February 2025, I was sent a pair of Reyax LoRa modules to try out and review. They duly went into the increasingly dangerous pile of interesting hardware waiting for attention and frankly, I never got around to using them. Having no idea how to use LoRa and moving home didn’t help (a multi-month, still ongoing) process.
That is until today:
I decided to start with absolutely no grand plan — just two NodeMCU ESP8266 boards (just because I have them), two identical Reyax RYLR998 LoRa modules and the desire to see how difficult it would be to get a simple long-range wireless link working.
Trust me, I’ve tried ALL ways to get a signal down to my letterbox – including 433Mhz dedicated sensor and receiver boxes from AliExpress (one way) – let me first bore you… my office is surrounded by thick stone inside a cavehome – behind my room a mountain (large hill) – in front, the living room – all walls are SOLID – out of the 3-layer breezeblock exit to a semi-enclosed foyer – again breezeblock – around the BBQ area – stone and breezeblock again stopping line of sight… across our car park area, large enough for 3 cars, to our gates – total up to now 70 steps – I’m tall. Then down a 20 degree curved slope – our shared footpath with our neighbour – 76 more steps to our letterbox – a grand total of 146 steps.
First things first – talking to the modules
The RYLR998 modules are wonderfully straight-forward once you know what they expect. Connected to a USB serial adapter, both respond (at default 115Kbaud) to a simple:
AT
with:
+OK
They also happily reveal their firmware version:
+VER=RYLR998_REYAX_V1.2.3
That was encouraging. Both modules were alive. I configured them with different addresses (1 and 2 – the default was 0) but with the same network ID and radio frequency, then I tried sending messages between them and rather pleasingly:
It worked.
Adding the NodeMCUs
Next came a pair of very ordinary NodeMCU ESP8266 boards. No Bluetooth, fancy displays or anything complicated — just a couple of ESP8266s talking to the LoRa modules over software serial at 115K Baud.
The ESP8266 board below is generic – not all have the same pins and capacitors – the pinouts here match my boards – handy reference…
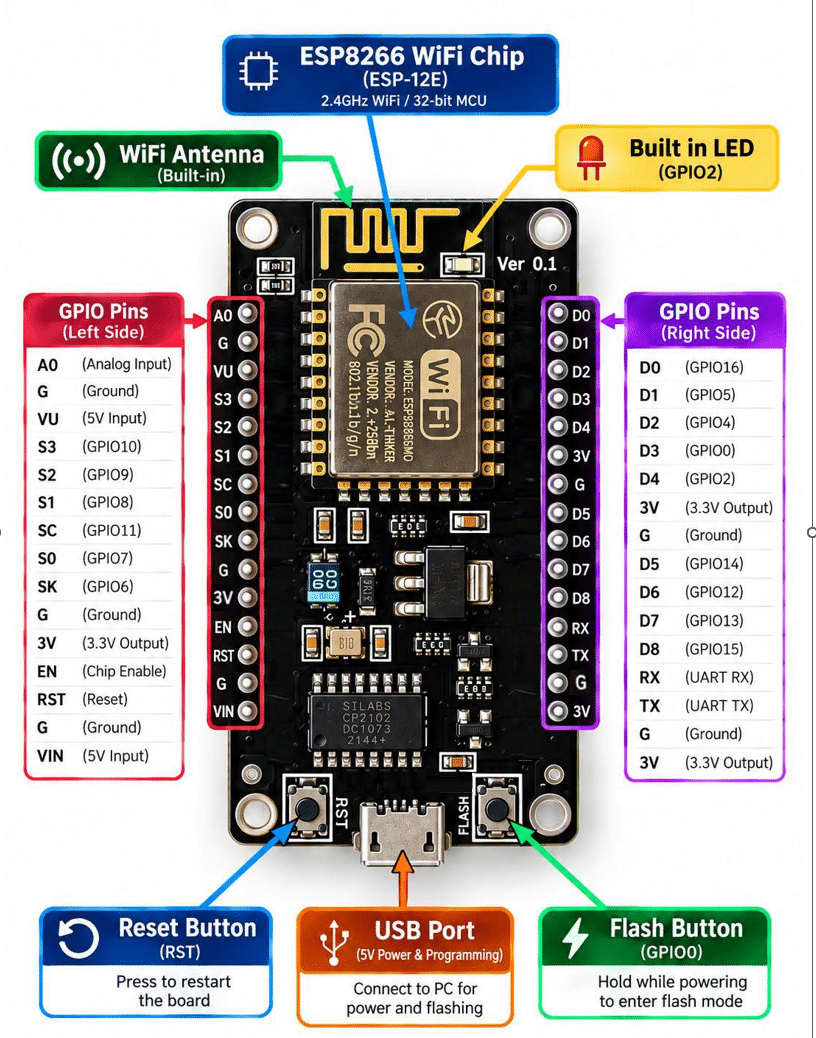
The LoRa module’s TX and RX pins were connected to the ESP8266 using D6 and D7, with the usual crossed-over serial arrangement.
The first experiment couldn’t have been much simpler: send an ON command to one NodeMCU from the other – and turn its built-in blue LED on. Send OFF and turn it off.
Soon I was doing this from one side of the property to the other.
Rock walls are surprisingly effective
My house isn’t exactly ideal for radio experiments.
I took the “remote” NodeMCU +LoRa board, now running on a USB battery… firstly to our gate and then down to the letterbox.
At the final destination, rotating the LoRa transceiver by only a small amount could make the difference between success and failure but – that’s better than I’d managed up until today.
That immediately made the next idea obvious: why not put the home end on Wi-Fi?
LoRa meets ESPHome
The indoor NodeMCU was moved from the Arduino IDE to ESPHome.
It now connects to any of several available Wi-Fi networks and provides a simple web interface as well as connecting directly into Home Assistant.
The first control was deliberately basic: a single switch in the Web UI.
Turn it on:
Wi-Fi
  ↓
ESP8266
  ↓
LoRa ON command
  ↓
Remote Node
  ↓
LED ON
Turn it off and the remote LED turns off.
That meant I could move the LoRa base unit around the house, power it from a USB battery and control the remote node directly from my phone.
But did the remote node actually receive the command?
Sending a LoRa command is one thing. Knowing that it actually arrived is rather more useful. Is anyone old enough to remember Steve Ciarcia’s Circuit Cellar and that horrible X10 home control setup? Long before Wi-Fi, Zigbee, ESPHome and LoRa, there was X10 — the home-control system that sent simple commands around the house via the mains wiring. It was very much a one-way affair: send a command and hope the light, socket or whatever had actually received it, with none of the useful feedback we now take for granted.
And back on-message… so the remote NodeMCU (Arduino IDE) was modified to send a message back after completing each command.
DONE:ON
or:
DONE:OFF
The indoor ESPHome node listens continuously for those replies and displays the result in both its web interface and in Home Assistant.
The result is a proper two-way LoRa link:
ESPHome
    ↓
LoRa command
    ↓
Remote Node
    ↓
Action completed
    ↓
LoRa acknowledgement
    ↓
ESPHome
Signal strength for free
The returned LoRa messages also contain useful radio information.
The base unit can therefore extract the received signal strength and signal-to-noise information from the returning packet and display:
- signal strength;
- SNR;
- a simple quality rating from Excellent through to Rubbish.
That immediately made this little project a rather useful LoRa test rig as well as a remote control system.
Adding a remote input
The next experiment was even more interesting:
GPIO14 on the remote NodeMCU was configured as an input with its internal pull-up enabled. A simple connection between the GPIO pin and ground changes its state.
When that happens, the remote node sends:
INPUT:ON
or:
INPUT:OFF
back over LoRa radio.
The ESPHome transceiver turns those messages into a proper binary sensor, visible both in its own web interface and in Home Assistant.
So we now have:
Remote sensor
      ↓
ESP8266 GPIO
      ↓
LoRa
      ↓
ESP8266 + ESPHome
      ↓ Wi-Fi
Home Assistant
And that gave me an idea…
The letterbox at the bottom of the hill is metal, so my original thoughts about various types of presence sensing were becoming unnecessarily complicated and battery-consuming.
Then I realised something rather obvious… the postman can only operate one part of the letterbox: the flap.
A tiny microswitch attached to that flap could trigger the GPIO input on the remote unit. That state can then be sent straight back to Home Assistant.
A simple, long-range, battery-powered “you’ve got post” sensor.
And that’s probably where this experiment is heading next.
Not bad for an afternoon’s work
Starting with two LoRa modules which had been sitting unused for 18 months, I now have:
- two-way LoRa communications;
- remote LED control;
- command acknowledgements;
- signal-strength monitoring;
- a remote GPIO sensor;
- a Wi-Fi-connected ESPHome gateway;
- Home Assistant integration.
MY THANKS to Rayax for getting me into this in the first place. And the whole thing is (not necessarily) built from two extremely cheap and familiar ESP8266 NodeMCU boards and the two Rayax modules. As I’m only using 4 signal wires (RX, TX, LED, INPUT – and LED is built-in so no wire necessary or shown here) any old ESP12 module would do.
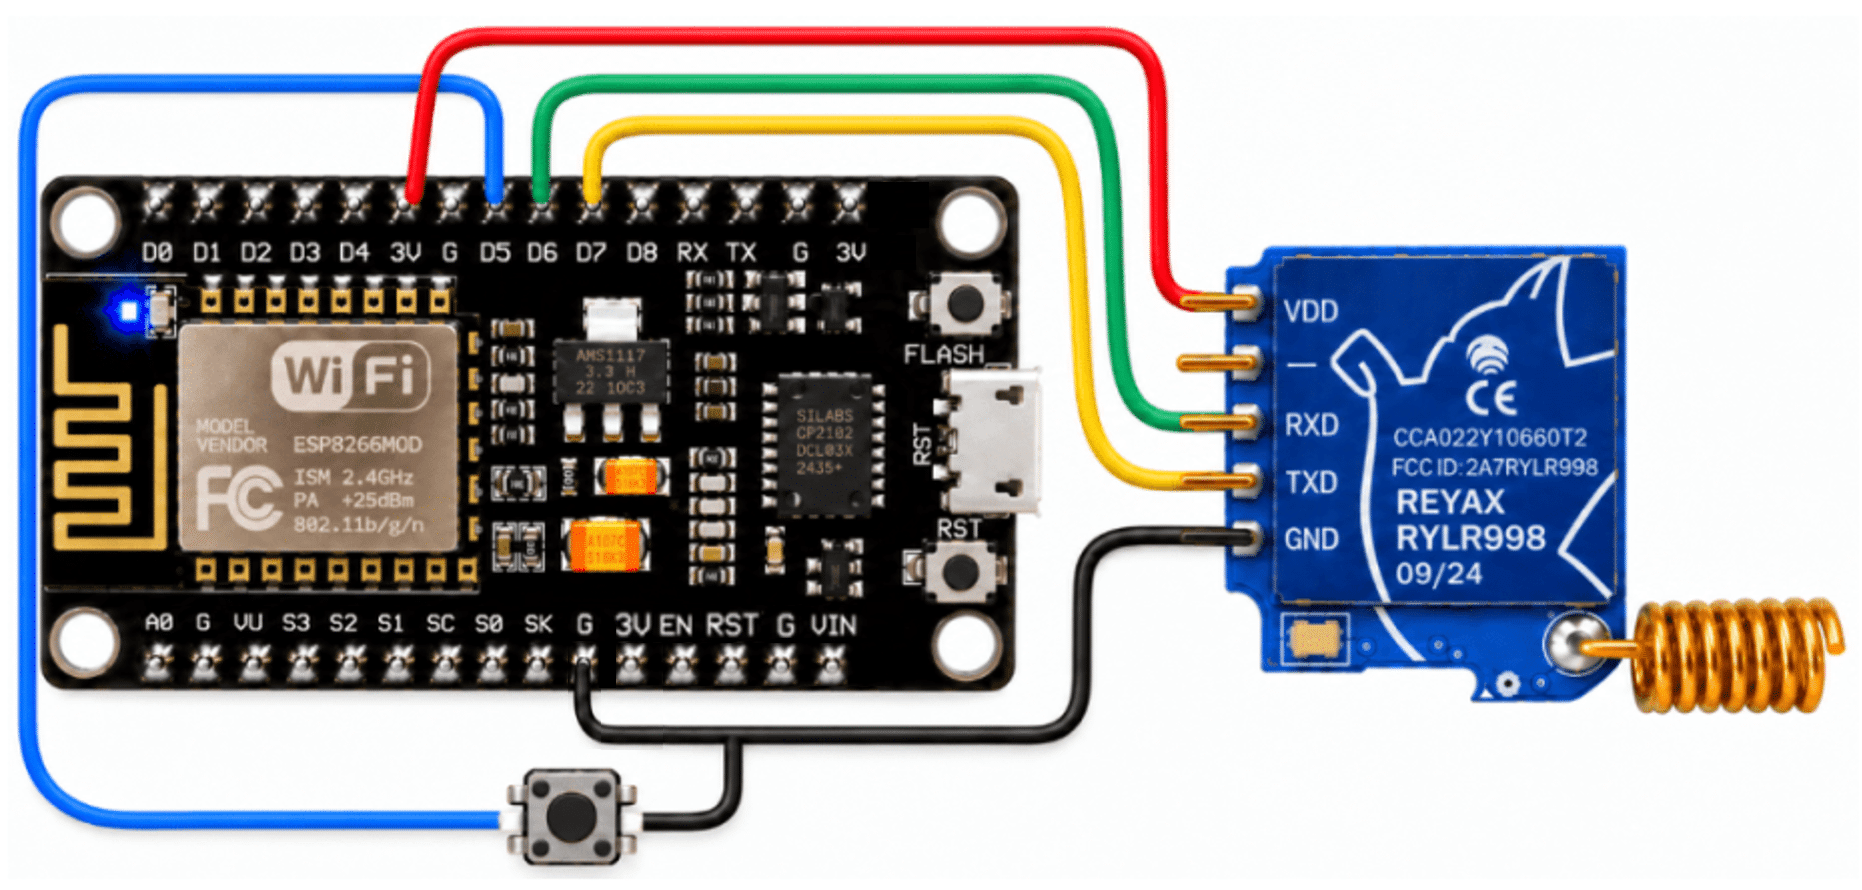
Not bad for a first proper afternoon playing with LoRa – indeed the first time I’ve touched LoRa other than looking at the boards (gnd, tx, rx and 3v3 – I didn’t touch the RST pin). Don’t even ask why I didn’t use the second G pin (NodeMCU) for the button return – ChatGPT is brilliant at cat photos but rubbish at wiring – I’m going back to PowerPoint.
Now I just need to sort out the wiring so it doesn’t fall apart every time I breathe near it… 😄
I can develop this into a full source code blog if there’s enough interest.. or I might do it regardless… 😄
Oh, go on then…. the home unit in ESPHOME YAML and the remote unit in Arduino code –
# LoRa/ESP8266-based Letterbox sensor

substitutions:
  device_version: "0.1"

esphome:
  name: lora-transmitter
  friendly_name: LoRa Transmitter

esp8266:
  board: nodemcuv2

wifi:
  networks:
    - ssid: !secret wifi_ssid
      password: !secret wifi_password

    - ssid: !secret wifi_ssid2
      password: !secret wifi_password

    - ssid: !secret wifi_ssid3
      password: !secret wifi_password

    - ssid: !secret wifi_ssid4
      password: !secret wifi_password

    - ssid: !secret wifi_ssid5
      password: !secret wifi_password

  power_save_mode: none
  post_connect_roaming: true

api:

ota:
  - platform: esphome

web_server:
  port: 80
  version: 3
  local: true
  log: false

  sorting_groups:
    - id: controls
      name: "Controls"
      sorting_weight: 10

    - id: remote_status
      name: "LoRa Remote Status"
      sorting_weight: 20

    - id: lora_signal
      name: "LoRa Signal"
      sorting_weight: 30

    - id: wifi_status
      name: "WiFi Status"
      sorting_weight: 40

    - id: system
      name: "System"
      sorting_weight: 50

time:
  - platform: sntp
    id: sntp_time

logger:
  baud_rate: 0

script:
  - id: check_lora_remote
    mode: restart

    then:
      - lambda: |-
          id(lora_remote_connection).publish_state("CHECKING");

      - if:
          condition:
            switch.is_on: lora_test_led
          then:
            - uart.write:
                id: lora_uart
                data: "AT+SEND=1,2,ON\r\n"
          else:
            - uart.write:
                id: lora_uart
                data: "AT+SEND=1,3,OFF\r\n"

      - delay: 5s

      - lambda: |-
          if (id(lora_remote_connection).state == "CHECKING") {
            id(lora_remote_connection).publish_state("OFFLINE");
          }

interval:
  - interval: 5min
    then:
      - script.execute: check_lora_remote

uart:
  id: lora_uart
  tx_pin: D7
  rx_pin: D6
  baud_rate: 115200

  debug:
    direction: RX
    dummy_receiver: true

    after:
      delimiter: "\n"

    sequence:
      - lambda: |-
          std::string received(bytes.begin(), bytes.end());

          if (received.find("DONE:ON") != std::string::npos) {
            id(lora_status).publish_state("ON");
            id(lora_test_led).publish_state(true);
            id(lora_remote_connection).publish_state("ONLINE");

            if (id(sntp_time).now().is_valid()) {
              id(lora_led_last_changed).publish_state(
                id(sntp_time).now().strftime("%d/%m/%Y %H:%M:%S")
              );
            }

          } else if (received.find("DONE:OFF") != std::string::npos) {
            id(lora_status).publish_state("OFF");
            id(lora_test_led).publish_state(false);
            id(lora_remote_connection).publish_state("ONLINE");

            if (id(sntp_time).now().is_valid()) {
              id(lora_led_last_changed).publish_state(
                id(sntp_time).now().strftime("%d/%m/%Y %H:%M:%S")
              );
            }

          } else if (received.find("INPUT:ON") != std::string::npos) {
            id(lora_remote_input).publish_state(true);

            if (id(sntp_time).now().is_valid()) {
              id(lora_input_last_changed).publish_state(
                id(sntp_time).now().strftime("%d/%m/%Y %H:%M:%S")
              );
            }

          } else if (received.find("INPUT:OFF") != std::string::npos) {
            id(lora_remote_input).publish_state(false);

            if (id(sntp_time).now().is_valid()) {
              id(lora_input_last_changed).publish_state(
                id(sntp_time).now().strftime("%d/%m/%Y %H:%M:%S")
              );
            }
          }

          // RSSI and SNR extraction
          size_t last_comma = received.rfind(',');
          size_t previous_comma = received.rfind(',', last_comma - 1);

          if (last_comma != std::string::npos &&
              previous_comma != std::string::npos) {

            std::string rssi_string =
              received.substr(previous_comma + 1,
                              last_comma - previous_comma - 1);

            std::string snr_string =
              received.substr(last_comma + 1);

            int rssi = atoi(rssi_string.c_str());
            int snr = atoi(snr_string.c_str());

            id(lora_rssi).publish_state(rssi);
            id(lora_snr).publish_state(snr);

            if (rssi >= -60) {
              id(lora_quality).publish_state("Excellent");
            } else if (rssi >= -80) {
              id(lora_quality).publish_state("Good");
            } else if (rssi >= -100) {
              id(lora_quality).publish_state("OK");
            } else if (rssi >= -115) {
              id(lora_quality).publish_state("Poor");
            } else {
              id(lora_quality).publish_state("Rubbish");
            }
          }


binary_sensor:
  - platform: template
    name: "LoRa Remote Input"
    id: lora_remote_input
    device_class: opening

    web_server:
      sorting_group_id: remote_status
      sorting_weight: 30

text_sensor:
  - platform: template
    name: "LoRa Remote LED Status"
    id: lora_status
    icon: "mdi:radio"

    web_server:
      sorting_group_id: remote_status
      sorting_weight: 20

  - platform: template
    name: "LoRa Signal Quality"
    id: lora_quality
    icon: "mdi:signal"

    web_server:
      sorting_group_id: lora_signal
      sorting_weight: 30

  - platform: wifi_info
    ip_address:
      name: "LoRa WiFi IP Address"
      icon: "mdi:ip-network"

      web_server:
        sorting_group_id: wifi_status
        sorting_weight: 20

    ssid:
      name: "LoRa WiFi SSID"
      icon: "mdi:wifi"

      web_server:
        sorting_group_id: wifi_status
        sorting_weight: 10

  - platform: template
    name: "LoRa Transmitter Version"
    id: lora_transmitter_version
    lambda: |-
      return {"${device_version}"};
    update_interval: 60s

    web_server:
      sorting_group_id: system
      sorting_weight: 10

  - platform: template
    name: "LoRa Remote LED Last Changed"
    id: lora_led_last_changed
    icon: "mdi:clock-outline"

    web_server:
      sorting_group_id: remote_status
      sorting_weight: 40

  - platform: template
    name: "LoRa Remote Input Last Changed"
    id: lora_input_last_changed
    icon: "mdi:clock-outline"

    web_server:
      sorting_group_id: remote_status
      sorting_weight: 50

  - platform: template
    name: "LoRa Remote Connection"
    id: lora_remote_connection
    icon: "mdi:radio-tower"

    web_server:
      sorting_group_id: remote_status
      sorting_weight: 10

sensor:
  - platform: template
    name: "LoRa Signal Strength"
    id: lora_rssi
    unit_of_measurement: "dBm"
    icon: "mdi:signal"

    web_server:
      sorting_group_id: lora_signal
      sorting_weight: 10

  - platform: template
    name: "LoRa Signal SNR"
    id: lora_snr
    unit_of_measurement: "dB"
    icon: "mdi:signal"

    web_server:
      sorting_group_id: lora_signal
      sorting_weight: 20

  - platform: wifi_signal
    name: "LoRa WiFi Signal Strength"
    update_interval: 60s
    icon: "mdi:wifi"

    web_server:
      sorting_group_id: wifi_status
      sorting_weight: 30

switch:
  - platform: template
    name: "LoRa Remote LED"
    id: lora_test_led
    optimistic: true

    web_server:
      sorting_group_id: controls
      sorting_weight: 10

    turn_on_action:
      - uart.write:
          id: lora_uart
          data: "AT+SEND=1,2,ON\r\n"

    turn_off_action:
      - uart.write:
          id: lora_uart
          data: "AT+SEND=1,3,OFF\r\n"
And the considerably simpler Arduino-type code remote…
void setup() {
  // Disable Wi-Fi completely
  WiFi.mode(WIFI_OFF);
  WiFi.forceSleepBegin();
  delay(1);

  pinMode(LED_BUILTIN, OUTPUT);
  digitalWrite(LED_BUILTIN, HIGH);  // LED OFF (active-low)

  pinMode(inputPin, INPUT_PULLUP);
  lastInputState = digitalRead(inputPin);

  Serial.begin(115200);
  loraSerial.begin(115200);

  Serial.println();
  Serial.println("LoRa Remote Node ready");

  // Send initial input state
  if (lastInputState == LOW) {
    loraSerial.print("AT+SEND=2,8,INPUT:ON\r\n");
  } else {
    loraSerial.print("AT+SEND=2,9,INPUT:OFF\r\n");
  }
}

void loop() {

  // Check the input for a change
  bool inputState = digitalRead(inputPin);

  if (inputState != lastInputState) {
    delay(30);  // Simple debounce
    inputState = digitalRead(inputPin);

    if (inputState != lastInputState) {
      lastInputState = inputState;

      if (inputState == LOW) {
        Serial.println("Input ON");
        loraSerial.print("AT+SEND=2,8,INPUT:ON\r\n");
      } else {
        Serial.println("Input OFF");
        loraSerial.print("AT+SEND=2,9,INPUT:OFF\r\n");
      }
    }
  }

  // Process incoming LoRa commands
  if (loraSerial.available()) {
    String message = loraSerial.readStringUntil('\n');
    message.trim();

    Serial.println(message);

    if (message.indexOf(",ON,") >= 0) {
      digitalWrite(LED_BUILTIN, LOW);
      Serial.println("LED ON");
      loraSerial.print("AT+SEND=2,7,DONE:ON\r\n");
    }

    if (message.indexOf(",OFF,") >= 0) {
      digitalWrite(LED_BUILTIN, HIGH);
      Serial.println("LED OFF");
      loraSerial.print("AT+SEND=2,8,DONE:OFF\r\n");
    }
  }
}
Let’s see what the WebUI looks like – ok so I need to stop calling it a transmitter (Maybe Lora-ESP8266 Letterbox base unit or similar): The thing you learn as you make more ESPHOME projects is to re-use useful info for new projects.. much of the info below will automagically appear in Home Assistant once I add this ESPHOME project into the latter…

At this point, a thought…. I’ve already had a response on the blog here questioning the use of the ESP8266 on the remote end – power use, and fair enough. One thought that’s just come to mind: the Arduino Pro Mini (AliExpress – prices vary wildly but can be cheaper than an ESP8266 or ESP32) would use pretty similar code for the remote end, and I believe it runs on 3 V and can use VERY low power. I used to have a shed-load of these but binned them when I got involved in ESP programming….
However, I have written back to Reyax this morning and asked them for the power consumption of their radio module. If it turns out that that’s quite high, then there isn’t any point in rushing to find a different micro for the remote end. Fingers crossed. For the base unit I’m more than happy with the ESP8266 NodeMCU board. Thinking about it – the Wemos D1 Mini would be much smaller… I’ll bet lots of us have those lying around doing nothing.
Oh, they sent me LoRa module links for Digikey, eBay, Amazon and their own Reyax site. I’ve not verified these and they may or may not be useful depending where in the world you live (eBay.com would be useless to me – and eBay Spain is AWFUL). Enjoy.
The Wednesday power Update
I got sufficiently fired up yesterday, that I decided to measure current today. Regardless of whether I use USB on the NodeMCU board or actually use a power supply with an accurate meter, the LoRa unit takes 17 mA typically. The whole project (remote end) on USB takes about 37 mA only. So, with the USB out, I took my life in my hands and measured the current, putting 3V3 into the 3V pin to power the unit (only 3V3, not that and USB). The total current consumption was around 36 mA. Add 1 mA when the LED is turned on.
Just because I could, I tried putting from my power supply 3 volts in instead of 3V3… and everything works perfectly, but no significant power reduction. So we were still looking at 36 mA. Even if I were to use an ESP32, we’ve got that 17 mA for the LoRa sensor. Now that I know I can use 3V3 or 3V, were I to use some kind of larger battery, let’s see, what, 2,000 milliamp hour? That’s only 55 hours, so I guess we can kiss goodbye to long-term use on a letterbox without any form of power. Even something dramatic, if I could get a processor that uses no power whatsoever, I’ve still got 17 mA. What? 110 hours? No good at all.
BUT all is not lost – I went looking for the spec of the Reyax – turns out there’s a mode 2….. we could put a Wemos D1 into sleep mode with periodic wakeup and have that wake up the REYAX… this could yet go someplace for my little letterbox idea. Meanwhile – if anyone has any ideas for a project where power IS available – the only problem being distance – well, what we have here is already looking good.
One thing at a time, has anyone noticed how ridiculous 115kbaud is to turn a LED on and off or read a sensor – 9600 is my next step….
More in PART 2 – under development…
Consider using the Moteino boards based on Atmel CPU and with onboard LORA. Very low power and there are several post box sketches available. I have several of these doing jobs around our rural property. Highly recommended.
One thing to consider is power at the mailbox. Ideally, you want something as low power as possible, and the ESP8266 is not that. The ESP32 has better deep sleep capabilities, but you may also want to consider a super-simple low power microcontroller without wifi, etc.
The other aspect to consider is ESPHome’s packet_transport: component, which can run over LoRa directly (driving a Semtech transceiver module), or over UART (which your modules provide). That lets you use ESPHome on both ends of the LoRa link, exposing entities from one node as entities in the other. And of course, ESPHome also supports deep sleep modes in the ESP32.
I was thinking about that when I got up this morning. I’ve no restriction on a box on the side of the letterbox – can’t put it inside as it’s metal. However, the ESP8266 has it’s WiFi turned off.. I guess the USB connector and regulator won’t be helping.
I remember a company ThingsOnEdge.com, now defunct who made ESP8266 gadgets that were VERY low power – so it can be done… Here – https://tech.scargill.net/the-iotcricket-from-thingsonedge-com/ – I wrote back in 2021 in that blog entry something about 0.5uA – of course there is also the LoRa module to consider…
Using an ESP32 doesn’t automatically mean low power because there is still USB.. Just as an example of an ESP32 board which can apparently go as low as 28uA standby in deep sleep – but then waking it up to respond to the microswitch is another conversation – I’ve been pointed to this – the ESP32-C6 ePulse Feather C6 by ThingPulse – I’ve no experience of it though – https://thingpulse.com/products/epulse-feather-c6/?srsltid=AfmBOop2MubPA6Z4lv3u8RcE317UMIaAZnO-LXxNQ4jYjHGl2btzAUhf
However, generally – using an ESP32 is no big deal – the code for the remote end (as you can see in the listing – Arduino code) is quite short… the effort went into the base end (ESPHOME)..
Now you’ve triggered me off – an Arduino Pro Mini for the remote end would likely solve any power issues while keeping cost right down (Lora module consumption notwithstanding). Once my unit is boxed up and tested – that could make for a decent follow-up..